VMware Site Recovery Manager – SSL Zertifikate via Windows CA erstellen

Beim Verbinden zweiter Sites des Site Recovery Manager dürfen keine unterschiedlichen Zertifikatmethoden verwendet werden. Entweder selbst signiert, oder von einer Zertifizierungsstelle signiert. Und das bei beiden SRM Servern sowie dem vCenter Server.
Eine Hürde beim SRM ist wiederum das beide Server den gleichen „Subject Alternative Name“ haben müssen. Außerdem muss das Zertifikat für Server & Client Authentifizierung vorgesehen sein.
Dafür muss man sich bei einer Windows-CA ein eigenes Template erstellen. Der einfachste Weg dazu ist das kopieren & anpassen des Computer Templates.
Eingestellt werden muss:

- Allow Private Key to be exported (da das Zertifikat später noch umgewandelt werden muss)
- Application Polices = Server Authentication & Client Authentication
- Subject Name wird via "Subject in request" bereitgestellt" (Ansonsten würde der Subject Alternative Name immer durch den Computernamen überschrieben.)


Anschließend nicht vergessen dass das Template korrekt berechtigt wird. Nun kann man das Zertifikat anfordern.
Man hält sich hier am besten an folgenden KB. Das ganze ist ja schon ziemlich komplex und einiges muss beachtet werden.
Kurz zusammengefasst:

- Der CN/O/OU muss bei beiden Site Recovery Managern identisch sein
- Die Organisation (O Attribute) muss mit dem Zertifikat des vCenter Servers übereinstimmen
- Die OrganisationsEinheit (OU Attribute) muss mit dem Zertifikat des vCenter Servers übereinstimmen
- Die Zertifikate müssen von der gleichen CA ausgestellt sein


Die Zertifikate müssen also bis auf den subjectAlternativeName sowie die ipv4 Adresse komplett identisch sein. (Groß/Kleinschreibung beachten!)
Nachdem man das Zertifikat erstellt hat, dieses exportieren (mit Private Key) und anschließend noch in das P12 Format umkonvertieren:
# Private Key exportieren

openssl pkcs12 -in SERVER.pfx -out aa.key -nocerts -nodes
Enter Import Password:
MAC verified OK

# Zertifikat exportieren

openssl pkcs12 -in SERVER.pfx -clcerts -nokeys -out publicCert.pem
Enter Import Password:
MAC verified OK

# Anhand von Key & Zertifikat ein .p12 Zertifikat erstellen

openssl pkcs12 -export -in publicCert.pem -inkey aa.key -out SERVER.p12
Enter Export Password:
Verifying - Enter Export Password:

Dieses Zertifikat kann man nun bei der Installation bzw. bei einer „Reperaturinstallation“ angeben. Fertig.
Je nachdem was man bei der Installation des SRM als Hostname angegeben hat – muss man diesen gegebenenfalls nochmal abändern, sodass dieser mit dem subjectAlternativeName des Zertifiaktes übereinstimmt.
Siehe folgende Fehlermeldung:

 The host name (server.domain.info) in the Subject Alternative Name of the provided certificate does not identically match the SRM host name (192.168.0.2).

altname-ip
Den SRM Hostname kann man im Nachhinein noch ändern, durch das editieren der Datei: extension.xml. Siehe dazu den VMware KB.
Auch hier muss man auf die Groß/Kleinschreibung beachten!
 

VMware SSL Certificate Automation Tool – fails at vCenter Server

Früher setzte VMware noch mehr auf selbst erstellte Zertifikate zur Absicherung der vielen verschiedenen Serverdiensten. Doch mittlerweile ist für viele wie z.B. VMware Horizon View ein von einer Zertifizierungsstelle erzeugtes Zertifikat notwendig. Fängt man einmal mit dem Signieren an kommt man auch nicht mehr groß um die anderen Dienste herum. ESXi Server, vCenter Server, SSO Server, Update Manager, Inventory Dienst, Site Recovery Manager und noch viele mehr können bzw. müssen dementsprechend auch mit eigenen Zertifikaten versorgt werden.
Um dem Chaos etwas entgegen zu wirken hat VMware ein kleines Kommandozeilentool veröffentlicht – das VMware SSL Certificate Automation Tool. Momentan in der Version 1.0.1 bei VMware verfügbar.
2044696-examplecsr
 
Beim Updaten des vCenter Server Zertifikats bin ich auf folgenden Fehler gestoßen:

[19.06.2013 - 10:48:11,31]: ""Cannot reload the vCenter Server SSL certificates. The certificate might not be unique.""
[19.06.2013 - 10:48:11,31]: Deleting the new certificates and keys...
[19.06.2013 - 10:48:11,33]: Restoring the original certificates and keys...
1 file(s) copied.
1 file(s) copied.
1 file(s) copied.
[19.06.2013 - 10:48:11,36]: The vCenter certificate update failed.

[Expand Vollständiges Log]
[19.06.2013 – 10:48:04,48]: Validating Lookup Service connection
Intializing registration provider…
Getting SSL certificates for https://server.domain.info:7444/lookupservice/sdk
Getting SSL certificates for https://server.domain.info:7444/sso-adminserver/sdk
Getting SSL certificates for https://server.domain.info:7444/ims/STSService?wsdl
Successfully created dummy service, we have sufficient privileges
Successfully deleted dummy service, we have sufficient privileges
The file C:\tool\backup\VC\ROOT_LS_SSL_CHAIN.crt already exists. Overwriting…
The file C:\tool\backup\VC\1_LS_SSL_CHAIN.crt already exists. Overwriting…
Certificates saved successfully
Return code is: Success
[19.06.2013 – 10:48:09,05]: Cleaning any temporary files
[19.06.2013 – 10:48:09,05]: Backing up the certificates and keys from „C:\ProgramData\VMware\VMware VirtualCenter\SSL…“
1 file(s) copied.
1 file(s) copied.
1 file(s) copied.
[19.06.2013 – 10:48:09,08]: Copying the new certificates and keys to „C:\ProgramData\VMware\VMware VirtualCenter\SSL…“
[19.06.2013 – 10:48:09,10]: Creating the PKCS certificate file…
Could not reload vCenter SSL Certificates
[19.06.2013 – 10:48:10,35]: „“Cannot reload the vCenter Server SSL certificates. The certificate might not be unique.““
[19.06.2013 – 10:48:10,36]: Deleting the new certificates and keys…
[19.06.2013 – 10:48:10,36]: Restoring the original certificates and keys…
1 file(s) copied.
1 file(s) copied.
1 file(s) copied.
[19.06.2013 – 10:48:10,41]: Attempting rollback…
Could not reload vCenter SSL Certificates
[19.06.2013 – 10:48:11,31]: „“Cannot reload the vCenter Server SSL certificates. The certificate might not be unique.““
[19.06.2013 – 10:48:11,31]: Deleting the new certificates and keys…
[19.06.2013 – 10:48:11,33]: Restoring the original certificates and keys…
1 file(s) copied.
1 file(s) copied.
1 file(s) copied.
[19.06.2013 – 10:48:11,36]: The vCenter certificate update failed.
[/Expand]
Bei der Ursachenforschung bin ich auf einen hilfreichen Post in der Community gestoßen. Dort wird beschrieben, dass das Problem offenbar an einer fehlerhaften Zuordnung des LookupService mit dem vCenter liegt.
Behoben werden kann der Fehler durch das einsetzen der korrekten ID des LookupService in die vpxd.cfg des vCenter Servers.
Hier die Anleitung:

Steps:
1. Stop vCenter service
2. Look for your ID in LS_ServiceID.prop in folder C:\ProgramData\VMware\VMware VirtualCenter
3. Copy this ID (e.g. {C4672589-9258-42B1-90E2-1EF268BBD402}:5 )
4. Edit your vpxd.cfg in the same folder and replace
<serviceId>vCenterService</serviceId>
with
<serviceId>your ID</serviceId>
5. Start vCenter Service
Then the SSL automation tool works!
You don't need to revert the changes.

Anschließend hat auch das Updaten des Zertifikates mittels des SSL Certificate Automation Tool geklappt.
[Expand Komplettes Logfile]
#####################################
[19.06.2013 – 11:00:22,03]: Validating Lookup Service connection
Intializing registration provider…
Getting SSL certificates for https://server.domain.info:7444/lookupservice/sdk
Getting SSL certificates for https://server.domain.info:7444/sso-adminserver/sdk
Getting SSL certificates for https://server.domain.info:7444/ims/STSService?wsdl
Successfully created dummy service, we have sufficient privileges
Successfully deleted dummy service, we have sufficient privileges
The file C:\tool\backup\VC\ROOT_LS_SSL_CHAIN.crt already exists. Overwriting…
The file C:\tool\backup\VC\1_LS_SSL_CHAIN.crt already exists. Overwriting…
Certificates saved successfully
Return code is: Success
[19.06.2013 – 11:00:26,72]: Cleaning any temporary files
[19.06.2013 – 11:00:26,75]: Backing up the certificates and keys from „C:\ProgramData\VMware\VMware VirtualCenter\SSL…“
1 file(s) copied.
1 file(s) copied.
1 file(s) copied.
[19.06.2013 – 11:00:26,77]: Copying the new certificates and keys to „C:\ProgramData\VMware\VMware VirtualCenter\SSL…“
[19.06.2013 – 11:00:26,80]: Creating the PKCS certificate file…
Successfully reloaded vCenter SSL Certificates
[19.06.2013 – 11:00:31,98]: Encrypting the password with the certificates…
—— In-memory logs start ——–
mem> 2013-06-19T11:00:32.172+02:00 [04384 info ‚Hooks‘] Hooks Initialized
—— In-memory logs end ——–
2013-06-19T11:00:32.187+02:00 [04384 info ‚Default‘] Logging uses fast path: true
2013-06-19T11:00:32.187+02:00 [04384 info ‚Default‘] Handling bora/lib logs with VmaCore facilities
2013-06-19T11:00:32.187+02:00 [04384 info ‚Default‘] Initialized channel manager
2013-06-19T11:00:32.187+02:00 [04384 info ‚Default‘] Current working directory: C:\tool
2013-06-19T11:00:32.187+02:00 [04384 info ‚Default‘] ThreadPool windowsStackImmediateCommit = true
2013-06-19T11:00:32.187+02:00 [04384 info ‚ThreadPool‘] Thread enlisted
2013-06-19T11:00:32.187+02:00 [04384 info ‚Default‘] Log path: C:\ProgramData\VMware\VMware VirtualCenter\Logs
2013-06-19T11:00:32.187+02:00 [04384 info ‚Default‘] Initializing SSL
2013-06-19T11:00:33.248+02:00 [04384 info ‚Default‘] Vmacore::InitSSL: handshakeTimeoutUs = 120000000
2013-06-19T11:00:33.248+02:00 [06172 info ‚ThreadPool‘] Thread enlisted
2013-06-19T11:00:33.264+02:00 [04384 info ‚Default‘] Reset DB password succeeded.
[19.06.2013 – 11:00:33,26]: Setup complete. Restarting services…
[19.06.2013 – 11:00:33,27]: Restarting vCenter Server…
SERVICE_NAME: vctomcat
TYPE : 10 WIN32_OWN_PROCESS
STATE : 3 STOP_PENDING
(STOPPABLE, NOT_PAUSABLE, ACCEPTS_SHUTDOWN)
WIN32_EXIT_CODE : 0 (0x0)
SERVICE_EXIT_CODE : 0 (0x0)
CHECKPOINT : 0x17
WAIT_HINT : 0x0
[19.06.2013 – 11:00:33,29]: Stopping vCenter Web Services…
[19.06.2013 – 11:00:33,31]: „“Cannot stop the vCenter Server Web Services: 1″“
STATE : 1 STOPPED
SERVICE_NAME: vpxd
TYPE : 10 WIN32_OWN_PROCESS
STATE : 3 STOP_PENDING
(STOPPABLE, NOT_PAUSABLE, ACCEPTS_SHUTDOWN)
WIN32_EXIT_CODE : 0 (0x0)
SERVICE_EXIT_CODE : 0 (0x0)
CHECKPOINT : 0x0
WAIT_HINT : 0x124f80
[19.06.2013 – 11:00:38,19]: Stopping vCenter Server…
[19.06.2013 – 11:00:38,22]: „“Cannot stop vCenter Server: 1″“
[19.06.2013 – 11:00:43,15]: „“Cannot stop vCenter Server: 1″“
[19.06.2013 – 11:00:48,19]: „“Cannot stop vCenter Server: 1″“
[19.06.2013 – 11:00:53,15]: „“Cannot stop vCenter Server: 1″“
[19.06.2013 – 11:00:58,20]: „“Cannot stop vCenter Server: 1″“
[19.06.2013 – 11:01:03,15]: „“Cannot stop vCenter Server: 1″“
[19.06.2013 – 11:01:08,19]: „“Cannot stop vCenter Server: 1″“
[19.06.2013 – 11:01:13,22]: „“Cannot stop vCenter Server: 1″“
[19.06.2013 – 11:01:18,17]: „“Cannot stop vCenter Server: 1″“
[19.06.2013 – 11:01:23,22]: „“Cannot stop vCenter Server: 1″“
[19.06.2013 – 11:01:28,18]: „“Cannot stop vCenter Server: 1″“
[19.06.2013 – 11:01:33,22]: „“Cannot stop vCenter Server: 1″“
[19.06.2013 – 11:01:38,17]: „“Cannot stop vCenter Server: 1″“
STATE : 1 STOPPED
SERVICE_NAME: vpxd
TYPE : 10 WIN32_OWN_PROCESS
STATE : 2 START_PENDING
(STOPPABLE, NOT_PAUSABLE, ACCEPTS_SHUTDOWN)
WIN32_EXIT_CODE : 0 (0x0)
SERVICE_EXIT_CODE : 0 (0x0)
CHECKPOINT : 0x0
WAIT_HINT : 0x124f80
PID : 4616
FLAGS :
[19.06.2013 – 11:01:43,36]: Starting vCenter Server…
[19.06.2013 – 11:01:43,38]: „“Cannot start vCenter Server: 1″“
[19.06.2013 – 11:01:48,14]: „“Cannot start vCenter Server: 1″“
[19.06.2013 – 11:01:53,17]: „“Cannot start vCenter Server: 1″“
STATE : 4 RUNNING
SERVICE_NAME: vctomcat
TYPE : 10 WIN32_OWN_PROCESS
STATE : 2 START_PENDING
(NOT_STOPPABLE, NOT_PAUSABLE, IGNORES_SHUTDOWN)
WIN32_EXIT_CODE : 0 (0x0)
SERVICE_EXIT_CODE : 0 (0x0)
CHECKPOINT : 0x0
WAIT_HINT : 0x7d0
PID : 6168
FLAGS :
[19.06.2013 – 11:01:58,24]: Restarting vSphere Profile-Driven Storage Service…
SERVICE_NAME: vimPBSM
TYPE : 10 WIN32_OWN_PROCESS
STATE : 3 STOP_PENDING
(STOPPABLE, NOT_PAUSABLE, ACCEPTS_SHUTDOWN)
WIN32_EXIT_CODE : 0 (0x0)
SERVICE_EXIT_CODE : 0 (0x0)
CHECKPOINT : 0x3f
WAIT_HINT : 0x0
[19.06.2013 – 11:01:58,27]: „“Cannot stop vSphere Profile-Driven Storage Service: 1″“
STATE : 1 STOPPED
SERVICE_NAME: vimPBSM
TYPE : 10 WIN32_OWN_PROCESS
STATE : 2 START_PENDING
(NOT_STOPPABLE, NOT_PAUSABLE, IGNORES_SHUTDOWN)
WIN32_EXIT_CODE : 0 (0x0)
SERVICE_EXIT_CODE : 0 (0x0)
CHECKPOINT : 0x0
WAIT_HINT : 0x7d0
PID : 4644
FLAGS :
[19.06.2013 – 11:02:03,24]: vCenter certificates updated.
[/Expand]
 

VMware View – VM Status: "bereits verwendet" bzw. "already used" beheben

VMWare-View2Seit VMware (Horizon) View 5.1.2 bzw. 5.2 gibt es ein neues Feature zum Umgang mit Virtuellen Maschinen im Status „already used“ bzw. „bereits verwendet“.
Wird ein Benutzer nicht korrekt abgemeldet oder die Aufräumarbeiten des View Agent nicht erfolgreich abgeschlossen wird eine Virtuelle Maschine automatisch in diesen Status versetzt.
Dies ist ein Sicherheitsfeatures, welches nur aktiv ist, wenn bei dem betreffendem Pool die Einstellung „Delete or refresh desktop on logoff“ auf Delete oder Refresh gesetzt ist.
Das Problem an der Sache, dass (warum auch immer) Virtuelle Maschinen im Status „bereits verwendet“ zu angeschalteten bzw. zur Gruppe der verfügbaren VM’s zählt. Dadurch passiert es schnell, dass keine VM anmeldebereit ist aber auch keine weitere mehr angeschaltet wird, obwohl eigentlich noch genügend VM’s (ausgeschaltet) bereitgestellt sind.
Jedenfalls kann man sich jetzt Abhilfe schaffen indem man für seine Pool’s die neu eingeführte „Dirty VM Policy“ benutzt. Dies ist eine ADAM Regel welche über das Setzen des LDAP-Attributes „pae-DirtyVmPolicy“ bei dem entsprechendem Pool greift.
Die Regel greift nur wenn:

A. The desktop session has ended
B. There are no active session either ‘Connected’ or ‘Disconnected’
C. The VM has been marked as ‘dirty’. A VM is marked as ‘dirty’, once a connection has been made to it at least once.

Es gibt 3 mögliche Optionen, wie mit den VM’s umgegangen werden soll:
1. Block access and keep for manual cleanup

By default, the Dirty VM policy will be unset, and the pae-DirtyVMPolicy will have a value ‘0’. Any
‘Single use pool’ VM that skipped the clean-up action because of any reason will be marked as
‘Already Used’
This is recommended for scenarios where administrators do not wish to allow users to get to each
other's data, but also to protect the VMs from data loss in case something does go wrong.

2. Ignore the previous usage and allow access

To ignore the previous VM usage and make it as change the pae-DirtyVMPolicy to ‘1’. With this
configuration and any single use pool VM that misses the cleanup action will be declared as available,
and will allow access to upcoming desktop launch requests.
This is recommended for administrators those who don’t care about the occasional user profile
overlap. This way Administrator can maximize the usage of the pool

3. Forcefully cleanup and declare as available

To perform an aggressive cleanup action (delete or refresh the VM as configured for the pool); set the
pae-DirtyVMPolicy valure to ‘2’. This will ensure no VMs left as “Already Used” and address the user
profile /data overlap issues when gets assigned to another user.
This is recommended for administrators who decide to automatically cleaning up a VM where
something have gone wrong may mean the loss of important logs/data but value maximum pool usage
higher.

dirtyVmpolicy

Howto: Asus Transformer Pad TF300T rooten bei gesperrtem Bootloader

asus-tf300tWieder einmal ein kleiner Beitrag was rooten angeht. Diesmal geht’s um das Asus Transformer Pad TF300T. Meiner Meinung nach eines der besten Tablets im Moment. Würde ich eines suchen, dann wäre dies auch meine Wahl. Vor allem das Keydock – die Tastatur welche die Funktion als Cover, Dock und sogar als Zusatzakku vereint gibt es so bei keinem anderem Tablet.
Auch hier kann man sich natürlich root Rechte verschaffen – und dass auch bei gesperrtem Bootloader.
Das reicht für die meisten Anwender auch vollkommen und sichert euch auch noch die Garantie. Bei entsperrtem Bootloader kann man zwar Custom-Roms installieren hat aber in den meisten Fällen nur eingeschränkte Garantie, weil dadurch auch leichter ein Hardwareschaden zu produzieren ist.
Das rooten ist super einfach und in unter 5 Minuten erledigt.
Die Methode funktioniert bei folgenden Geräten:

TF300T - 4.1.1
TF300T - 4.2.1
TF300TG - 4.1.1
TF201
TF700 - 4.1.1
TF700 - 4.2.1
ME301T - 4.2.1 (Memo Smart Pad 10)
Nexus 7
Asus Transformer AIO P1801 B100K - 4.2.1

Schritt 1: Treiber installieren (sofern nicht vorhanden)
Die Asus Treiber könnt ihr hier herunterladen. (Quelle: XDA)
Schritt 2: USB Debugging aktivieren
Dies findet ihr in den Entwickler-Optionen. Der Menüpunkt ist allerdings versteckt, kann angezeigt werden indem ihr auf -> Einstellungen -> About / Telefoninfo geht und dort 7 mal auf die Build-Nummer klickt.
Schritt 3: Root Toolkit ausführen / run.bat
Das Rootprogramm genannt „motochopper“ bekommt ihr hier. Einfach entpacken und die run.bat ausführen. (Quelle: XDA)
Nach erfolgreichem root startet das Tablet neu und ihr habt das Superuser App „SuperSU“ installiert.
Viel Spaß damit.

Raspberry Pi als Nagios Poller installieren und in Centreon aufnehmen

300px-RaspberryPiEin kleiner Raspberry Pi bietet sich ja quasi als Nagios Poller an, wenn man ein kleines, günstiges und stromsparendes Gerät zum Überwachen von Servern, PC’s,  Druckern, oder vielem mehr sucht.
Ich beschreibe hier wie man einen zweiten Nagios-Server in eine bestehende Nagios / Centreon Umgebung aufnehmen kann. Wie man Nagios bzw. auch mit der wesentlich einfacheren Konfigurationsoberfläche Centreon installieren kann habe ich bereits beschrieben. Da hat sich bis auf ein paar Versionsnummern auch nichts verändert. Daher verweise ich an den passenden Stellen auf meinen alten Beitrag.
Wer einfach nur Nagios auf einem Raspyberry installieren will, kann hier auch einfach bis Punkt 2 folgen. Einfach am Ende Centreon nicht mitinstallieren.
Als Grundsystem für den Raspberry wird wegen der Einfachheit ein Debian RAW-Image verwendet. Dieses könnt ihr euch hier herunterladen: http://www.raspberrypi.org/downloads
Achtung: Die NDOUtils funktionieren nicht im Zusammenspiel mit dem „hard float“ Raspberry Image. Wenn ihr die NDOutils einsetzt müsst ihr die „Soft-float“ Debian Version verwenden.
(Ich verwende noch die NDOutils!)

Bis auf die Abhängigkeiten ist fast alles identisch zur normalen Installation von Nagios – wie ich es schon hier beschrieb.
1. Abhängigkeiten Installieren

apt-get install apache2 libapache2-mod-php5 build-essential libgd2-xpm-dev mysql-client gcc make g++ lsb-release libssl-dev

2. Nagios + Plugins herunterladen und installieren
Könnt ihr aus dem Beitrag hier entnehmen: https://constey.de/2012/06/how-to-install-nagios-centreon-nagvis-check_mk-ubuntu-12-04-server/
(
Wenn man nur Nagios installieren will, ohne Centreon – ist man hier fertig.)
3. Zusätzlichen centreon Benutzer anlegen
Da der Centreon Central Server mit dem User centreon arbeitet, und diesen auch für den Austausch von Config-Dateien etc. verwendet, muss dieser auch hier angelegt werden.

/usr/sbin/useradd -m -s /bin/bash centreon
passwd centreon

4. Noch den Centreon User in die Nagios Gruppen aufnehmen

/usr/sbin/usermod -G nagcmd centreon
/usr/sbin/usermod -G nagios centreon

5. SSH Authentifizierung per Keyfile einrichten & in Centreon aufnehmen
Haltet euch hier an die Doku von Centreon. Diese ist sehr gut, und bebildert.
http://en.doc.centreon.com/DistributedArchitecture
In der Sudo Konfiguration muss der centreon Benutzer ebenfalls analog dem nagios Benutzer berechtigt werden:

centreon   ALL=NOPASSWD: /etc/init.d/nagios restart
centreon   ALL=NOPASSWD: /etc/init.d/nagios stop
centreon   ALL=NOPASSWD: /etc/init.d/nagios start
centreon   ALL=NOPASSWD: /etc/init.d/nagios reload
centreon   ALL=NOPASSWD: /usr/sbin/nagiostats
centreon   ALL=NOPASSWD: /usr/sbin/nagios *

Außerdem muss der Schritt: „Setting up key authentication using SSH“ noch mit dem centreon Benutzer ausgeführt werden. Also:

su centreon
ssh-keygen
(alles mit Enter bestätigen (kein Kennwort!)
ssh-copy-id -i ~/.ssh/id_rsa.pub centreon@{IP_ADDRESS}

Hat man nun den Poller im Centreon angelegt, wie in der Doku hier beschrieben, kann man Testweise einen Host anlegen, der von dem neuen Poller abgefragt werden soll.
Anschließend unter Configuration -> Monitoring Engines, die Konfiguration exportieren und den neuen Poller neustarten lassen.
Wichtige Infos zum Debuggen findet man in den Logfiles von Centreon. Ein Beispiel für ein funktionierenden Poller:

vi /usr/local/centreon/log/centcore.log
2013-06-18 14:22:01 - Info: copied rotated file for instance 5
2013-06-18 14:34:54 - Start: Send config files on poller 5
2013-06-18 14:35:05 - End: Send config files on poller 5
2013-06-18 14:35:18 - Init Script : 'sudo /etc/init.d/nagios restart' On poller 101.1.39 (5)
2013-06-18 14:35:18 - Engine : Running configuration check...done.
2013-06-18 14:35:18 - Engine : Stopping nagios: .done.
2013-06-18 14:35:18 - Engine : Starting nagios: done.
2013-06-19 00:00:42 - Info: copied rotated file for instance 5
Timeout, server 10.0.199.39 not responding.^M
2013-06-20 00:01:00 - Info: copied rotated file for instance 5
Timeout, server 10.0.199.39 not responding.^M
2013-06-20 23:59:49 - Info: copied rotated file for instance 5

Sollten die neu angelegten Hosts zwar in der Centreon Konfiguration sein, aber nicht unter Monitoring auftauchen muss geprüft werden, ob der ndoutils Dienst korrekt läuft.
Dazu das Nagios-Log auf dem Poller checken:

vi /usr/local/nagios/var/nagios.log
[1371558916] Nagios 3.5.0 starting... (PID=7777)
[1371558916] Local time is Tue Jun 18 14:35:16 CEST 2013
[1371558916] LOG VERSION: 2.0
[1371558916] ndomod: NDOMOD 1.5.2 (06-08-2012) Copyright (c) 2009 Nagios Core Development Team and Community Contributors
[1371558916] ndomod: Successfully connected to data sink. 0 queued items to flush.
[1371558916] Event broker module '/usr/local/nagios/bin/ndomod.o' initialized successfully.


Office 2013/365 deinstallieren

Wie man Office deinstalliert ? Klingt doch eigentlich ziemlich simpel. Doch was machen, wenn das vorinstallierte Office nicht bei den Installierten Anwendungen unter „Programme und Features“ auftaucht?
Ich hatte das Problem bei einem der letzten Aldi-PC’s mit Windows 8. Dort war die Office Suite als Probeversion installiert, jedoch konnte man sie nicht auf normalem Weg entfernen.
Abhilfe schafft ein Microsoft Fix-it Tool: Download
Den zugehörigen KB-Beitrag findet ihr hier: http://support.microsoft.com/kb/2739501/de
removal-tool
Einfach Tool starten – los geht’s. Dauert ein paar Minuten und ihr habt Office 2013 bzw. 365 bzw. deinstalliert.
Hinweis: Funktioniert nur mit den beiden oben genannten Programmen. Wenn man noch Office 2010 installiert hat bleibt das vorhanden.

Samsung S3 Mini – Rooten (I8190)

s3mini (Medium)
Wie auch bei allen anderen schönen Handys dieser Welt gibt es auch hier Wege und Mittel um sich root Rechte zu beschaffen.
Wieder die Frage: Warum braucht man das ? Ich bin kein Fan von Werbung und Co. also kann ein guter Ad-Blocker nicht schaden. Großer Punkt – Privatsphäre/Datenschutz: Klar es gibt auch die ein oder andere Firewall für Android die auch ohne root Rechte funktioniert. Allerdings sind diese nicht ansatzweise so umfangreich und von der Funktion her so gut wie die LBE Firewall.
Zum Rooten selbst braucht ihr nur das Tool ODIN (zum Flashen), die Samsung Treiber und ein gerootetes Image.
(Ich verlinke hier ein Originalimage welches zusätzlich mit root Rechten ausgerüstet ist.)
Es gibt auch noch das Samsung S3 Mini Toolkit, was noch wesentlich mehr Funktionen zu bieten hat. Ich habe es aber noch nicht getestet, da der Weg über ODIN bisher immer ziemlich einfach war.
Bei dieser Methode gehen bei korrekter Anwendung keine Daten verloren. Alle Einstellungen, Apps, Bilder etc. bleiben erhalten.
Schritt 1: Treiber installieren
SAMSUNG_USB_Driver_v.1.5.22.0.exe
Schritt 2: Odin herunterladen
Hier – bzw. als Anhang in dem Beitrag
Schritt 3: Telefoninfo überprüfen
Ihr geht auf die Einstellungen -> About/Telefoninfo (ganz unten)
Model muss I8190 sein.
Abhängig von der Baseband Version (die letzten 3 Stellen) benötigt ihr das passende root Image.
Beispiel:
base on – XXAMD3.
PDA – I8190XXAMD3
PHONE- I8190XXMB3
CSC- I8190OXAAMD3
Android version: Jelly Bean 4.12
= Root Paket: https://mega.co.nz/#!qIsiEZIZ!L7rPSSTJ89-N3WrKs-i5vjYoW0lCIXMnkC5fGcnCg3o
[EXPAND Ältere/Andere Versionen gibts hier]
XXAMB3.
PDA – I8190XXAMB3
PHONE- I8190XXAMB3
CSC- I8190OXAAMB3
Android version: Jelly Bean 4.12
https://mega.co.nz/#!XN0AkYpA!N-NVF2…ClfFJtfCw6x9KU
XXALL2.
PDA – I8190XXALL2
PHONE- I8190XXALL2
CSC- I8190OXXALL1
Android version: 4.11
https://sourceforge.net/projects/avi…h.zip/download
XXALK6.
PDA – I8190XXALK6
PHONE- I8190XXALK6
CSC- I8190XEFALK1
Android version: 4.11
https://sourceforge.net/projects/avi…h.zip/download
[/EXPAND]
Schritt 4: Handy in Download Mode bringen
Dazu Handy ausschalten und gleichzeitig drücken: Leiser, Home, Power (Anschließend dann nochmal Lauter)
s3mini-downloadmode (Medium)
Schritt 5: Odin starten, auf PDA klicken und die heruntergeladene .tar Datei auswählen.
Start klicken. Fertig.

VMware ESXi 5 Server mit Cacti überwachen

Vorab – dazu gibt es schon einen Beitrag und zwar vom Ersteller des Templates Nitro bzw. Hypervisor.fr
Wie die Domainendung schon zu vermuten gibt aber leider in Französisch. Ich übersetzte die Anleitung sozusagen nur grob und funktional 🙂
Cacti ist die Monitoringsoftware schlecht hin. Wer sich mit MRTG auseinandergesetzt hat wird es kennen, stundenlang in Konfigurationsdateien herum zu editieren. Da ist Cacti doch eine wesentlich ansprechendere, schnellere, und einfachere Lösung.
Natürlich versucht man alle wichtigen Systeme im Monitoring zu haben. Wie man den ESXi Server auch in die Nagios bzw. Centreon Überwachung aufnehmen kann habe ich euch bereits hier beschrieben. Die Methode ist die Gleiche – basierend auf der vSphere Perl SDK und des check_vmware_api Script.
1. Voraussetzungen
Ihr benötigt die VMware vSphere Perl SDK, sowie die notwendigen Perl Module etc. um das check_vmware_api Script zum Laufen zu bekommen.
Wie das geht, habe ich euch hier in einem separatem Beitrag bereits beschrieben.
Seit ihr soweit dass ihr das Script von Hand laufen lassen könnt, gehts hier weiter.
2. vi_host Paket herunterladen:
http://files.hypervisor.fr/scripts/check_vmware_api.zip
3. Die beiden Dateien müssen in das Cacti Script_Queries Verzeichnis kopiert werden. – Standard ist /var/www/cacti/resource/script_queries/

check_vmware_cluster.xml
check_vmware_datastore.xml

4. Die Datei check_esx3_helper.sh muss in das Verzeichnis kopiert werden:

/var/www/cacti/scripts

5. Nun das check_vmware_api Script von op5 herunterladen und ebenfalls in das Verzeichnis kopieren:

/var/www/cacti/scripts

6. Die beiden anderen Dateien importiert ihr ins Cacti:

cacti_data_query_vmware_vpx_-_cluster_usage.xml
cacti_data_query_vmware_vpx_-_vmfs_usage.xml

import-template-cacti-esxi
7. Nachdem nun die Templates importiert sind, müssen diese mit dem vCenter verknüpft werden:
cacti_host_view
8. Logindaten fürs vSphere eingeben
Die Anmeldeinformationen werden anhand der SNMP v3 Logindaten ausgelesen. Sollte man also sein vCenter Server bereits via SNMP überwachen, dann muss man im Cacti dafür ein extra Gerät anlegen, damit man beide SNMP Einstellungen benutzten kann.
snmp-v3-cacti
9. Anschließend die Graphen erstellen:
cacti_graph_view
10. Rundum sollte es dann nach einer Zeit so aussehen:
cacti_cluster_view
Die Bilder sind teilweise kopiert von: http://www.hypervisor.fr/?p=3896

VMware ESXi 5 mit Nagios/Centreon überwachen

VMware bietet mit seinem vSphere Client bzw. des vSphere Webclient eine schönes Tool zur Verwaltung der ESX Farm. Dort kann man sich auch die Performancewerte zu CPU, Ram, HDD, Netzwerk anschauen, Graphen erzeugen und vieles mehr…. Wer jetzt aber ein bestehendes System zum Monitoren hat, freut sich mit Sicherheit darüber, dort auch alle Systeme aufnehmen zu können.
Da seit dem ESX3 die SNMP Funktionalität bzw. alle nützlichen Attribute daraus gänzlich entfernt wurden, bleibt zum Abfragen nur die PowerCLI bzw. die Perl SDK. Wie das funktioniert beschreibe ich hier:
Als erstes die aktuellste VMware vSphere Perl SDK installieren. Momentan 5.1.0 – gibt’s bei VMware.
Entpacken:

tar xvf VMware-vSphere-Perl-SDK-5.1.0-780721.x86_64.tar.gz

Umgebungsvariablen setzen: (WICHTIG – ohne geht’s nicht!)

export http_proxy=
export ftp_proxy=

Installer ausführen:

sudo ./vmware-install.pl

Perl Module installieren:

perl -MCPAN -e shell

Anschließend für die unten aufgelisteten Module jeweils machen:

install XML::Simple
XML::Simple
Nagios::Plugin
Class::MethodMaker
URI
LWP
HTML::Parser

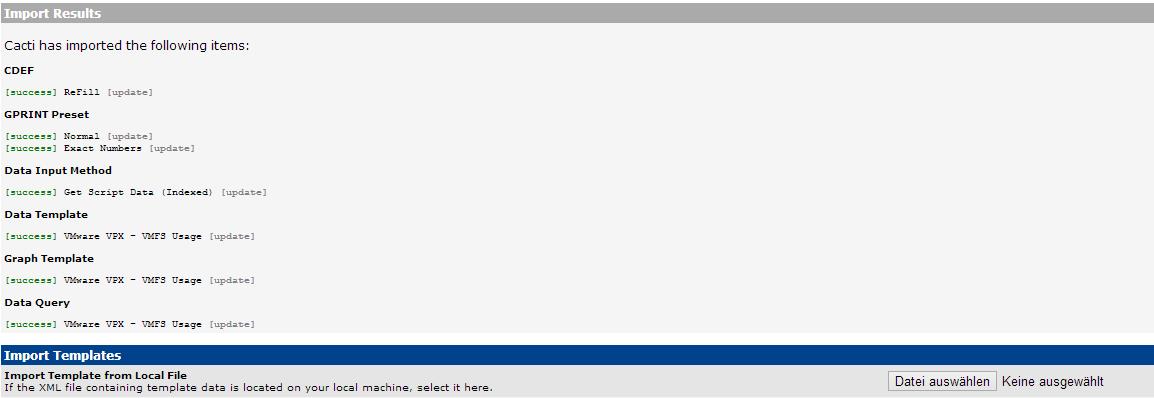
Das Nagios Plugin / Script herunterladen: check_vmware_api
Jetzt noch die SSL Überprüfung vom LWP Modul zu deaktivieren. Ich empfehle folgendes noch in den Kopfbereich des check_vmware_api Scriptes hinzuzufügen:

$ENV{PERL_LWP_SSL_VERIFY_HOSTNAME} = 0;

Alternativ kann man die Einstellung auch Global vornehmen:

sudo vim /usr/share/perl5/LWP/Protocol/https.pm

In der Datei nach der Zeile:

$ssl_opts{SSL_verify_mode} ||= 1;

suchen und diese durch folgende ersetzen:

$ssl_opts{SSL_verify_mode} ||= 0;

Ansonsten bekommt ihr eventuell folgende Fehlermeldung:

CHECK_ESX3.PL CRITICAL - Server version unavailable at 'https://MYESX:443/sdk/vimService.wsdl' at /usr/lib/perl5/5.10.0/VMware/VICommon.pm line 545.

Zum Testen kann man sich nun mal den Gesamtverbrauch an CPU Ressourcen in MHZ ausgeben lassen:

root@SERVER:/# /usr/local/nagios/libexec/check_esx3.pl -D vcenter.domain.info -u user@domain.info -p password -l cpu -s usagemhz
CHECK_ESX3.PL OK - cpu usagemhz=31792.00 MHz | cpu_usagemhz=31792.00Mhz;;

Insgesamt gibt es sehr viele Optionen, die komplette Liste gibts hier:
[EXPAND check_vmware_api Befehle]
check_esx3.pl 0.7.0
This nagios plugin is free software, and comes with ABSOLUTELY NO WARRANTY.
It may be used, redistributed and/or modified under the terms of the GNU
General Public Licence (see http://www.fsf.org/licensing/licenses/gpl.txt).
VMWare Infrastructure plugin
Usage: check_esx3.pl -D <data_center> | -H <host_name> [ -C <cluster_name> ] [ -N <vm_name> ]
-u -p | -f
-l [ -s ] [ -T ] [ -i ]
[ -x <black_list> ] [ -o <additional_options> ]
[ -t ] [ -w <warn_range> ] [ -c <crit_range> ]
[ -V ] [ -h ]
-?, –usage
Print usage information
-h, –help
Print detailed help screen
-V, –version
Print version information
–extra-opts=[section][@file]
Read options from an ini file. See http://nagiosplugins.org/extra-opts
for usage and examples.
-H, –host=
ESX or ESXi hostname.
-C, –cluster=
ESX or ESXi clustername.
-D, –datacenter=
Datacenter hostname.
-N, –name=
Virtual machine name.
-u, –username=
Username to connect with.
-p, –password= Password to use with the username.
-f, –authfile= Authentication file with login and password. File syntax :
username=
password= -w, –warning=THRESHOLD
Warning threshold. See
http://nagiosplug.sourceforge.net/developer-guidelines.html#THRESHOLDFORMAT
for the threshold format.
-c, –critical=THRESHOLD
Critical threshold. See
http://nagiosplug.sourceforge.net/developer-guidelines.html#THRESHOLDFORMAT
for the threshold format.
-l, –command=COMMAND
Specify command type (CPU, MEM, NET, IO, VMFS, RUNTIME, …)
-s, –subcommand=SUBCOMMAND
Specify subcommand
-S, –sessionfile=SESSIONFILE
Specify a filename to store sessions for faster authentication
-x, –exclude=<black_list>
Specify black list
-o, –options=<additional_options>
Specify additional command options (quickstats, …)
-T, –timestamp=
Timeshift in seconds that could fix issues with „Unknown error“. Use values like 5, 10, 20, etc
-i, –interval=
Sampling Period in seconds. Basic historic intervals: 300, 1800, 7200 or 86400. See config for any changes.
Supports literval values to autonegotiate interval value: r – realtime interval, h – historical interval specified by position.
Default value is 20 (realtime). Since cluster does not have realtime stats interval other than 20(default realtime) is mandatory.
-M, –maxsamples=
Maximum number of samples to retrieve. Max sample number is ignored for historic intervals.
Default value is 1 (latest available sample).
–trace=
Set verbosity level of vSphere API request/respond trace
-t, –timeout=INTEGER
Seconds before plugin times out (default: 30)
-v, –verbose
Show details for command-line debugging (can repeat up to 3 times)
Supported commands(^ – blank or not specified parameter, o – options, T – timeshift value, b – blacklist) :
VM specific :
* cpu – shows cpu info
+ usage – CPU usage in percentage
+ usagemhz – CPU usage in MHz
+ wait – CPU wait time in ms
+ ready – CPU ready time in ms
^ all cpu info(no thresholds)
* mem – shows mem info
+ usage – mem usage in percentage
+ usagemb – mem usage in MB
+ swap – swap mem usage in MB
+ swapin – swapin mem usage in MB
+ swapout – swapout mem usage in MB
+ overhead – additional mem used by VM Server in MB
+ overall – overall mem used by VM Server in MB
+ active – active mem usage in MB
+ memctl – mem used by VM memory control driver(vmmemctl) that controls ballooning
^ all mem info(except overall and no thresholds)
* net – shows net info
+ usage – overall network usage in KBps(Kilobytes per Second)
+ receive – receive in KBps(Kilobytes per Second)
+ send – send in KBps(Kilobytes per Second)
^ all net info(except usage and no thresholds)
* io – shows disk I/O info
+ usage – overall disk usage in MB/s
+ read – read latency in ms (totalReadLatency.average)
+ write – write latency in ms (totalWriteLatency.average)
^ all disk io info(no thresholds)
* runtime – shows runtime info
+ con – connection state
+ cpu – allocated CPU in MHz
+ mem – allocated mem in MB
+ state – virtual machine state (UP, DOWN, SUSPENDED)
+ status – overall object status (gray/green/red/yellow)
+ consoleconnections – console connections to VM
+ guest – guest OS status, needs VMware Tools
+ tools – VMWare Tools status
+ issues – all issues for the host
^ all runtime info(except con and no thresholds)
Host specific :
* cpu – shows cpu info
+ usage – CPU usage in percentage
o quickstats – switch for query either PerfCounter values or Runtime info
+ usagemhz – CPU usage in MHz
o quickstats – switch for query either PerfCounter values or Runtime info
^ all cpu info
o quickstats – switch for query either PerfCounter values or Runtime info
* mem – shows mem info
+ usage – mem usage in percentage
o quickstats – switch for query either PerfCounter values or Runtime info
+ usagemb – mem usage in MB
o quickstats – switch for query either PerfCounter values or Runtime info
+ swap – swap mem usage in MB
o listvm – turn on/off output list of swapping VM’s
+ overhead – additional mem used by VM Server in MB
+ overall – overall mem used by VM Server in MB
+ memctl – mem used by VM memory control driver(vmmemctl) that controls ballooning
o listvm – turn on/off output list of ballooning VM’s
^ all mem info(except overall and no thresholds)
* net – shows net info
+ usage – overall network usage in KBps(Kilobytes per Second)
+ receive – receive in KBps(Kilobytes per Second)
+ send – send in KBps(Kilobytes per Second)
+ nic – makes sure all active NICs are plugged in
^ all net info(except usage and no thresholds)
* io – shows disk io info
+ aborted – aborted commands count
+ resets – bus resets count
+ read – read latency in ms (totalReadLatency.average)
+ write – write latency in ms (totalWriteLatency.average)
+ kernel – kernel latency in ms
+ device – device latency in ms
+ queue – queue latency in ms
^ all disk io info
* vmfs – shows Datastore info
+ (name) – free space info for datastore with name (name)
o used – output used space instead of free
o breif – list only alerting volumes
o regexp – whether to treat name as regexp
o blacklistregexp – whether to treat blacklist as regexp
b – blacklist VMFS’s
T (value) – timeshift to detemine if we need to refresh
^ all datastore info
o used – output used space instead of free
o breif – list only alerting volumes
o blacklistregexp – whether to treat blacklist as regexp
b – blacklist VMFS’s
T (value) – timeshift to detemine if we need to refresh
* runtime – shows runtime info
+ con – connection state
+ health – checks cpu/storage/memory/sensor status
o listitems – list all available sensors(use for listing purpose only)
o blackregexpflag – whether to treat blacklist as regexp
b – blacklist status objects
+ storagehealth – storage status check
o blackregexpflag – whether to treat blacklist as regexp
b – blacklist status objects
+ temperature – temperature sensors
o blackregexpflag – whether to treat blacklist as regexp
b – blacklist status objects
+ sensor – threshold specified sensor
+ maintenance – shows whether host is in maintenance mode
+ list(vm) – list of VMWare machines and their statuses
+ status – overall object status (gray/green/red/yellow)
+ issues – all issues for the host
b – blacklist issues
^ all runtime info(health, storagehealth, temperature and sensor are represented as one value and no thresholds)
* service – shows Host service info
+ (names) – check the state of one or several services specified by (names), syntax for (names):,,…,
^ show all services
* storage – shows Host storage info
+ adapter – list bus adapters
b – blacklist adapters
+ lun – list SCSI logical units
b – blacklist LUN’s
+ path – list logical unit paths
b – blacklist paths
^ show all storage info
* uptime – shows Host uptime
o quickstats – switch for query either PerfCounter values or Runtime info
* device – shows Host specific device info
+ cd/dvd – list vm’s with attached cd/dvd drives
o listall – list all available devices(use for listing purpose only)
DC specific :
* cpu – shows cpu info
+ usage – CPU usage in percentage
o quickstats – switch for query either PerfCounter values or Runtime info
+ usagemhz – CPU usage in MHz
o quickstats – switch for query either PerfCounter values or Runtime info
^ all cpu info
o quickstats – switch for query either PerfCounter values or Runtime info
* mem – shows mem info
+ usage – mem usage in percentage
o quickstats – switch for query either PerfCounter values or Runtime info
+ usagemb – mem usage in MB
o quickstats – switch for query either PerfCounter values or Runtime info
+ swap – swap mem usage in MB
+ overhead – additional mem used by VM Server in MB
+ overall – overall mem used by VM Server in MB
+ memctl – mem used by VM memory control driver(vmmemctl) that controls ballooning
^ all mem info(except overall and no thresholds)
* net – shows net info
+ usage – overall network usage in KBps(Kilobytes per Second)
+ receive – receive in KBps(Kilobytes per Second)
+ send – send in KBps(Kilobytes per Second)
^ all net info(except usage and no thresholds)
* io – shows disk io info
+ aborted – aborted commands count
+ resets – bus resets count
+ read – read latency in ms (totalReadLatency.average)
+ write – write latency in ms (totalWriteLatency.average)
+ kernel – kernel latency in ms
+ device – device latency in ms
+ queue – queue latency in ms
^ all disk io info
* vmfs – shows Datastore info
+ (name) – free space info for datastore with name (name)
o used – output used space instead of free
o breif – list only alerting volumes
o regexp – whether to treat name as regexp
o blacklistregexp – whether to treat blacklist as regexp
b – blacklist VMFS’s
T (value) – timeshift to detemine if we need to refresh
^ all datastore info
o used – output used space instead of free
o breif – list only alerting volumes
o blacklistregexp – whether to treat blacklist as regexp
b – blacklist VMFS’s
T (value) – timeshift to detemine if we need to refresh
* runtime – shows runtime info
+ list(vm) – list of VMWare machines and their statuses
+ listhost – list of VMWare esx host servers and their statuses
+ listcluster – list of VMWare clusters and their statuses
+ tools – VMWare Tools status
b – blacklist VM’s
+ status – overall object status (gray/green/red/yellow)
+ issues – all issues for the host
b – blacklist issues
^ all runtime info(except cluster and tools and no thresholds)
* recommendations – shows recommendations for cluster
+ (name) – recommendations for cluster with name (name)
^ all clusters recommendations
Cluster specific :
* cpu – shows cpu info
+ usage – CPU usage in percentage
+ usagemhz – CPU usage in MHz
^ all cpu info
* mem – shows mem info
+ usage – mem usage in percentage
+ usagemb – mem usage in MB
+ swap – swap mem usage in MB
o listvm – turn on/off output list of swapping VM’s
+ memctl – mem used by VM memory control driver(vmmemctl) that controls ballooning
o listvm – turn on/off output list of ballooning VM’s
^ all mem info(plus overhead and no thresholds)
* cluster – shows cluster services info
+ effectivecpu – total available cpu resources of all hosts within cluster
+ effectivemem – total amount of machine memory of all hosts in the cluster
+ failover – VMWare HA number of failures that can be tolerated
+ cpufainess – fairness of distributed cpu resource allocation
+ memfainess – fairness of distributed mem resource allocation
^ only effectivecpu and effectivemem values for cluster services
* runtime – shows runtime info
+ list(vm) – list of VMWare machines in cluster and their statuses
+ listhost – list of VMWare esx host servers in cluster and their statuses
+ status – overall cluster status (gray/green/red/yellow)
+ issues – all issues for the cluster
b – blacklist issues
^ all cluster runtime info
* vmfs – shows Datastore info
+ (name) – free space info for datastore with name (name)
o used – output used space instead of free
o breif – list only alerting volumes
o regexp – whether to treat name as regexp
o blacklistregexp – whether to treat blacklist as regexp
b – blacklist VMFS’s
T (value) – timeshift to detemine if we need to refresh
^ all datastore info
o used – output used space instead of free
o breif – list only alerting volumes
o blacklistregexp – whether to treat blacklist as regexp
b – blacklist VMFS’s
T (value) – timeshift to detemine if we need to refresh
Copyright (c) 2008 op5
[/Expand]
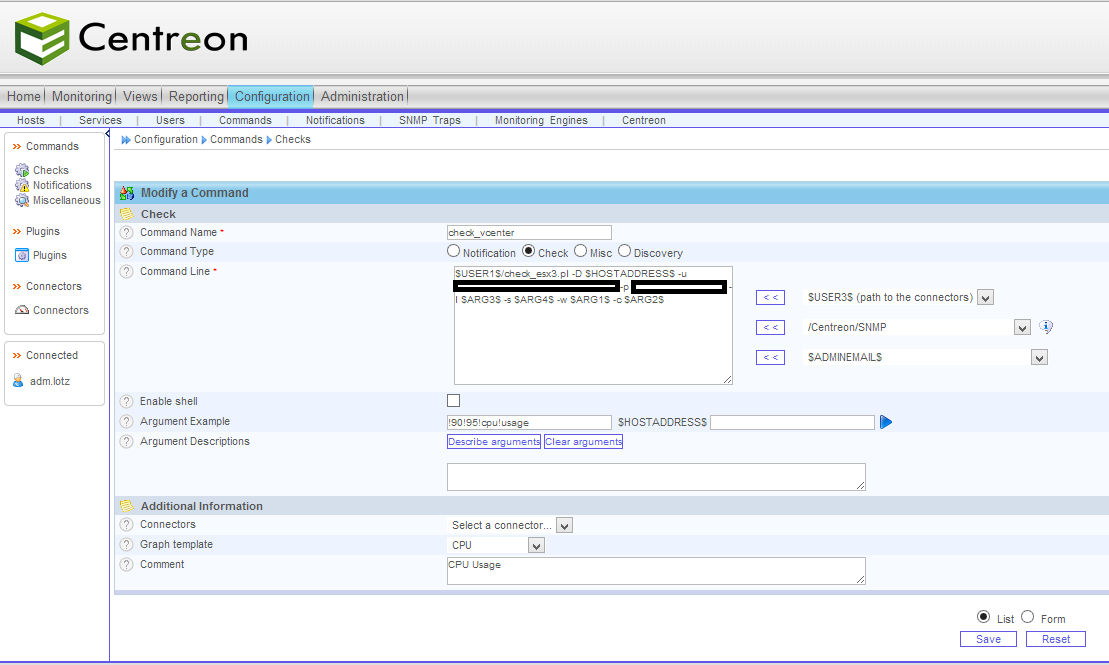
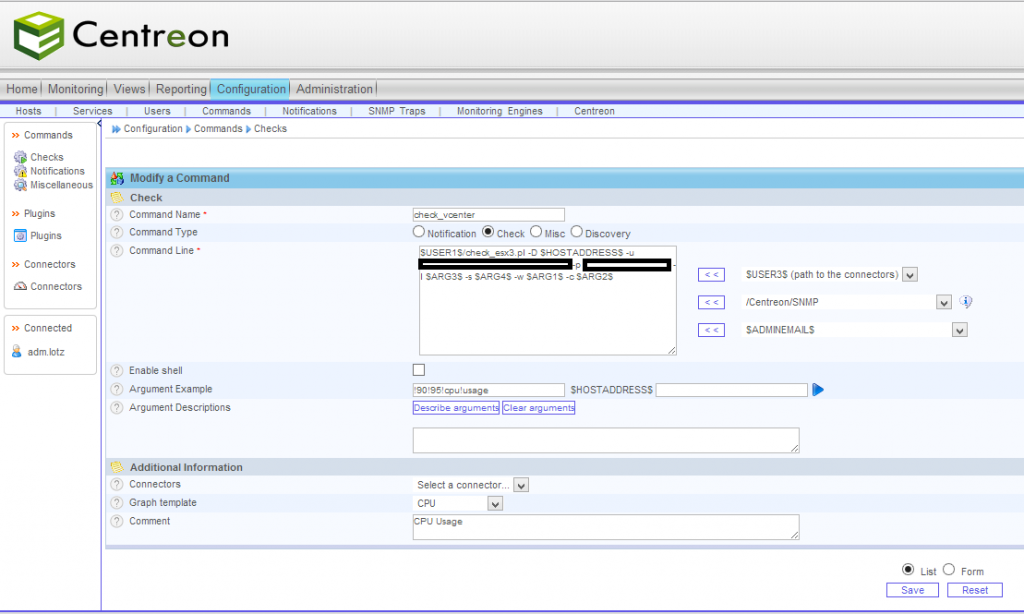
Das check_vmware_api Script fügt ihr nun im Nagios bzw. Centreon unter Commands/Checks hinzu, unter Angabe der gewollten Parameter, wodurch ihr dann auch die Service Checks erstellen könnt.
centreon-command-esxi
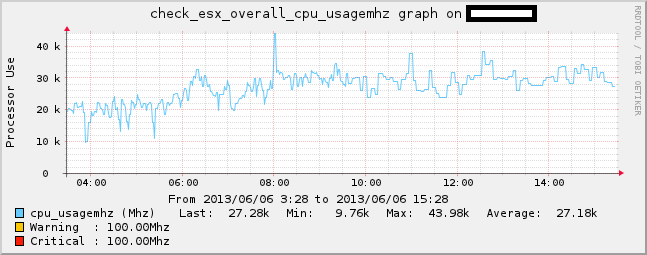
In den Graphen sieht es dann so aus:
esxi-nagios-cpu

Nagios::Plugin für Perl nachinstallieren

Wenn man Nagios ohne die Nagios Plugins für Perl compiliert/installiert hat, kann man diese im Nachhinein wie folgt nachinstallieren:

perl -MCPAN -e shell

[EXPAND CPAN LOG]
CPAN is the world-wide archive of perl resources. It consists of about
300 sites that all replicate the same contents around the globe. Many
countries have at least one CPAN site already. The resources found on
CPAN are easily accessible with the CPAN.pm module. If you want to use
CPAN.pm, lots of things have to be configured. Fortunately, most of
them can be determined automatically. If you prefer the automatic
configuration, answer ‚yes‘ below.
If you prefer to enter a dialog instead, you can answer ’no‘ to this
question and I’ll let you configure in small steps one thing after the
other. (Note: you can revisit this dialog anytime later by typing ‚o
conf init‘ at the cpan prompt.)
Would you like me to configure as much as possible automatically? [yes]
Autoconfigured everything but ‚urllist‘.
Now you need to choose your CPAN mirror sites. You can let me
pick mirrors for you, you can select them from a list or you
can enter them by hand.
Would you like me to automatically choose the best CPAN mirror
sites for you? (This means connecting to the Internet and could
take a couple minutes) [yes]
Trying to fetch a mirror list from the Internet
Fetching with LWP:
http://www.perl.org/CPAN/MIRRORED.BY
Searching for the best CPAN mirrors (please be patient) ……………………………………………………………………………………. done!
New urllist
ftp://mirror.netcologne.de/cpan/
ftp://ftp.hosteurope.de/pub/CPAN/
ftp://ftp.u-tx.net/CPAN/
ftp://ftp.mirror.8086.net/sites/CPAN/
ftp://mirror.checkdomain.de/CPAN/
Autoconfiguration complete.
commit: wrote ‚/etc/perl/CPAN/Config.pm‘
Terminal does not support AddHistory.
cpan shell — CPAN exploration and modules installation (v1.9456)
Enter ‚h‘ for help.
[/EXPAND]

cpan[1]> install Nagios::Plugin

[EXPAND CPAN Nagios Installation Log]
Running install for module ‚Nagios::Plugin‘
Running make for T/TO/TONVOON/Nagios-Plugin-0.36.tar.gz
Fetching with LWP:
ftp://mirror.netcologne.de/cpan/authors/id/T/TO/TONVOON/Nagios-Plugin-0.36.tar.gz
Fetching with LWP:
ftp://mirror.netcologne.de/cpan/authors/id/T/TO/TONVOON/CHECKSUMS
Checksum for /home/drmadmin/.cpan/sources/authors/id/T/TO/TONVOON/Nagios-Plugin-0.36.tar.gz ok
CPAN.pm: Going to build T/TO/TONVOON/Nagios-Plugin-0.36.tar.gz
Checking if your kit is complete…
Looks good
Warning: prerequisite Config::Tiny 0 not found.
Warning: prerequisite Math::Calc::Units 0 not found.
Warning: prerequisite Params::Validate 0 not found.
Writing Makefile for Nagios::Plugin
—- Unsatisfied dependencies detected during —-
—- TONVOON/Nagios-Plugin-0.36.tar.gz —-
Params::Validate [requires]
Math::Calc::Units [requires]
Config::Tiny [requires]
Running make test
Delayed until after prerequisites
Running make install
Delayed until after prerequisites
Running install for module ‚Params::Validate‘
Running make for D/DR/DROLSKY/Params-Validate-1.07.tar.gz
Fetching with LWP:
ftp://mirror.netcologne.de/cpan/authors/id/D/DR/DROLSKY/Params-Validate-1.07.tar.gz
Fetching with LWP:
ftp://mirror.netcologne.de/cpan/authors/id/D/DR/DROLSKY/CHECKSUMS
Checksum for /home/drmadmin/.cpan/sources/authors/id/D/DR/DROLSKY/Params-Validate-1.07.tar.gz ok
CPAN.pm: Going to build D/DR/DROLSKY/Params-Validate-1.07.tar.gz
Checking prerequisites…
requires:
! Module::Implementation is not installed
build_requires:
! Test::Fatal is not installed
ERRORS/WARNINGS FOUND IN PREREQUISITES. You may wish to install the versions
of the modules indicated above before proceeding with this installation
Creating new ‚MYMETA.yml‘ with configuration results
Creating new ‚Build‘ script for ‚Params-Validate‘ version ‚1.07‘
—- Unsatisfied dependencies detected during —-
—- DROLSKY/Params-Validate-1.07.tar.gz —-
Test::Fatal [build_requires]
Module::Implementation [requires]
Running Build test
Delayed until after prerequisites
Running Build install
Delayed until after prerequisites
Running install for module ‚Test::Fatal‘
Running make for R/RJ/RJBS/Test-Fatal-0.010.tar.gz
Fetching with LWP:
ftp://mirror.netcologne.de/cpan/authors/id/R/RJ/RJBS/Test-Fatal-0.010.tar.gz
Fetching with LWP:
ftp://mirror.netcologne.de/cpan/authors/id/R/RJ/RJBS/CHECKSUMS
Checksum for /home/drmadmin/.cpan/sources/authors/id/R/RJ/RJBS/Test-Fatal-0.010.tar.gz ok
CPAN.pm: Going to build R/RJ/RJBS/Test-Fatal-0.010.tar.gz
Checking if your kit is complete…
Looks good
Warning: prerequisite Try::Tiny 0.07 not found.
Writing Makefile for Test::Fatal
—- Unsatisfied dependencies detected during —-
—- RJBS/Test-Fatal-0.010.tar.gz —-
Try::Tiny [requires]
Running make test
Delayed until after prerequisites
Running make install
Delayed until after prerequisites
Running install for module ‚Try::Tiny‘
Running make for D/DO/DOY/Try-Tiny-0.12.tar.gz
Fetching with LWP:
ftp://mirror.netcologne.de/cpan/authors/id/D/DO/DOY/Try-Tiny-0.12.tar.gz
Fetching with LWP:
ftp://mirror.netcologne.de/cpan/authors/id/D/DO/DOY/CHECKSUMS
Checksum for /home/drmadmin/.cpan/sources/authors/id/D/DO/DOY/Try-Tiny-0.12.tar.gz ok
CPAN.pm: Going to build D/DO/DOY/Try-Tiny-0.12.tar.gz
Checking if your kit is complete…
Looks good
Writing Makefile for Try::Tiny
cp lib/Try/Tiny.pm blib/lib/Try/Tiny.pm
Manifying blib/man3/Try::Tiny.3pm
DOY/Try-Tiny-0.12.tar.gz
/usr/bin/make — OK
Running make test
PERL_DL_NONLAZY=1 /usr/bin/perl „-MExtUtils::Command::MM“ „-e“ „test_harness(0, ‚blib/lib‘, ‚blib/arch‘)“ t/*.t
t/basic.t ……. ok
t/context.t ….. ok
t/finally.t ….. ok
t/given_when.t .. ok
t/when.t …….. ok
All tests successful.
Files=5, Tests=85, 0 wallclock secs ( 0.04 usr 0.02 sys + 0.16 cusr 0.02 csys = 0.24 CPU)
Result: PASS
DOY/Try-Tiny-0.12.tar.gz
/usr/bin/make test — OK
Running make install
Installing /usr/local/share/perl/5.12.4/Try/Tiny.pm
Installing /usr/local/man/man3/Try::Tiny.3pm
Appending installation info to /usr/local/lib/perl/5.12.4/perllocal.pod
DOY/Try-Tiny-0.12.tar.gz
/usr/bin/make install — OK
Running make for R/RJ/RJBS/Test-Fatal-0.010.tar.gz
Has already been unwrapped into directory /home/drmadmin/.cpan/build/Test-Fatal-0.010-ipHhnd
CPAN.pm: Going to build R/RJ/RJBS/Test-Fatal-0.010.tar.gz
cp lib/Test/Fatal.pm blib/lib/Test/Fatal.pm
Manifying blib/man3/Test::Fatal.3pm
RJBS/Test-Fatal-0.010.tar.gz
/usr/bin/make — OK
Running make test
PERL_DL_NONLAZY=1 /usr/bin/perl „-MExtUtils::Command::MM“ „-e“ „test_harness(0, ‚blib/lib‘, ‚blib/arch‘)“ t/*.t
t/basic.t …………… ok
t/like-exception.t …… ok
t/release-pod-syntax.t .. skipped: these tests are for release candidate testing
All tests successful.
Files=3, Tests=12, 0 wallclock secs ( 0.03 usr 0.00 sys + 0.09 cusr 0.00 csys = 0.12 CPU)
Result: PASS
RJBS/Test-Fatal-0.010.tar.gz
/usr/bin/make test — OK
Running make install
Installing /usr/local/share/perl/5.12.4/Test/Fatal.pm
Installing /usr/local/man/man3/Test::Fatal.3pm
Appending installation info to /usr/local/lib/perl/5.12.4/perllocal.pod
RJBS/Test-Fatal-0.010.tar.gz
/usr/bin/make install — OK
Running install for module ‚Module::Implementation‘
Running make for D/DR/DROLSKY/Module-Implementation-0.06.tar.gz
Fetching with LWP:
ftp://mirror.netcologne.de/cpan/authors/id/D/DR/DROLSKY/Module-Implementation-0.06.tar.gz
Checksum for /home/drmadmin/.cpan/sources/authors/id/D/DR/DROLSKY/Module-Implementation-0.06.tar.gz ok
CPAN.pm: Going to build D/DR/DROLSKY/Module-Implementation-0.06.tar.gz
Checking if your kit is complete…
Looks good
Warning: prerequisite Module::Runtime 0.012 not found.
Warning: prerequisite Test::Requires 0 not found.
Writing Makefile for Module::Implementation
—- Unsatisfied dependencies detected during —-
—- DROLSKY/Module-Implementation-0.06.tar.gz —-
Test::Requires [build_requires]
Module::Runtime [requires]
Running make test
Delayed until after prerequisites
Running make install
Delayed until after prerequisites
Running install for module ‚Test::Requires‘
Running make for T/TO/TOKUHIROM/Test-Requires-0.06.tar.gz
Fetching with LWP:
ftp://mirror.netcologne.de/cpan/authors/id/T/TO/TOKUHIROM/Test-Requires-0.06.tar.gz
Fetching with LWP:
ftp://mirror.netcologne.de/cpan/authors/id/T/TO/TOKUHIROM/CHECKSUMS
Checksum for /home/drmadmin/.cpan/sources/authors/id/T/TO/TOKUHIROM/Test-Requires-0.06.tar.gz ok
CPAN.pm: Going to build T/TO/TOKUHIROM/Test-Requires-0.06.tar.gz
Checking if your kit is complete…
Looks good
Writing Makefile for Test::Requires
cp lib/Test/Requires.pm blib/lib/Test/Requires.pm
Manifying blib/man3/Test::Requires.3pm
TOKUHIROM/Test-Requires-0.06.tar.gz
/usr/bin/make — OK
Running make test
PERL_DL_NONLAZY=1 /usr/bin/perl „-MExtUtils::Command::MM“ „-e“ „test_harness(0, ‚inc‘, ‚blib/lib‘, ‚blib/arch‘)“ t/*.t
t/00_compile.t ……… ok
t/01_simple.t ………. ok
t/02_no_plan.t ……… ok
t/03_import_hashref.t .. skipped: Test requires module ‚Acme::Unknown::Missing::Module::Name‘ but it’s not found
t/04_import_array.t …. skipped: Test requires module ‚Acme::Unknown::Missing::Module::Name‘ but it’s not found
t/05_success.t ……… ok
All tests successful.
Files=6, Tests=13, 0 wallclock secs ( 0.04 usr 0.01 sys + 0.17 cusr 0.02 csys = 0.24 CPU)
Result: PASS
TOKUHIROM/Test-Requires-0.06.tar.gz
/usr/bin/make test — OK
Running make install
Installing /usr/local/share/perl/5.12.4/Test/Requires.pm
Installing /usr/local/man/man3/Test::Requires.3pm
Appending installation info to /usr/local/lib/perl/5.12.4/perllocal.pod
TOKUHIROM/Test-Requires-0.06.tar.gz
/usr/bin/make install — OK
Running install for module ‚Module::Runtime‘
Running make for Z/ZE/ZEFRAM/Module-Runtime-0.013.tar.gz
Fetching with LWP:
ftp://mirror.netcologne.de/cpan/authors/id/Z/ZE/ZEFRAM/Module-Runtime-0.013.tar.gz
Fetching with LWP:
ftp://mirror.netcologne.de/cpan/authors/id/Z/ZE/ZEFRAM/CHECKSUMS
Checksum for /home/drmadmin/.cpan/sources/authors/id/Z/ZE/ZEFRAM/Module-Runtime-0.013.tar.gz ok
CPAN.pm: Going to build Z/ZE/ZEFRAM/Module-Runtime-0.013.tar.gz
Creating new ‚MYMETA.yml‘ with configuration results
Creating new ‚Build‘ script for ‚Module-Runtime‘ version ‚0.013‘
Building Module-Runtime
ZEFRAM/Module-Runtime-0.013.tar.gz
./Build — OK
Running Build test
t/cmn.t ……….. ok
t/dependency.t …. ok
t/import_error.t .. ok
t/ivmn.t ………. ok
t/ivms.t ………. ok
t/mnf.t ……….. ok
t/pod_cvg.t ……. skipped: Test::Pod::Coverage not available
t/pod_syn.t ……. skipped: Test::Pod not available
t/rm.t ………… ok
t/taint.t ……… ok
t/um.t ………… ok
t/upo.t ……….. ok
All tests successful.
Files=12, Tests=303, 1 wallclock secs ( 0.09 usr 0.03 sys + 0.43 cusr 0.04 csys = 0.59 CPU)
Result: PASS
ZEFRAM/Module-Runtime-0.013.tar.gz
./Build test — OK
Running Build install
Building Module-Runtime
Installing /usr/local/share/perl/5.12.4/Module/Runtime.pm
Installing /usr/local/man/man3/Module::Runtime.3pm
ZEFRAM/Module-Runtime-0.013.tar.gz
./Build install — OK
Running make for D/DR/DROLSKY/Module-Implementation-0.06.tar.gz
Has already been unwrapped into directory /home/drmadmin/.cpan/build/Module-Implementation-0.06-kPJenR
CPAN.pm: Going to build D/DR/DROLSKY/Module-Implementation-0.06.tar.gz
cp lib/Module/Implementation.pm blib/lib/Module/Implementation.pm
Manifying blib/man3/Module::Implementation.3pm
DROLSKY/Module-Implementation-0.06.tar.gz
/usr/bin/make — OK
Running make test
PERL_DL_NONLAZY=1 /usr/bin/perl „-MExtUtils::Command::MM“ „-e“ „test_harness(0, ‚blib/lib‘, ‚blib/arch‘)“ t/*.t
t/basic.t ……………… ok
t/both-fail.t ………….. ok
t/env-value.t ………….. ok
t/more-symbols.t ……….. ok
t/one-impl-fails1.t …….. ok
t/one-impl-fails2.t …….. ok
t/release-cpan-changes.t … skipped: these tests are for release candidate testing
t/release-eol.t ………… skipped: these tests are for release candidate testing
t/release-no-tabs.t …….. skipped: these tests are for release candidate testing
t/release-pod-linkcheck.t .. skipped: these tests are for release candidate testing
t/release-pod-no404s.t ….. skipped: these tests are for release candidate testing
t/release-pod-spell.t …… skipped: these tests are for release candidate testing
t/release-pod-syntax.t ….. skipped: these tests are for release candidate testing
t/requested-fails.t …….. ok
t/taint.t ……………… skipped: Test requires module ‚Test::Taint‘ but it’s not found
All tests successful.
Files=15, Tests=22, 0 wallclock secs ( 0.07 usr 0.02 sys + 0.38 cusr 0.06 csys = 0.53 CPU)
Result: PASS
DROLSKY/Module-Implementation-0.06.tar.gz
/usr/bin/make test — OK
Running make install
Installing /usr/local/share/perl/5.12.4/Module/Implementation.pm
Installing /usr/local/man/man3/Module::Implementation.3pm
Appending installation info to /usr/local/lib/perl/5.12.4/perllocal.pod
DROLSKY/Module-Implementation-0.06.tar.gz
/usr/bin/make install — OK
Running Build for D/DR/DROLSKY/Params-Validate-1.07.tar.gz
Has already been unwrapped into directory /home/drmadmin/.cpan/build/Params-Validate-1.07-ag8vW1
CPAN.pm: Going to build D/DR/DROLSKY/Params-Validate-1.07.tar.gz
Building Params-Validate
cc -Ic -I/usr/lib/perl/5.12/CORE -DXS_VERSION=“1.07″ -DVERSION=“1.07″ -fPIC -c -D_REENTRANT -D_GNU_SOURCE -DDEBIAN -fno-strict-aliasing -pipe -fstack-protector -I/usr/local/include -D_LARGEFILE_SOURCE -D_FILE_OFFSET_BITS=64 -O2 -g -o lib/Params/Validate/XS.o lib/Params/Validate/XS.c
ExtUtils::Mkbootstrap::Mkbootstrap(‚blib/arch/auto/Params/Validate/XS/XS.bs‘)
cc -shared -O2 -g -L/usr/local/lib -fstack-protector -o blib/arch/auto/Params/Validate/XS/XS.so lib/Params/Validate/XS.o
DROLSKY/Params-Validate-1.07.tar.gz
./Build — OK
Running Build test
t/01-validate.t ……………………. ok
t/02-noop.t ……………………….. ok
t/03-attribute.t …………………… ok
t/04-defaults.t ……………………. ok
t/05-noop_default.t ………………… ok
t/06-options.t …………………….. ok
t/07-with.t ……………………….. ok
t/08-noop_with.t …………………… ok
t/09-regex.t ………………………. ok
t/10-noop_regex.t ………………….. ok
t/11-cb.t …………………………. ok
t/12-noop_cb.t …………………….. ok
t/13-taint.t ………………………. ok
t/14-no_validate.t …………………. ok
t/15-case.t ……………………….. ok
t/16-normalize.t …………………… ok
t/17-callbacks.t …………………… ok
t/18-depends.t …………………….. ok
t/19-untaint.t …………………….. skipped: These tests require Test::Taint 0.02+ to run
t/21-can.t ………………………… ok
t/22-overload-can-bug.t …………….. ok
t/23-readonly.t ……………………. skipped: Need Readonly::XS and Readonly for this test
t/24-tied.t ……………………….. ok
t/25-undef-regex.t …………………. ok
t/26-isa.t ………………………… ok
t/27-string-as-type.t ………………. ok
t/28-readonly-return.t ……………… ok
t/29-taint-mode.t ………………….. skipped: This test is flaky
t/30-hashref-alteration.t …………… ok
t/31-incorrect-spelling.t …………… skipped: Spec validation is disabled for now
t/32-regex-as-value.t ………………. ok
t/33-keep-errsv.t ………………….. ok
t/34-recursive-validation.t …………. ok
t/release-cpan-changes.t ……………. skipped: these tests are for release candidate testing
t/release-eol.t ……………………. skipped: these tests are for release candidate testing
t/release-no-tabs.t ………………… skipped: these tests are for release candidate testing
t/release-pod-coverage.t ……………. skipped: these tests are for release candidate testing
t/release-pod-linkcheck.t …………… skipped: these tests are for release candidate testing
t/release-pod-no404s.t ……………… skipped: these tests are for release candidate testing
t/release-pod-spell.t ………………. skipped: these tests are for release candidate testing
t/release-pod-syntax.t ……………… skipped: these tests are for release candidate testing
t/release-pp-01-validate.t ………….. skipped: these tests are for testing by the release
t/release-pp-02-noop.t ……………… skipped: these tests are for testing by the release
t/release-pp-03-attribute.t …………. skipped: these tests are for testing by the release
t/release-pp-04-defaults.t ………….. skipped: these tests are for testing by the release
t/release-pp-05-noop_default.t ………. skipped: these tests are for testing by the release
t/release-pp-06-options.t …………… skipped: these tests are for testing by the release
t/release-pp-07-with.t ……………… skipped: these tests are for testing by the release
t/release-pp-08-noop_with.t …………. skipped: these tests are for testing by the release
t/release-pp-09-regex.t …………….. skipped: these tests are for testing by the release
t/release-pp-10-noop_regex.t ………… skipped: these tests are for testing by the release
t/release-pp-11-cb.t ……………….. skipped: these tests are for testing by the release
t/release-pp-12-noop_cb.t …………… skipped: these tests are for testing by the release
t/release-pp-13-taint.t …………….. skipped: these tests are for testing by the release
t/release-pp-14-no_validate.t ……….. skipped: these tests are for testing by the release
t/release-pp-15-case.t ……………… skipped: these tests are for testing by the release
t/release-pp-16-normalize.t …………. skipped: these tests are for testing by the release
t/release-pp-17-callbacks.t …………. skipped: these tests are for testing by the release
t/release-pp-18-depends.t …………… skipped: these tests are for testing by the release
t/release-pp-19-untaint.t …………… skipped: these tests are for testing by the release
t/release-pp-21-can.t ………………. skipped: these tests are for testing by the release
t/release-pp-22-overload-can-bug.t …… skipped: these tests are for testing by the release
t/release-pp-23-readonly.t ………….. skipped: these tests are for testing by the release
t/release-pp-24-tied.t ……………… skipped: these tests are for testing by the release
t/release-pp-25-undef-regex.t ……….. skipped: these tests are for testing by the release
t/release-pp-26-isa.t ………………. skipped: these tests are for testing by the release
t/release-pp-27-string-as-type.t …….. skipped: these tests are for testing by the release
t/release-pp-28-readonly-return.t ……. skipped: these tests are for testing by the release
t/release-pp-29-taint-mode.t ………… skipped: these tests are for testing by the release
t/release-pp-30-hashref-alteration.t …. skipped: these tests are for testing by the release
t/release-pp-31-incorrect-spelling.t …. skipped: these tests are for testing by the release
t/release-pp-32-regex-as-value.t …….. skipped: these tests are for testing by the release
t/release-pp-33-keep-errsv.t ………… skipped: these tests are for testing by the release
t/release-pp-34-recursive-validation.t .. skipped: these tests are for testing by the release
t/release-pp-is-loaded.t ……………. skipped: these tests are for release candidate testing
t/release-xs-is-loaded.t ……………. skipped: these tests are for release candidate testing
t/release-xs-segfault.t …………….. skipped: these tests are for release candidate testing
All tests successful.
Test Summary Report
——————-
t/34-recursive-validation.t (Wstat: 0 Tests: 1 Failed: 0)
TODO passed: 1
Files=77, Tests=502, 4 wallclock secs ( 0.33 usr 0.12 sys + 2.46 cusr 0.36 csys = 3.27 CPU)
Result: PASS
DROLSKY/Params-Validate-1.07.tar.gz
./Build test — OK
Running Build install
Building Params-Validate
Files found in blib/arch: installing files in blib/lib into architecture dependent library tree
Installing /usr/local/lib/perl/5.12.4/auto/Params/Validate/XS/XS.so
Installing /usr/local/lib/perl/5.12.4/auto/Params/Validate/XS/XS.bs
Installing /usr/local/lib/perl/5.12.4/Params/ValidateXS.pm
Installing /usr/local/lib/perl/5.12.4/Params/ValidatePP.pm
Installing /usr/local/lib/perl/5.12.4/Params/Validate.pm
Installing /usr/local/lib/perl/5.12.4/Params/Validate/PP.pm
Installing /usr/local/lib/perl/5.12.4/Params/Validate/XS.pm
Installing /usr/local/lib/perl/5.12.4/Params/Validate/Constants.pm
Installing /usr/local/lib/perl/5.12.4/Attribute/Params/Validate.pm
Installing /usr/local/man/man3/Attribute::Params::Validate.3pm
Installing /usr/local/man/man3/Params::Validate.3pm
DROLSKY/Params-Validate-1.07.tar.gz
./Build install — OK
Running install for module ‚Math::Calc::Units‘
Running make for S/SF/SFINK/Math-Calc-Units-1.07.tar.gz
Checksum for /home/drmadmin/.cpan/sources/authors/id/S/SF/SFINK/Math-Calc-Units-1.07.tar.gz ok
CPAN.pm: Going to build S/SF/SFINK/Math-Calc-Units-1.07.tar.gz
Checking if your kit is complete…
Looks good
Writing Makefile for Math::Calc::Units
cp Units/Convert/Byte.pm blib/lib/Math/Calc/Units/Convert/Byte.pm
cp Units/Convert/Multi.pm blib/lib/Math/Calc/Units/Convert/Multi.pm
cp Units/Convert/Combo.pm blib/lib/Math/Calc/Units/Convert/Combo.pm
cp Units/Grammar.y blib/lib/Math/Calc/Units/Grammar.y
cp Units/Convert/Metric.pm blib/lib/Math/Calc/Units/Convert/Metric.pm
cp Units/Grammar.pm blib/lib/Math/Calc/Units/Grammar.pm
cp Units/Convert/Date.pm blib/lib/Math/Calc/Units/Convert/Date.pm
cp Units/Convert.pm blib/lib/Math/Calc/Units/Convert.pm
cp Units/Convert/Base2Metric.pm blib/lib/Math/Calc/Units/Convert/Base2Metric.pm
cp Units/Rank.pm blib/lib/Math/Calc/Units/Rank.pm
cp Units/Convert/Base.pm blib/lib/Math/Calc/Units/Convert/Base.pm
cp Units/Convert/Distance.pm blib/lib/Math/Calc/Units/Convert/Distance.pm
cp Units/Compute.pm blib/lib/Math/Calc/Units/Compute.pm
cp Units.pm blib/lib/Math/Calc/Units.pm
cp Units/Convert/Time.pm blib/lib/Math/Calc/Units/Convert/Time.pm
cp script/ucalc blib/script/ucalc
/usr/bin/perl -MExtUtils::MY -e ‚MY->fixin(shift)‘ — blib/script/ucalc
Manifying blib/man3/Math::Calc::Units.3pm
SFINK/Math-Calc-Units-1.07.tar.gz
/usr/bin/make — OK
Running make test
PERL_DL_NONLAZY=1 /usr/bin/perl „-MExtUtils::Command::MM“ „-e“ „test_harness(0, ‚blib/lib‘, ‚blib/arch‘)“ t/*.t
t/main.t .. ok
t/pod.t … skipped: Test::Pod 1.00 required for testing POD
All tests successful.
Files=2, Tests=64, 0 wallclock secs ( 0.04 usr 0.00 sys + 0.13 cusr 0.01 csys = 0.18 CPU)
Result: PASS
SFINK/Math-Calc-Units-1.07.tar.gz
/usr/bin/make test — OK
Running make install
Installing /usr/local/share/perl/5.12.4/Math/Calc/Units.pm
Installing /usr/local/share/perl/5.12.4/Math/Calc/Units/Compute.pm
Installing /usr/local/share/perl/5.12.4/Math/Calc/Units/Rank.pm
Installing /usr/local/share/perl/5.12.4/Math/Calc/Units/Grammar.pm
Installing /usr/local/share/perl/5.12.4/Math/Calc/Units/Convert.pm
Installing /usr/local/share/perl/5.12.4/Math/Calc/Units/Grammar.y
Installing /usr/local/share/perl/5.12.4/Math/Calc/Units/Convert/Date.pm
Installing /usr/local/share/perl/5.12.4/Math/Calc/Units/Convert/Byte.pm
Installing /usr/local/share/perl/5.12.4/Math/Calc/Units/Convert/Base.pm
Installing /usr/local/share/perl/5.12.4/Math/Calc/Units/Convert/Distance.pm
Installing /usr/local/share/perl/5.12.4/Math/Calc/Units/Convert/Base2Metric.pm
Installing /usr/local/share/perl/5.12.4/Math/Calc/Units/Convert/Time.pm
Installing /usr/local/share/perl/5.12.4/Math/Calc/Units/Convert/Multi.pm
Installing /usr/local/share/perl/5.12.4/Math/Calc/Units/Convert/Combo.pm
Installing /usr/local/share/perl/5.12.4/Math/Calc/Units/Convert/Metric.pm
Installing /usr/local/man/man3/Math::Calc::Units.3pm
Appending installation info to /usr/local/lib/perl/5.12.4/perllocal.pod
SFINK/Math-Calc-Units-1.07.tar.gz
/usr/bin/make install — OK
Running install for module ‚Config::Tiny‘
Running make for A/AD/ADAMK/Config-Tiny-2.14.tar.gz
Checksum for /home/drmadmin/.cpan/sources/authors/id/A/AD/ADAMK/Config-Tiny-2.14.tar.gz ok
CPAN.pm: Going to build A/AD/ADAMK/Config-Tiny-2.14.tar.gz
Checking if your kit is complete…
Looks good
Writing Makefile for Config::Tiny
cp lib/Config/Tiny.pm blib/lib/Config/Tiny.pm
Manifying blib/man3/Config::Tiny.3pm
ADAMK/Config-Tiny-2.14.tar.gz
/usr/bin/make — OK
Running make test
PERL_DL_NONLAZY=1 /usr/bin/perl „-MExtUtils::Command::MM“ „-e“ „test_harness(0, ‚blib/lib‘, ‚blib/arch‘)“ t/*.t
t/01_compile.t .. ok
t/02_main.t ….. ok
All tests successful.
Files=2, Tests=34, 0 wallclock secs ( 0.02 usr 0.01 sys + 0.06 cusr 0.01 csys = 0.10 CPU)
Result: PASS
ADAMK/Config-Tiny-2.14.tar.gz
/usr/bin/make test — OK
Running make install
Installing /usr/local/share/perl/5.12.4/Config/Tiny.pm
Installing /usr/local/man/man3/Config::Tiny.3pm
Appending installation info to /usr/local/lib/perl/5.12.4/perllocal.pod
ADAMK/Config-Tiny-2.14.tar.gz
/usr/bin/make install — OK
Running make for T/TO/TONVOON/Nagios-Plugin-0.36.tar.gz
Has already been unwrapped into directory /home/drmadmin/.cpan/build/Nagios-Plugin-0.36-HwusWi
CPAN.pm: Going to build T/TO/TONVOON/Nagios-Plugin-0.36.tar.gz
cp lib/Nagios/Plugin/ExitResult.pm blib/lib/Nagios/Plugin/ExitResult.pm
cp lib/Nagios/Plugin/Functions.pm blib/lib/Nagios/Plugin/Functions.pm
cp lib/Nagios/Plugin/Threshold.pm blib/lib/Nagios/Plugin/Threshold.pm
cp lib/Nagios/Plugin/Range.pm blib/lib/Nagios/Plugin/Range.pm
cp lib/Nagios/Plugin/Getopt.pm blib/lib/Nagios/Plugin/Getopt.pm
cp lib/Nagios/Plugin/Performance.pm blib/lib/Nagios/Plugin/Performance.pm
cp lib/Nagios/Plugin/Config.pm blib/lib/Nagios/Plugin/Config.pm
cp lib/Nagios/Plugin.pm blib/lib/Nagios/Plugin.pm
Manifying blib/man3/Nagios::Plugin::ExitResult.3pm
Manifying blib/man3/Nagios::Plugin::Functions.3pm
Manifying blib/man3/Nagios::Plugin::Threshold.3pm
Manifying blib/man3/Nagios::Plugin::Range.3pm
Manifying blib/man3/Nagios::Plugin::Getopt.3pm
Manifying blib/man3/Nagios::Plugin::Performance.3pm
Manifying blib/man3/Nagios::Plugin::Config.3pm
Manifying blib/man3/Nagios::Plugin.3pm
TONVOON/Nagios-Plugin-0.36.tar.gz
/usr/bin/make — OK
Running make test
PERL_DL_NONLAZY=1 /usr/bin/perl „-MExtUtils::Command::MM“ „-e“ „test_harness(0, ‚blib/lib‘, ‚blib/arch‘)“ t/*.t
t/check_stuff.t ………………. ok
t/Nagios-Plugin-01.t ………….. ok
t/Nagios-Plugin-02.t ………….. ok
t/Nagios-Plugin-03.t ………….. ok
t/Nagios-Plugin-04.t ………….. ok
t/Nagios-Plugin-Functions-01.t …. 1/113 defined(%hash) is deprecated at t/Nagios-Plugin-Functions-01.t line 22.
(Maybe you should just omit the defined()?)
t/Nagios-Plugin-Functions-01.t …. ok
t/Nagios-Plugin-Functions-02.t …. ok
t/Nagios-Plugin-Functions-03.t …. ok
t/Nagios-Plugin-Getopt-01.t ……. ok
t/Nagios-Plugin-Getopt-02.t ……. ok
t/Nagios-Plugin-Getopt-03.t ……. ok
t/Nagios-Plugin-Getopt-04.t ……. ok
t/Nagios-Plugin-Performance-02.t .. ok
t/Nagios-Plugin-Performance.t ….. ok
t/Nagios-Plugin-Range.t ……….. ok
t/Nagios-Plugin-Threshold.t ……. ok
All tests successful.
Files=16, Tests=975, 4 wallclock secs ( 0.20 usr 0.02 sys + 3.84 cusr 0.20 csys = 4.26 CPU)
Result: PASS
TONVOON/Nagios-Plugin-0.36.tar.gz
/usr/bin/make test — OK
Running make install
Installing /usr/local/share/perl/5.12.4/Nagios/Plugin.pm
Installing /usr/local/share/perl/5.12.4/Nagios/Plugin/Performance.pm
Installing /usr/local/share/perl/5.12.4/Nagios/Plugin/Functions.pm
Installing /usr/local/share/perl/5.12.4/Nagios/Plugin/Range.pm
Installing /usr/local/share/perl/5.12.4/Nagios/Plugin/Threshold.pm
Installing /usr/local/share/perl/5.12.4/Nagios/Plugin/ExitResult.pm
Installing /usr/local/share/perl/5.12.4/Nagios/Plugin/Config.pm
Installing /usr/local/share/perl/5.12.4/Nagios/Plugin/Getopt.pm
Installing /usr/local/man/man3/Nagios::Plugin.3pm
Installing /usr/local/man/man3/Nagios::Plugin::Performance.3pm
Installing /usr/local/man/man3/Nagios::Plugin::Getopt.3pm
Installing /usr/local/man/man3/Nagios::Plugin::Threshold.3pm
Installing /usr/local/man/man3/Nagios::Plugin::Range.3pm
Installing /usr/local/man/man3/Nagios::Plugin::Functions.3pm
Installing /usr/local/man/man3/Nagios::Plugin::ExitResult.3pm
Installing /usr/local/man/man3/Nagios::Plugin::Config.3pm
Appending installation info to /usr/local/lib/perl/5.12.4/perllocal.pod
TONVOON/Nagios-Plugin-0.36.tar.gz
/usr/bin/make install — OK
[/EXPAND]

cpan[3]> quit

Fertig.
Alternativ kann man auch beim Kompilieren von Nagios die Perl-Erweiterung installieren:

./configure --enable-perl-modules

Anschließend noch Make, Make Install machen.
Noch nice to know, wie man sich die bisher installierten Perl Module auflisten lassen kann:

instmodsh

Bringt die Ausgabe:

Available commands are:
l            - List all installed modules
m    - Select a module
q            - Quit the program
cmd?
At cmd? prompt type l to list all installed modules:

Mit der Eingabe von l , bekommt man nun die Ausgabe der Module:

cmd? l
Sample outputs:
Installed modules are:
Archive::Tar
CPAN
Class::Spiffy
Compress::Zlib
Cwd
Digest::SHA