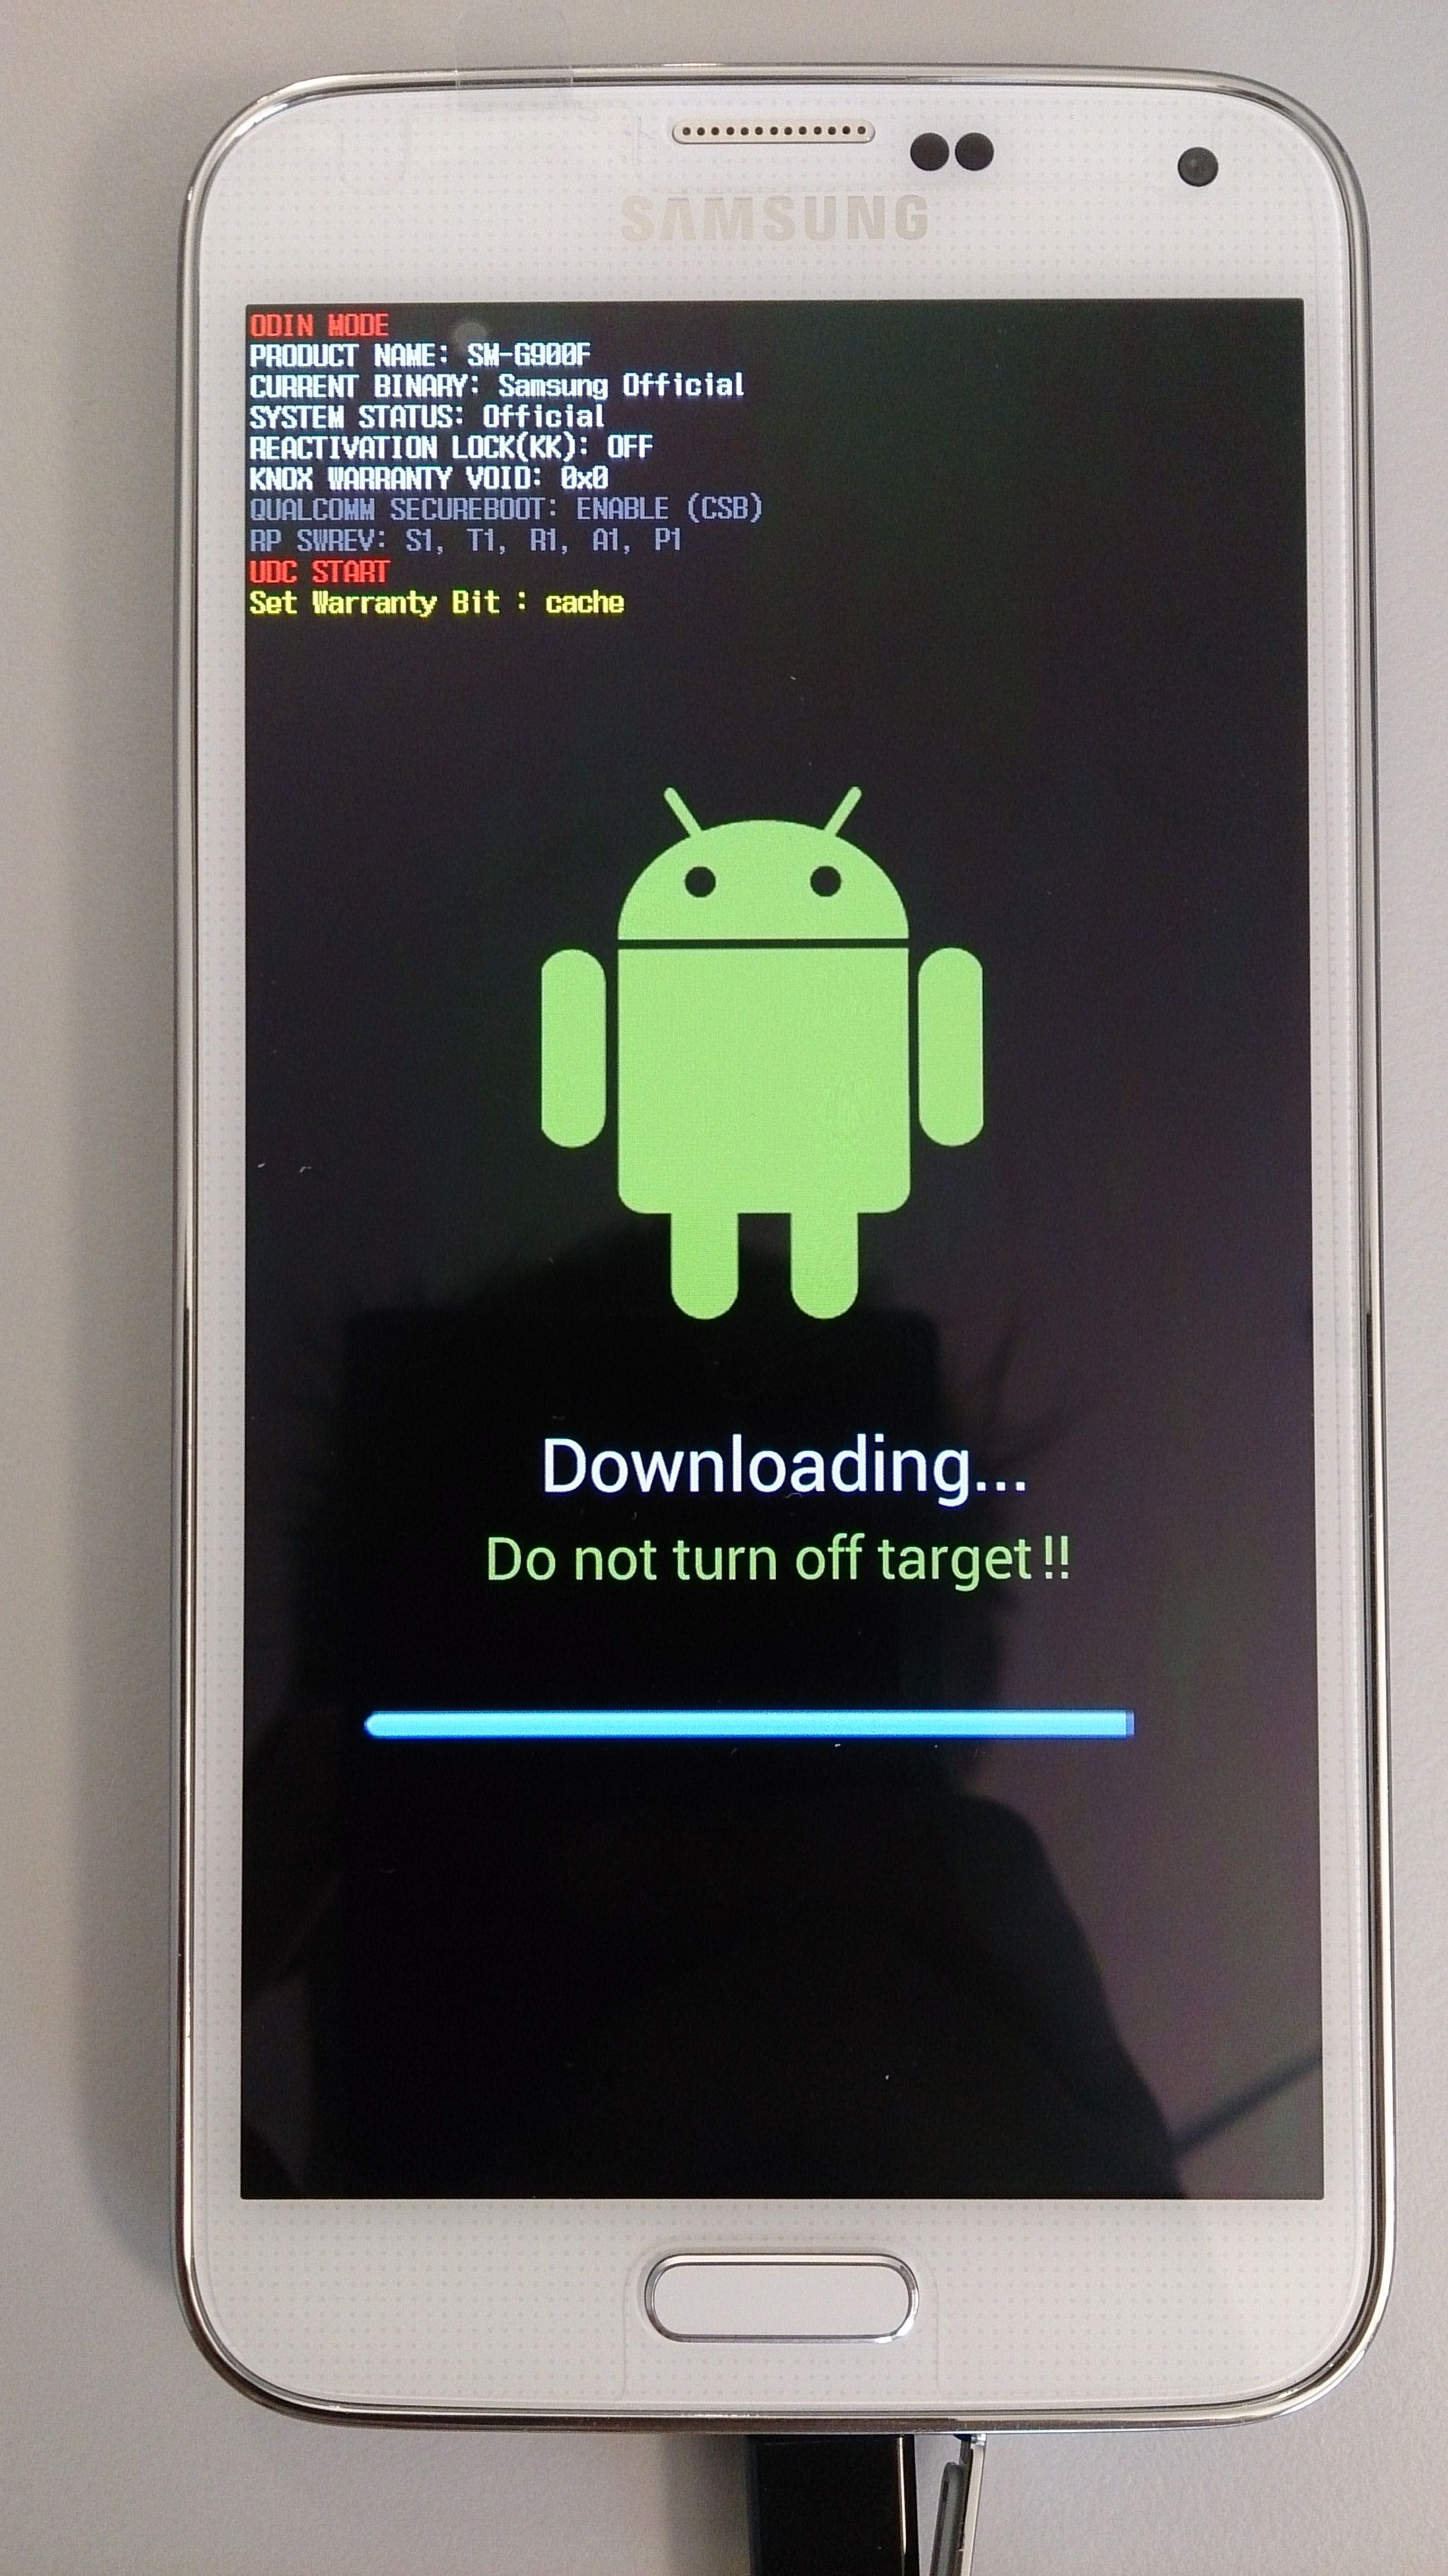
Um auch beim neusten Galaxy S5 wieder an Root Rechte zu kommen hier eine kleine Anleitung. Der ganze Prozess dauert keine 5 Minuten, sofern ihr schon die Treiber installiert habt.
Info: Durch das Prozedere wird ein Fuse-Bit gesetzt, auch bekannt als Knox-Bit wodurch der Hersteller herausbekommt, dass das Gerät verändert wurde. Dies kann unter Umständen Einflüsse auf die Garantie haben.
[stextbox id=“info“]Euer Modelltyp bekommt ihr heraus über: Einstellungen -> Geräteinformationen -> Modellnummer[/stextbox]
Ihr benötigt folgende Software/Tools:
Samsung USB-Treiber – Download hier.
CF Auto Root – bekommt ihr hier. Es gibt unterschiedliche Versionen für alle Modelle.
Odin 3.09 – bekommt ihr hier.
[stextbox id=“info“]In den Downloadmodus kommt ihr wie folgt: Handy ausschalten -> Home & Powerbutton & Leister gleichzeitig drücken.[/stextbox]
Howto Root:
1. Odin starten und auf den PDA Button klicken. Dort die entpackte CF Root Datei (.tar.md5) auswählen.
Keine anderen Einstellungen setzen. Der Hacken bei Repartition sollte NICHT gesetzt sein!
2. Handy in den Downloadmodus bringen und per USB anschließen
3. Startbutton in Odin drücken.
Nun wird ein modifiziertes Recovery geflasht und anschließend das Handy neu gestartet.
4. Fertig
Anleitung
Google Maps – Offline Karten speichern
Es geht wieder einmal in den Urlaub. Eigentlich Handyfreie Zone, doch da unser Smartphone mittlerweile ja auch Foto und Navigator ist, ist es dann wohl doch dabei.
In Zeiten von bezahlbaren Tages- oder Wochentarifen für Datenverbindungen im Ausland ist Internet im Ausland für die meisten kaum noch ein Tabu.
Doch wenn es um die Navigation geht, sprich Google Maps, oder andere Kartendienste kann man schnell viel Traffic verbrauchen.
Wer sich im Vorfeld aber schon ein paar Gedanken gemacht hat, kann sich aber die Karten des Urlaubsgebietes (oder auch von Zuhause) auch schon vorab herunterladen.
Damit wird die Karte auf der SD-Karte des Handys gespeichert und man kann so auch ohne Internet den Heimweg im Handy suchen 🙂
Wer auch so häufig Google Maps benutzt kann sich natürlich den Kartenbereich von dem heimischen Umfeld ebenfalls offline speichern. Das spart Traffic, schont euren Akku und lädt zudem auch noch schneller.
So nun viel geredet – wie geht’s ?
– Ihr öffnet Google Maps und sucht nach dem Bereich den ihr speichern möchtet. (pro Kartenbereich können maximal 80MB anfallen.)
– Anschließend gebt ihr folgendes im Suchfeld ein:
ok maps
– Der Kartenbereich wird heruntergeladen.
Diesen Vorgang kann man beliebig oft wiederholen.


Wer für längere Zeit im Ausland unterwegs ist, oder komplette Landeskarten speichern möchte – für den gibt es aber auch komfortablere Apps.
Zum Beispiel: MapsWithMe
Hier können großflächig alle Karten für X-Länder gespeichert werden.
[appbox googleplay com.mapswithme.maps]
Mein Favorit ist jedoch: City Maps 2Go Offline-Karten
[appbox googleplay com.ulmon.android.citymaps2go]
Hier lassen sich nicht nur Offline Karten speichern, sondern auch noch zusätzlich Informationen zu Restaurants, Shops, Bars, Touristen Attraktionen und zugehörige Wikipedia Artikel offline bereitstellen.
Finde ich sehr gut – als offline Reiseführer – sehr zu empfehlen….
Natürlich erspart man sich dadurch nicht den Weg zum örtlichen Touristenbüro 😉
Damit kann der nächste Urlaub ja kommen 😉 Viel Spaß!
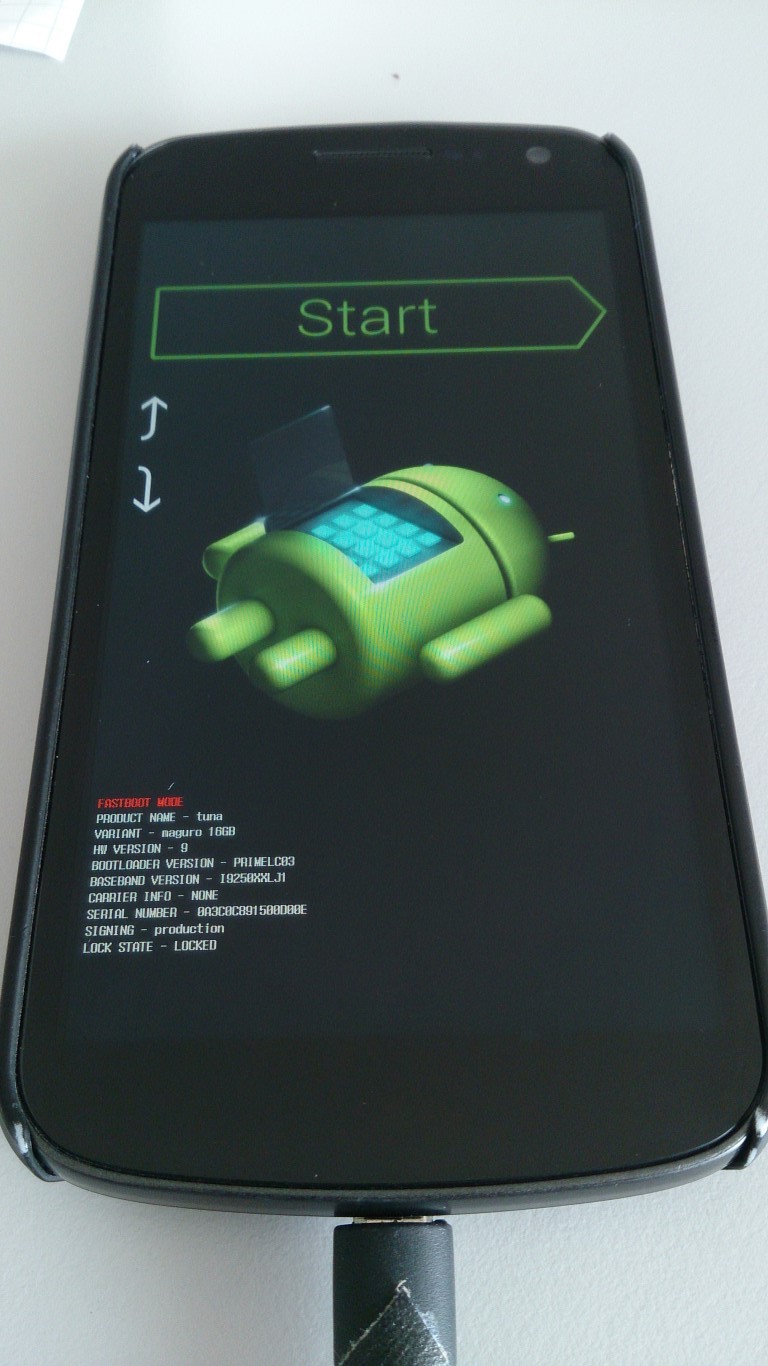
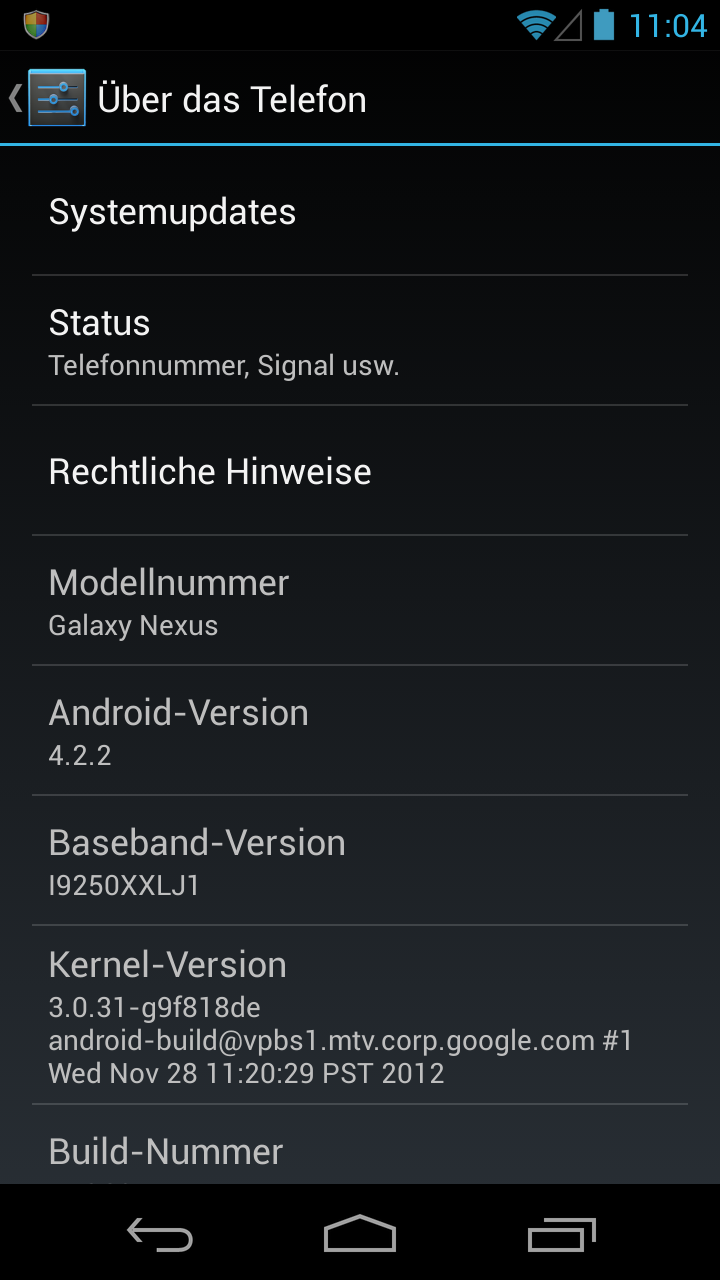
Howto: Samsung Galaxy Nexus GT-I9250 – 4.2.2 (JDQ39) rooten
 Heute mal kein Beitrag der ein Top-Aktuelles Handy betrifft, sondern schon eine etwas ältere Generation. Das Galaxy Nexus GT-I9250.
Wie rootet man das Handy mit der aktuellen Android Version 4.2.2 (JDQ39) ?
Das funktioniert in 4 groben Schritten:
1. Bootloader entsperren
2. Recovery installieren (z.B. TWRP oder CWM)
3. Super-SU / Root File via Recovery einspielen
4. Bootloader wieder sperren
Hier gibt’s ein fertiges Paket mit allen Tools / ADB / SuperSu / Recovery / Treibern: http://d-h.st/ynX
Eventuell aktuellere Versionen des TWRP Recovery’s bekommt ihr hier: openrecovery-twrp-2.6.0.0-maguro.img
Schritt 1:
Handy einschalten, USB Debugging aktivieren (In den Einstellungen – Entwickleroptionen – 7 Mal auf die Build-Nummer bei Telefoninfo klicken um die Entiwckleroptionen anzuzeigen.)
Schritt 2:
Nun vom PC aus das Handy in den Bootloader starten lassen, dazu fastboot ausführen.
adb reboot bootloader
Schritt 3:
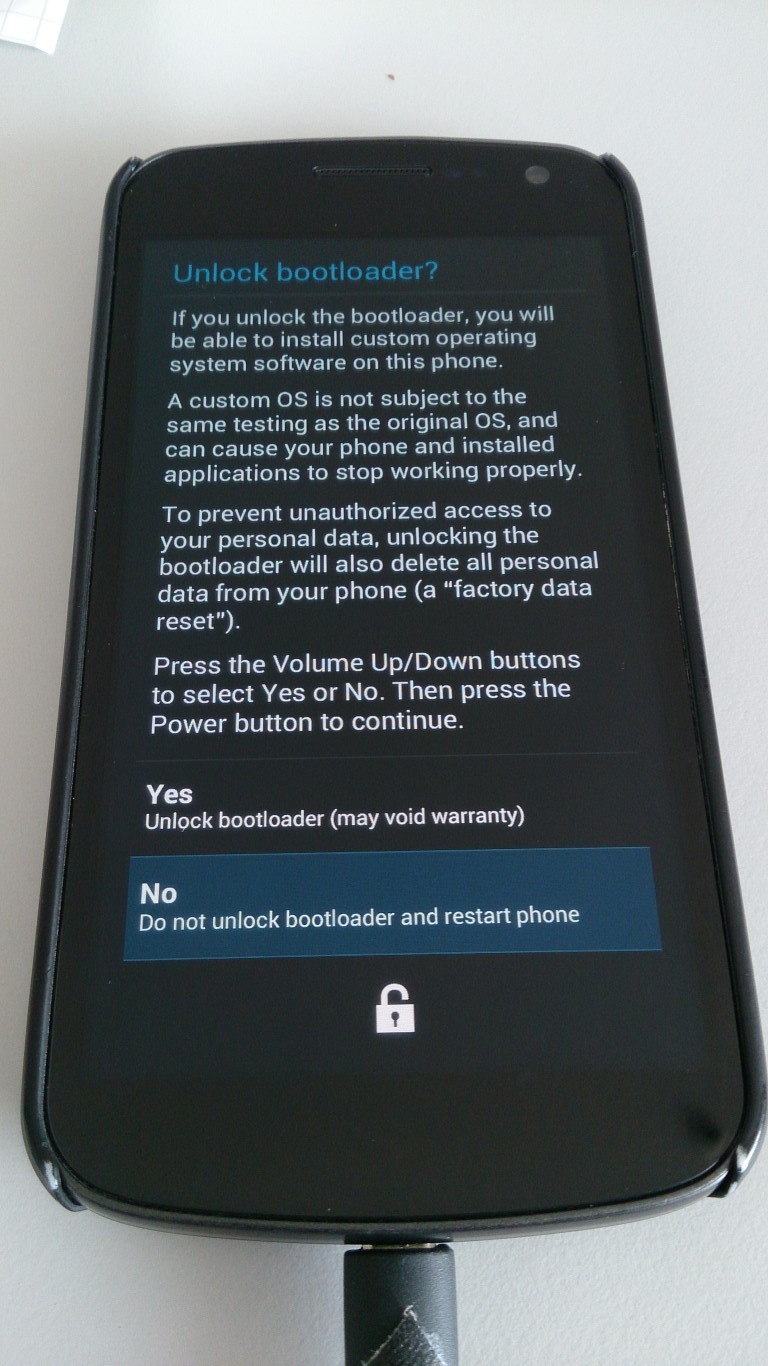
Das Handy ist nun im Bootloader – diesen müssen wir jetzt entsperren um das Recovery flashen zu können. Später sperren wir diesen auch wieder.
fastboot oem unlock
Schritt 4:
Da der Bootloader entsperrt ist können wir nun das Recovery flashen. Entweder gibt es hier TWRP oder CWM.
fastboot flash recovery openrecovery-twrp-2.6.0.0-maguro.img
Schritt 5:
Über die Laut/Leiser Taste wählen wir nun am Handy „Start Recovery“ aus sodass wir in das Recovery kommen.
Jetzt müssen wir das SuperSU File installieren um root Rechte zu bekommen. Das kann man entweder durch kopieren auf die SD-Karte flashen, oder per ADB-Sideload (komfortabler).
Dazu im TWRP unter Advanced auf „ADB-Sideload“ gehen und am PC folgendes ausführen (Pfad natürlich anpassen):
adb sideload "D:\GalaxyNexus\UPDATE-SuperSU-v1.04.zip"
Schritt 6:
So nun das Handy rebooten, und Schritt 2 wiederholen – anschließend zum Sperren des Bootloaders ausführen:
fastboot oem lock


Fertig.
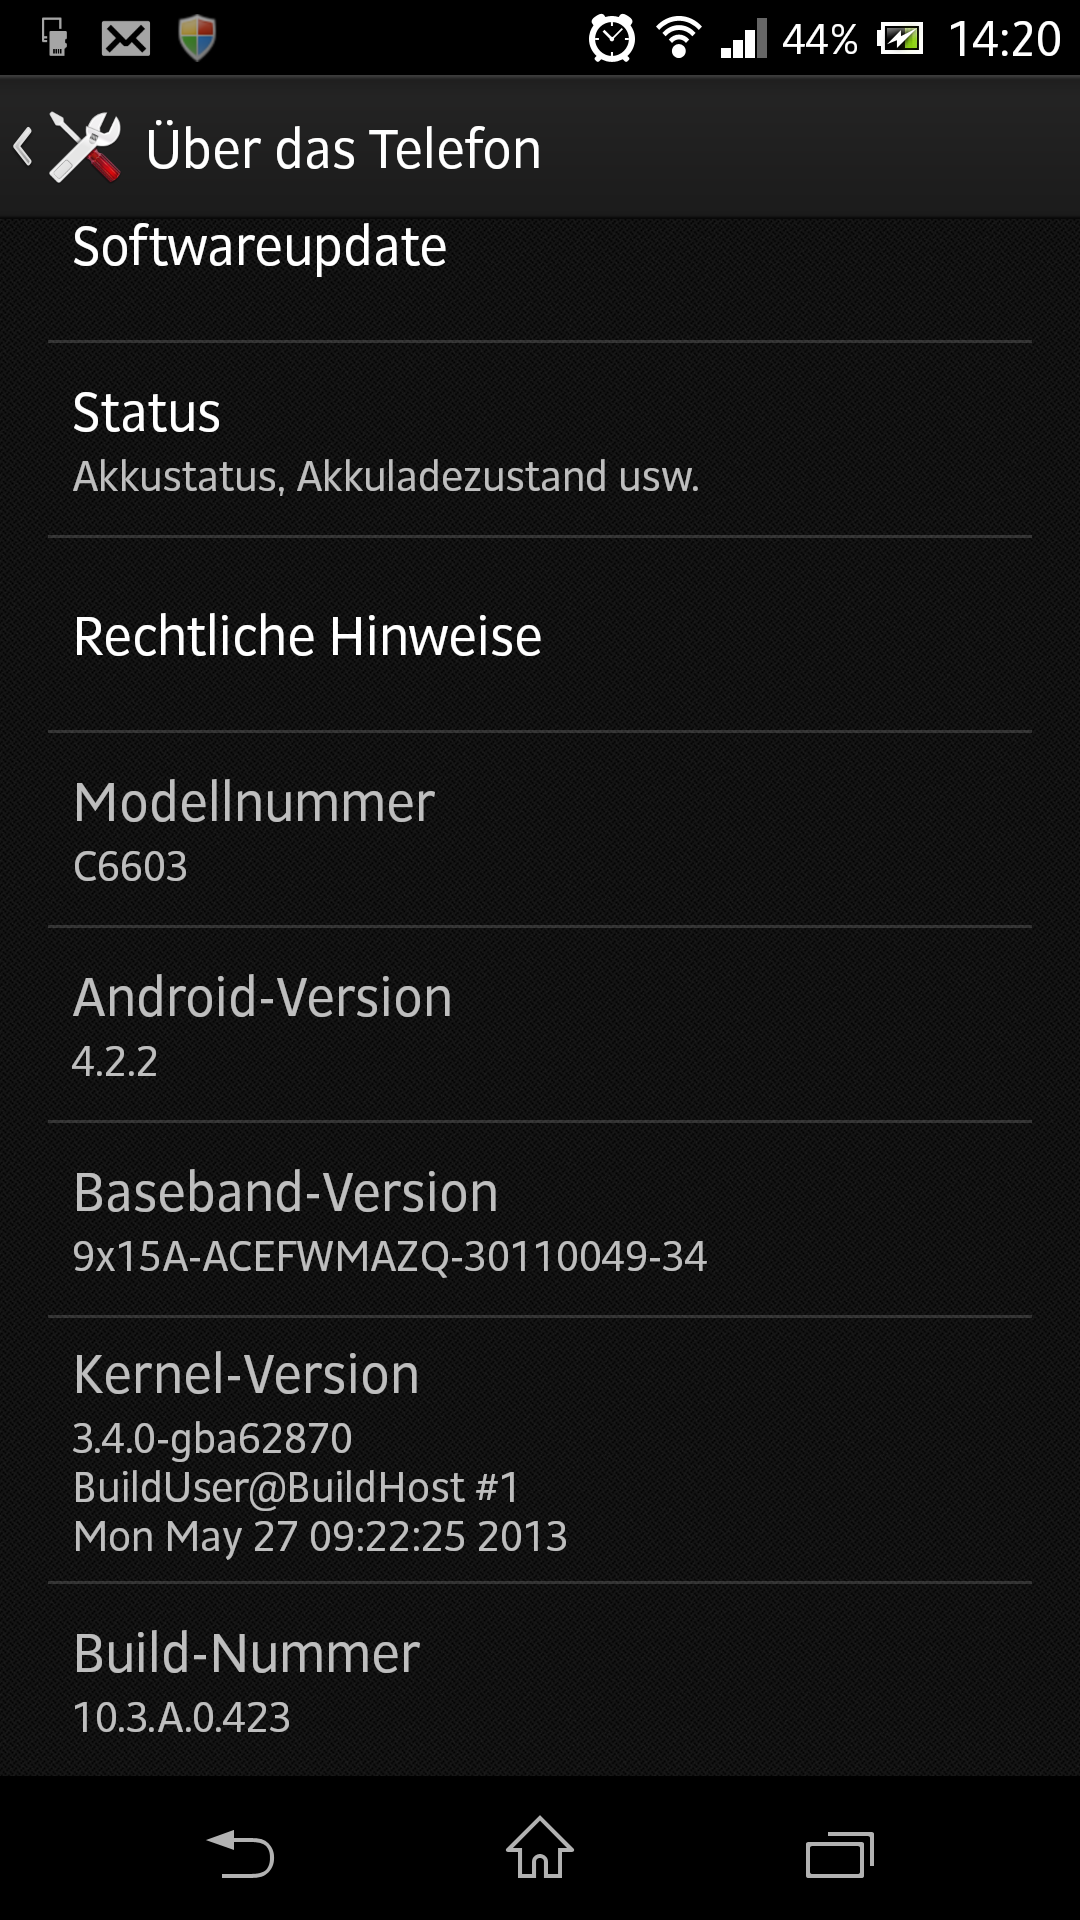
Sony Xperia Z – Android 4.2.2 verfügbar (10.3.A.0.423) *Update*
 Seit ein paar Tagen ist die aktuelle Android Version 4.2.2 für das Sony Xperia Z verfügbar – wird auch in Deutschland als OTA Update verteilt.
Für diejenigen die kein Custom Recovery installiert haben, klappt das Update auch so. Wer aber z.B. TWRP Recovery, oder CWM installiert hat, muss wahrscheinlich wie ich das Update per Hand bzw. Flashtool einspielen.
Eine komplette Übersicht über alle verschiedenen verfügbaren Versionen findet man in folgendem Thread.
Mit dem Update auf Android 4.2.2 gibt’s auch wieder ein paar Designänderungen. Zum Beispiel ist der Lockscreen und die Statusbar überarbeitet worden.
Außerdem bekommt man beim Installieren von Apps nun genauer aufgelistet, welche Rechte das App benötigt.
Weitere Änderungen:
XZ JB .423 viel flüssiger als vorherige Versionen
Kameraqualität soll verbessert sein
Kamera lädt immer noch langsam (wie vorher)
Die Screenshot Option wurde aus dem Power Menü entfernt - Jetzt muss man für einen Screenshot “Power + Volume down” drücken.
Neuer Lockscreen - Laggt etwas, braucht Zeit zum Laden
Transparente Statusbar


Zum Flashen des Updates hier eine kleine Anleitung:
IMMER das aktuellste Flashtool verwenden (momentan 0.9.11.0):
Download hier. (120MB)
Aktuelles Image: 10.3.A.0.423 / DE / Vodafone Branding
Download hier. (~770MB)
Es gibt auch Images (.ftf) Files ohne Branding – allerdings noch nicht für Deutschland. Wer unbedingt ein ungebrandetes Image haben will kann z.B. das aus Spanien benutzen „10.3.A.0.423 Generic ES unbranded“.
UPDATE: Jetzt verfügbar – Deutsch Ungebranded: Download hier (Empfehlung!)
Rest siehe in den Bildunterschriften:
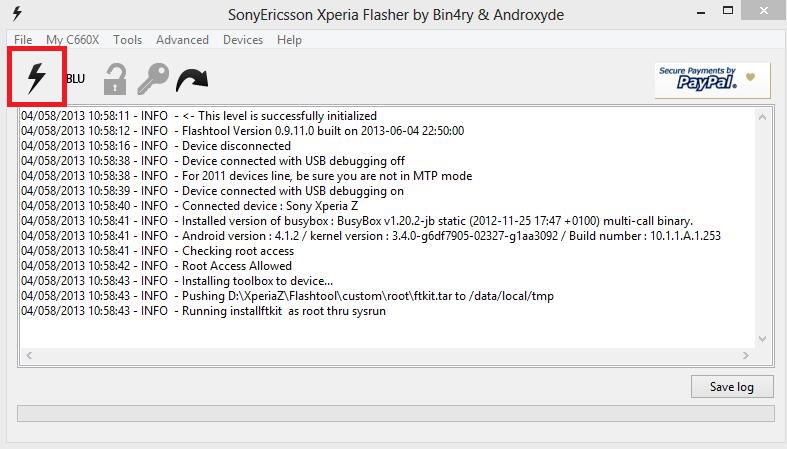

[Expand Flashtool Log]
058/2013 10:58:11 – INFO – 04/058/2013 10:58:12 – INFO – Flashtool Version 0.9.11.0 built on 2013-06-04 22:50:00
04/058/2013 10:58:16 – INFO – Device disconnected
04/058/2013 10:58:38 – INFO – Device connected with USB debugging off
04/058/2013 10:58:38 – INFO – For 2011 devices line, be sure you are not in MTP mode
04/058/2013 10:58:39 – INFO – Device connected with USB debugging on
04/058/2013 10:58:40 – INFO – Connected device : Sony Xperia Z
04/058/2013 10:58:41 – INFO – Installed version of busybox : BusyBox v1.20.2-jb static (2012-11-25 17:47 +0100) multi-call binary.
04/058/2013 10:58:41 – INFO – Android version : 4.1.2 / kernel version : 3.4.0-g6df7905-02327-g1aa3092 / Build number : 10.1.1.A.1.253
04/058/2013 10:58:41 – INFO – Checking root access
04/058/2013 10:58:42 – INFO – Root Access Allowed
04/058/2013 10:58:43 – INFO – Installing toolbox to device…
04/058/2013 10:58:43 – INFO – Pushing D:\XperiaZ\Flashtool\custom\root\ftkit.tar to /data/local/tmp
04/058/2013 10:58:43 – INFO – Running installftkit as root thru sysrun
04/001/2013 11:01:04 – INFO – Selected null
04/001/2013 11:01:04 – INFO – Flash canceled
04/005/2013 11:05:04 – INFO – Selected Sony Xperia Z C6603 / 10.3.A.0.423 / Vodafone DE
04/005/2013 11:05:04 – INFO – Preparing files for flashing
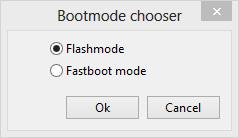
04/005/2013 11:05:54 – INFO – Please connect your device into flashmode.
04/006/2013 11:06:20 – INFO – Device disconnected
04/007/2013 11:07:12 – INFO – Device connected in flash mode
04/007/2013 11:07:12 – INFO – Opening device for R/W
04/007/2013 11:07:12 – INFO – Start Flashing
04/007/2013 11:07:13 – INFO – Processing loader
04/007/2013 11:07:13 – INFO – Checking header
04/007/2013 11:07:13 – INFO – Ending flash session
04/007/2013 11:07:13 – ERROR –
04/007/2013 11:07:13 – INFO – Device connected in flash mode
04/007/2013 11:07:13 – ERROR – Error flashing. Aborted
04/007/2013 11:07:25 – INFO – Device disconnected
04/007/2013 11:07:54 – INFO – Selected Sony Xperia Z C6603 / 10.3.A.0.423 / Vodafone DE
04/007/2013 11:07:54 – INFO – Preparing files for flashing
04/008/2013 11:08:22 – INFO – Please connect your device into flashmode.
04/008/2013 11:08:30 – INFO – Device connected in flash mode
04/008/2013 11:08:31 – INFO – Opening device for R/W
04/008/2013 11:08:31 – INFO – Reading device information
04/008/2013 11:08:31 – INFO – Phone ready for flashmode operations.
04/008/2013 11:08:31 – INFO – Current device : C6603 – CB5A1P84LG – 1270-8440_R12A – 1269-5309_10.1.1.A.1.253 – VODAFONE1-LTE_10.1.1.A.1.253
04/008/2013 11:08:31 – INFO – Start Flashing
04/008/2013 11:08:31 – INFO – Processing loader
04/008/2013 11:08:31 – INFO – Checking header
04/008/2013 11:08:31 – INFO – Flashing data
04/008/2013 11:08:32 – INFO – Loader : S1_Root_5ca3 – Version : APQ8064_39 / Bootloader status : ROOTABLE
04/008/2013 11:08:32 – INFO – Processing partition-image.sin
04/008/2013 11:08:32 – INFO – Checking header
04/008/2013 11:08:32 – INFO – Flashing data
04/008/2013 11:08:32 – INFO – Flashing preset1.ta 04/008/2013 11:08:32 – INFO – Writing TA unit : [00, 00, 08, A4, 00, 00, 00, 0E, 00, 00, 00, 00, 00, 00, 00, 00, 00, 00, 00, 00, 00, 00]
04/008/2013 11:08:32 – WARN – This file is ignored : simlock.ta
04/008/2013 11:08:32 – INFO – Processing kernel.sin
04/008/2013 11:08:32 – INFO – Checking header
04/008/2013 11:08:32 – INFO – Flashing data
04/008/2013 11:08:33 – INFO – Processing fotakernel.sin
04/008/2013 11:08:33 – INFO – Checking header
04/008/2013 11:08:33 – INFO – Flashing data
04/008/2013 11:08:35 – INFO – Processing amss_fs_3.sin
04/008/2013 11:08:35 – INFO – Checking header
04/008/2013 11:08:35 – INFO – Flashing data
04/008/2013 11:08:35 – INFO – Processing amss_fs_2.sin
04/008/2013 11:08:35 – INFO – Checking header
04/008/2013 11:08:35 – INFO – Flashing data
04/008/2013 11:08:35 – INFO – Processing amss_fs_1.sin
04/008/2013 11:08:35 – INFO – Checking header
04/008/2013 11:08:35 – INFO – Flashing data
04/008/2013 11:08:35 – INFO – Processing rpm.sin
04/008/2013 11:08:35 – INFO – Checking header
04/008/2013 11:08:35 – INFO – Flashing data
04/008/2013 11:08:35 – INFO – Processing elabel-c6603-row_201302281243_10.3.A.0.423.sin
04/008/2013 11:08:35 – INFO – Checking header
04/008/2013 11:08:35 – INFO – Flashing data
04/008/2013 11:08:39 – INFO – Processing system.sin
04/008/2013 11:08:39 – INFO – Checking header
04/008/2013 11:08:39 – INFO – Flashing data
04/011/2013 11:11:39 – INFO – Ending flash session
04/011/2013 11:11:39 – INFO – Flashing finished.
04/011/2013 11:11:39 – INFO – Please unplug and start your phone
04/011/2013 11:11:39 – INFO – For flashtool, Unknown Sources and Debugging must be checked in phone settings
04/011/2013 11:11:39 – INFO – Device connected in flash mode
04/012/2013 11:12:15 – INFO – Device disconnected
[/Expand]
Nach erfolgreichen Update muss man sich wieder root Rechte verschaffen. Das habe ich eben bereits hier beschrieben: „Sony Xperia Z – 4.2.2 rooten bei gesperrtem Bootloader“.
Sony Xperia Z – 4.2.2 rooten bei gesperrtem Bootloader
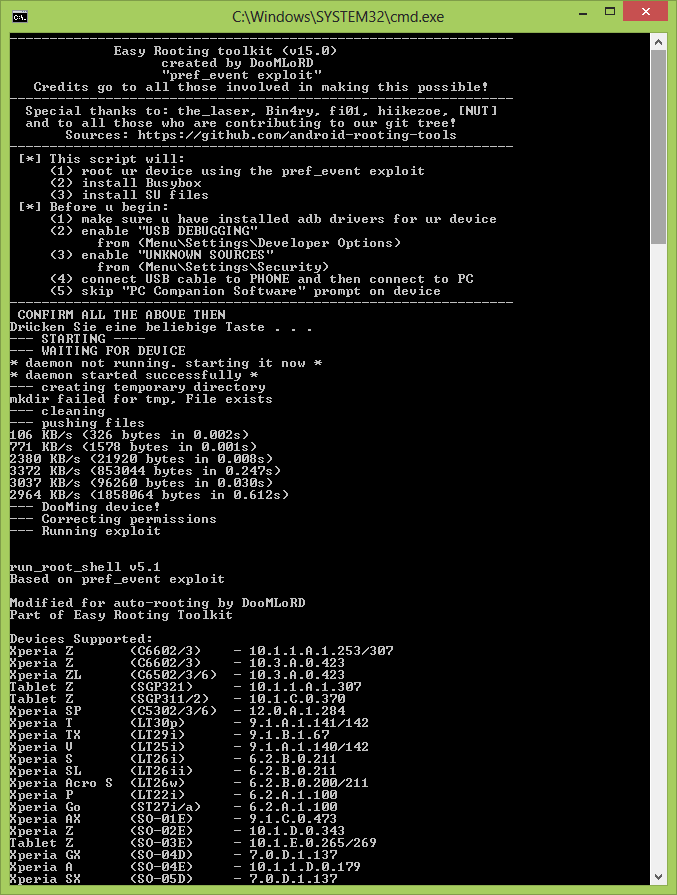
 Wer schon die seit einigen Tagen verfügbare Android Version 4.2.2 auf seinem Sony Xperia Z installiert hat und sich root Rechte verschaffen möchte kann sich an das neu verfügbare root-Toolkit „DooMLoRD Easy Rooting Toolkit (v15) {perf_event exploit}[20130624]“ halten.
Die Ausführung ist wieder super simple: USB Debugging aktivieren, Anwendungen aus „unbekannter Herkunft“ erlauben und eine Batch-Datei ausführen. Das Handy startet anschließend automatisch neu. Dauert keine Minute.
Den Download gibt es auch direkt hier.
Funktioniert bei folgenden Xperia Geräten:
- Xperia S (LT26i) {FW: 6.2.B.0.211} [v10 onwards]
- Xperia Z (C6603) {FW: 10.1.1.A.1.307} [v10 onwards]
- Xperia SP (C5302) {FW: 12.0.A.1.284} [v11 onwards]
- Xperia ZL (C6503) {FW: 10.3.A.0.423} [v12 onwards]
- Xperia Tablet Z (SGP311/2) {FW: 10.1.C.0.370} [v13 onwards]
- Xperia Tablet Z (SGP321) {FW: 10.1.1.A.1.307} [v13 onwards]
- Xperia T (LT30p) {FW: 9.1.A.1.141} [v13 onwards]
- Xperia Acro S (LT26w) {FW: 6.2.B.0.200} [v13 onwards]
- Google Nexus 4 (JDQ39) [v14 onwards]
- LG Optimus G E975 v10e (added by wphungsuk) [v14 onwards]
- Xperia T LT30p 9.1.A.1.142 (added by the_laser) [v14 onwards]
- Xperia TX LT29i 9.1.B.1.67 (added by sj8023ld) [v14 onwards]
- Xperia TX LT29i 9.1.B.0.411 (added by fi01) [v14 onwards]
- Xperia V LT25i 9.1.A.1.140 (added by the_laser) [v14 onwards]
- Xperia V LT25i 9.1.A.1.142 (added by the_laser) [v14 onwards]
- Xperia Acro S LT26w 6.2.B.0.211 (added by DooMLoRD, untested) [v14 onwards]
- Xperia SL LT26ii 6.2.B.0.211 (added by the_laser) [v14 onwards]
- Xperia P LT22i 6.2.A.1.100 (added by the_laser) [v14 onwards]
- Xperia Go ST27i 6.2.A.1.100 (added by the_laser) [v14 onwards]
- Xperia Go ST27a 6.2.A.1.100 (added by DooMLoRD, untested) [v14 onwards]
- Xperia AX SO-01E 9.1.C.0.473 (added by fi01) [v14 onwards]
- Xperia Z SO-02E 10.1.D.0.343 (added by fi01) [v14 onwards]
- Tablet Z SO-03E 10.1.E.0.265/269(added by fi01) [v14 onwards]
- Xperia GX SO-04D 7.0.D.1.137 (added by fi01) [v14 onwards]
- Xperia A SO-04E 10.1.1.D.0.179 (added by fi01) [v14 onwards]
- Xperia SX SO-05D 7.0.D.1.137 (added by fi01) [v14 onwards]
- Xperia VL SOL21 9.1.D.0.395 (added by fi01) [v14 onwards]
- Xperia UL SOL22 10.2.F.3.43 (added by fi01) [v14 onwards]
- Xperia Z (C6602/3) 10.3.A.0.423 [v15 onwards]
Die Durchführung sah bei mir wie folgt aus:

VMware SSL Certificate Automation Tool – fails at vCenter Server
Früher setzte VMware noch mehr auf selbst erstellte Zertifikate zur Absicherung der vielen verschiedenen Serverdiensten. Doch mittlerweile ist für viele wie z.B. VMware Horizon View ein von einer Zertifizierungsstelle erzeugtes Zertifikat notwendig. Fängt man einmal mit dem Signieren an kommt man auch nicht mehr groß um die anderen Dienste herum. ESXi Server, vCenter Server, SSO Server, Update Manager, Inventory Dienst, Site Recovery Manager und noch viele mehr können bzw. müssen dementsprechend auch mit eigenen Zertifikaten versorgt werden.
Um dem Chaos etwas entgegen zu wirken hat VMware ein kleines Kommandozeilentool veröffentlicht – das VMware SSL Certificate Automation Tool. Momentan in der Version 1.0.1 bei VMware verfügbar.

Beim Updaten des vCenter Server Zertifikats bin ich auf folgenden Fehler gestoßen:
[19.06.2013 - 10:48:11,31]: ""Cannot reload the vCenter Server SSL certificates. The certificate might not be unique.""
[19.06.2013 - 10:48:11,31]: Deleting the new certificates and keys...
[19.06.2013 - 10:48:11,33]: Restoring the original certificates and keys...
1 file(s) copied.
1 file(s) copied.
1 file(s) copied.
[19.06.2013 - 10:48:11,36]: The vCenter certificate update failed.
[Expand Vollständiges Log]
[19.06.2013 – 10:48:04,48]: Validating Lookup Service connection
Intializing registration provider…
Getting SSL certificates for https://server.domain.info:7444/lookupservice/sdk
Getting SSL certificates for https://server.domain.info:7444/sso-adminserver/sdk
Getting SSL certificates for https://server.domain.info:7444/ims/STSService?wsdl
Successfully created dummy service, we have sufficient privileges
Successfully deleted dummy service, we have sufficient privileges
The file C:\tool\backup\VC\ROOT_LS_SSL_CHAIN.crt already exists. Overwriting…
The file C:\tool\backup\VC\1_LS_SSL_CHAIN.crt already exists. Overwriting…
Certificates saved successfully
Return code is: Success
[19.06.2013 – 10:48:09,05]: Cleaning any temporary files
[19.06.2013 – 10:48:09,05]: Backing up the certificates and keys from „C:\ProgramData\VMware\VMware VirtualCenter\SSL…“
1 file(s) copied.
1 file(s) copied.
1 file(s) copied.
[19.06.2013 – 10:48:09,08]: Copying the new certificates and keys to „C:\ProgramData\VMware\VMware VirtualCenter\SSL…“
[19.06.2013 – 10:48:09,10]: Creating the PKCS certificate file…
Could not reload vCenter SSL Certificates
[19.06.2013 – 10:48:10,35]: „“Cannot reload the vCenter Server SSL certificates. The certificate might not be unique.““
[19.06.2013 – 10:48:10,36]: Deleting the new certificates and keys…
[19.06.2013 – 10:48:10,36]: Restoring the original certificates and keys…
1 file(s) copied.
1 file(s) copied.
1 file(s) copied.
[19.06.2013 – 10:48:10,41]: Attempting rollback…
Could not reload vCenter SSL Certificates
[19.06.2013 – 10:48:11,31]: „“Cannot reload the vCenter Server SSL certificates. The certificate might not be unique.““
[19.06.2013 – 10:48:11,31]: Deleting the new certificates and keys…
[19.06.2013 – 10:48:11,33]: Restoring the original certificates and keys…
1 file(s) copied.
1 file(s) copied.
1 file(s) copied.
[19.06.2013 – 10:48:11,36]: The vCenter certificate update failed.
[/Expand]
Bei der Ursachenforschung bin ich auf einen hilfreichen Post in der Community gestoßen. Dort wird beschrieben, dass das Problem offenbar an einer fehlerhaften Zuordnung des LookupService mit dem vCenter liegt.
Behoben werden kann der Fehler durch das einsetzen der korrekten ID des LookupService in die vpxd.cfg des vCenter Servers.
Hier die Anleitung:
Steps:
1. Stop vCenter service
2. Look for your ID in LS_ServiceID.prop in folder C:\ProgramData\VMware\VMware VirtualCenter
3. Copy this ID (e.g. {C4672589-9258-42B1-90E2-1EF268BBD402}:5 )
4. Edit your vpxd.cfg in the same folder and replace
<serviceId>vCenterService</serviceId>
with
<serviceId>your ID</serviceId>
5. Start vCenter Service
Then the SSL automation tool works!
You don't need to revert the changes.
Anschließend hat auch das Updaten des Zertifikates mittels des SSL Certificate Automation Tool geklappt.
[Expand Komplettes Logfile]
#####################################
[19.06.2013 – 11:00:22,03]: Validating Lookup Service connection
Intializing registration provider…
Getting SSL certificates for https://server.domain.info:7444/lookupservice/sdk
Getting SSL certificates for https://server.domain.info:7444/sso-adminserver/sdk
Getting SSL certificates for https://server.domain.info:7444/ims/STSService?wsdl
Successfully created dummy service, we have sufficient privileges
Successfully deleted dummy service, we have sufficient privileges
The file C:\tool\backup\VC\ROOT_LS_SSL_CHAIN.crt already exists. Overwriting…
The file C:\tool\backup\VC\1_LS_SSL_CHAIN.crt already exists. Overwriting…
Certificates saved successfully
Return code is: Success
[19.06.2013 – 11:00:26,72]: Cleaning any temporary files
[19.06.2013 – 11:00:26,75]: Backing up the certificates and keys from „C:\ProgramData\VMware\VMware VirtualCenter\SSL…“
1 file(s) copied.
1 file(s) copied.
1 file(s) copied.
[19.06.2013 – 11:00:26,77]: Copying the new certificates and keys to „C:\ProgramData\VMware\VMware VirtualCenter\SSL…“
[19.06.2013 – 11:00:26,80]: Creating the PKCS certificate file…
Successfully reloaded vCenter SSL Certificates
[19.06.2013 – 11:00:31,98]: Encrypting the password with the certificates…
—— In-memory logs start ——–
mem> 2013-06-19T11:00:32.172+02:00 [04384 info ‚Hooks‘] Hooks Initialized
—— In-memory logs end ——–
2013-06-19T11:00:32.187+02:00 [04384 info ‚Default‘] Logging uses fast path: true
2013-06-19T11:00:32.187+02:00 [04384 info ‚Default‘] Handling bora/lib logs with VmaCore facilities
2013-06-19T11:00:32.187+02:00 [04384 info ‚Default‘] Initialized channel manager
2013-06-19T11:00:32.187+02:00 [04384 info ‚Default‘] Current working directory: C:\tool
2013-06-19T11:00:32.187+02:00 [04384 info ‚Default‘] ThreadPool windowsStackImmediateCommit = true
2013-06-19T11:00:32.187+02:00 [04384 info ‚ThreadPool‘] Thread enlisted
2013-06-19T11:00:32.187+02:00 [04384 info ‚Default‘] Log path: C:\ProgramData\VMware\VMware VirtualCenter\Logs
2013-06-19T11:00:32.187+02:00 [04384 info ‚Default‘] Initializing SSL
2013-06-19T11:00:33.248+02:00 [04384 info ‚Default‘] Vmacore::InitSSL: handshakeTimeoutUs = 120000000
2013-06-19T11:00:33.248+02:00 [06172 info ‚ThreadPool‘] Thread enlisted
2013-06-19T11:00:33.264+02:00 [04384 info ‚Default‘] Reset DB password succeeded.
[19.06.2013 – 11:00:33,26]: Setup complete. Restarting services…
[19.06.2013 – 11:00:33,27]: Restarting vCenter Server…
SERVICE_NAME: vctomcat
TYPE : 10 WIN32_OWN_PROCESS
STATE : 3 STOP_PENDING
(STOPPABLE, NOT_PAUSABLE, ACCEPTS_SHUTDOWN)
WIN32_EXIT_CODE : 0 (0x0)
SERVICE_EXIT_CODE : 0 (0x0)
CHECKPOINT : 0x17
WAIT_HINT : 0x0
[19.06.2013 – 11:00:33,29]: Stopping vCenter Web Services…
[19.06.2013 – 11:00:33,31]: „“Cannot stop the vCenter Server Web Services: 1″“
STATE : 1 STOPPED
SERVICE_NAME: vpxd
TYPE : 10 WIN32_OWN_PROCESS
STATE : 3 STOP_PENDING
(STOPPABLE, NOT_PAUSABLE, ACCEPTS_SHUTDOWN)
WIN32_EXIT_CODE : 0 (0x0)
SERVICE_EXIT_CODE : 0 (0x0)
CHECKPOINT : 0x0
WAIT_HINT : 0x124f80
[19.06.2013 – 11:00:38,19]: Stopping vCenter Server…
[19.06.2013 – 11:00:38,22]: „“Cannot stop vCenter Server: 1″“
[19.06.2013 – 11:00:43,15]: „“Cannot stop vCenter Server: 1″“
[19.06.2013 – 11:00:48,19]: „“Cannot stop vCenter Server: 1″“
[19.06.2013 – 11:00:53,15]: „“Cannot stop vCenter Server: 1″“
[19.06.2013 – 11:00:58,20]: „“Cannot stop vCenter Server: 1″“
[19.06.2013 – 11:01:03,15]: „“Cannot stop vCenter Server: 1″“
[19.06.2013 – 11:01:08,19]: „“Cannot stop vCenter Server: 1″“
[19.06.2013 – 11:01:13,22]: „“Cannot stop vCenter Server: 1″“
[19.06.2013 – 11:01:18,17]: „“Cannot stop vCenter Server: 1″“
[19.06.2013 – 11:01:23,22]: „“Cannot stop vCenter Server: 1″“
[19.06.2013 – 11:01:28,18]: „“Cannot stop vCenter Server: 1″“
[19.06.2013 – 11:01:33,22]: „“Cannot stop vCenter Server: 1″“
[19.06.2013 – 11:01:38,17]: „“Cannot stop vCenter Server: 1″“
STATE : 1 STOPPED
SERVICE_NAME: vpxd
TYPE : 10 WIN32_OWN_PROCESS
STATE : 2 START_PENDING
(STOPPABLE, NOT_PAUSABLE, ACCEPTS_SHUTDOWN)
WIN32_EXIT_CODE : 0 (0x0)
SERVICE_EXIT_CODE : 0 (0x0)
CHECKPOINT : 0x0
WAIT_HINT : 0x124f80
PID : 4616
FLAGS :
[19.06.2013 – 11:01:43,36]: Starting vCenter Server…
[19.06.2013 – 11:01:43,38]: „“Cannot start vCenter Server: 1″“
[19.06.2013 – 11:01:48,14]: „“Cannot start vCenter Server: 1″“
[19.06.2013 – 11:01:53,17]: „“Cannot start vCenter Server: 1″“
STATE : 4 RUNNING
SERVICE_NAME: vctomcat
TYPE : 10 WIN32_OWN_PROCESS
STATE : 2 START_PENDING
(NOT_STOPPABLE, NOT_PAUSABLE, IGNORES_SHUTDOWN)
WIN32_EXIT_CODE : 0 (0x0)
SERVICE_EXIT_CODE : 0 (0x0)
CHECKPOINT : 0x0
WAIT_HINT : 0x7d0
PID : 6168
FLAGS :
[19.06.2013 – 11:01:58,24]: Restarting vSphere Profile-Driven Storage Service…
SERVICE_NAME: vimPBSM
TYPE : 10 WIN32_OWN_PROCESS
STATE : 3 STOP_PENDING
(STOPPABLE, NOT_PAUSABLE, ACCEPTS_SHUTDOWN)
WIN32_EXIT_CODE : 0 (0x0)
SERVICE_EXIT_CODE : 0 (0x0)
CHECKPOINT : 0x3f
WAIT_HINT : 0x0
[19.06.2013 – 11:01:58,27]: „“Cannot stop vSphere Profile-Driven Storage Service: 1″“
STATE : 1 STOPPED
SERVICE_NAME: vimPBSM
TYPE : 10 WIN32_OWN_PROCESS
STATE : 2 START_PENDING
(NOT_STOPPABLE, NOT_PAUSABLE, IGNORES_SHUTDOWN)
WIN32_EXIT_CODE : 0 (0x0)
SERVICE_EXIT_CODE : 0 (0x0)
CHECKPOINT : 0x0
WAIT_HINT : 0x7d0
PID : 4644
FLAGS :
[19.06.2013 – 11:02:03,24]: vCenter certificates updated.
[/Expand]
Howto: Asus Transformer Pad TF300T rooten bei gesperrtem Bootloader
 Wieder einmal ein kleiner Beitrag was rooten angeht. Diesmal geht’s um das Asus Transformer Pad TF300T. Meiner Meinung nach eines der besten Tablets im Moment. Würde ich eines suchen, dann wäre dies auch meine Wahl. Vor allem das Keydock – die Tastatur welche die Funktion als Cover, Dock und sogar als Zusatzakku vereint gibt es so bei keinem anderem Tablet.
Auch hier kann man sich natürlich root Rechte verschaffen – und dass auch bei gesperrtem Bootloader.
Das reicht für die meisten Anwender auch vollkommen und sichert euch auch noch die Garantie. Bei entsperrtem Bootloader kann man zwar Custom-Roms installieren hat aber in den meisten Fällen nur eingeschränkte Garantie, weil dadurch auch leichter ein Hardwareschaden zu produzieren ist.
Das rooten ist super einfach und in unter 5 Minuten erledigt.
Die Methode funktioniert bei folgenden Geräten:
TF300T - 4.1.1
TF300T - 4.2.1
TF300TG - 4.1.1
TF201
TF700 - 4.1.1
TF700 - 4.2.1
ME301T - 4.2.1 (Memo Smart Pad 10)
Nexus 7
Asus Transformer AIO P1801 B100K - 4.2.1
Schritt 1: Treiber installieren (sofern nicht vorhanden)
Die Asus Treiber könnt ihr hier herunterladen. (Quelle: XDA)
Schritt 2: USB Debugging aktivieren
Dies findet ihr in den Entwickler-Optionen. Der Menüpunkt ist allerdings versteckt, kann angezeigt werden indem ihr auf -> Einstellungen -> About / Telefoninfo geht und dort 7 mal auf die Build-Nummer klickt.
Schritt 3: Root Toolkit ausführen / run.bat
Das Rootprogramm genannt „motochopper“ bekommt ihr hier. Einfach entpacken und die run.bat ausführen. (Quelle: XDA)
Nach erfolgreichem root startet das Tablet neu und ihr habt das Superuser App „SuperSU“ installiert.
Viel Spaß damit.
Nagios::Plugin für Perl nachinstallieren
Wenn man Nagios ohne die Nagios Plugins für Perl compiliert/installiert hat, kann man diese im Nachhinein wie folgt nachinstallieren:
perl -MCPAN -e shell
[EXPAND CPAN LOG]
CPAN is the world-wide archive of perl resources. It consists of about
300 sites that all replicate the same contents around the globe. Many
countries have at least one CPAN site already. The resources found on
CPAN are easily accessible with the CPAN.pm module. If you want to use
CPAN.pm, lots of things have to be configured. Fortunately, most of
them can be determined automatically. If you prefer the automatic
configuration, answer ‚yes‘ below.
If you prefer to enter a dialog instead, you can answer ’no‘ to this
question and I’ll let you configure in small steps one thing after the
other. (Note: you can revisit this dialog anytime later by typing ‚o
conf init‘ at the cpan prompt.)
Would you like me to configure as much as possible automatically? [yes]
Autoconfigured everything but ‚urllist‘.
Now you need to choose your CPAN mirror sites. You can let me
pick mirrors for you, you can select them from a list or you
can enter them by hand.
Would you like me to automatically choose the best CPAN mirror
sites for you? (This means connecting to the Internet and could
take a couple minutes) [yes]
Trying to fetch a mirror list from the Internet
Fetching with LWP:
http://www.perl.org/CPAN/MIRRORED.BY
Searching for the best CPAN mirrors (please be patient) ……………………………………………………………………………………. done!
New urllist
ftp://mirror.netcologne.de/cpan/
ftp://ftp.hosteurope.de/pub/CPAN/
ftp://ftp.u-tx.net/CPAN/
ftp://ftp.mirror.8086.net/sites/CPAN/
ftp://mirror.checkdomain.de/CPAN/
Autoconfiguration complete.
commit: wrote ‚/etc/perl/CPAN/Config.pm‘
Terminal does not support AddHistory.
cpan shell — CPAN exploration and modules installation (v1.9456)
Enter ‚h‘ for help.
[/EXPAND]
cpan[1]> install Nagios::Plugin
[EXPAND CPAN Nagios Installation Log]
Running install for module ‚Nagios::Plugin‘
Running make for T/TO/TONVOON/Nagios-Plugin-0.36.tar.gz
Fetching with LWP:
ftp://mirror.netcologne.de/cpan/authors/id/T/TO/TONVOON/Nagios-Plugin-0.36.tar.gz
Fetching with LWP:
ftp://mirror.netcologne.de/cpan/authors/id/T/TO/TONVOON/CHECKSUMS
Checksum for /home/drmadmin/.cpan/sources/authors/id/T/TO/TONVOON/Nagios-Plugin-0.36.tar.gz ok
CPAN.pm: Going to build T/TO/TONVOON/Nagios-Plugin-0.36.tar.gz
Checking if your kit is complete…
Looks good
Warning: prerequisite Config::Tiny 0 not found.
Warning: prerequisite Math::Calc::Units 0 not found.
Warning: prerequisite Params::Validate 0 not found.
Writing Makefile for Nagios::Plugin
—- Unsatisfied dependencies detected during —-
—- TONVOON/Nagios-Plugin-0.36.tar.gz —-
Params::Validate [requires]
Math::Calc::Units [requires]
Config::Tiny [requires]
Running make test
Delayed until after prerequisites
Running make install
Delayed until after prerequisites
Running install for module ‚Params::Validate‘
Running make for D/DR/DROLSKY/Params-Validate-1.07.tar.gz
Fetching with LWP:
ftp://mirror.netcologne.de/cpan/authors/id/D/DR/DROLSKY/Params-Validate-1.07.tar.gz
Fetching with LWP:
ftp://mirror.netcologne.de/cpan/authors/id/D/DR/DROLSKY/CHECKSUMS
Checksum for /home/drmadmin/.cpan/sources/authors/id/D/DR/DROLSKY/Params-Validate-1.07.tar.gz ok
CPAN.pm: Going to build D/DR/DROLSKY/Params-Validate-1.07.tar.gz
Checking prerequisites…
requires:
! Module::Implementation is not installed
build_requires:
! Test::Fatal is not installed
ERRORS/WARNINGS FOUND IN PREREQUISITES. You may wish to install the versions
of the modules indicated above before proceeding with this installation
Creating new ‚MYMETA.yml‘ with configuration results
Creating new ‚Build‘ script for ‚Params-Validate‘ version ‚1.07‘
—- Unsatisfied dependencies detected during —-
—- DROLSKY/Params-Validate-1.07.tar.gz —-
Test::Fatal [build_requires]
Module::Implementation [requires]
Running Build test
Delayed until after prerequisites
Running Build install
Delayed until after prerequisites
Running install for module ‚Test::Fatal‘
Running make for R/RJ/RJBS/Test-Fatal-0.010.tar.gz
Fetching with LWP:
ftp://mirror.netcologne.de/cpan/authors/id/R/RJ/RJBS/Test-Fatal-0.010.tar.gz
Fetching with LWP:
ftp://mirror.netcologne.de/cpan/authors/id/R/RJ/RJBS/CHECKSUMS
Checksum for /home/drmadmin/.cpan/sources/authors/id/R/RJ/RJBS/Test-Fatal-0.010.tar.gz ok
CPAN.pm: Going to build R/RJ/RJBS/Test-Fatal-0.010.tar.gz
Checking if your kit is complete…
Looks good
Warning: prerequisite Try::Tiny 0.07 not found.
Writing Makefile for Test::Fatal
—- Unsatisfied dependencies detected during —-
—- RJBS/Test-Fatal-0.010.tar.gz —-
Try::Tiny [requires]
Running make test
Delayed until after prerequisites
Running make install
Delayed until after prerequisites
Running install for module ‚Try::Tiny‘
Running make for D/DO/DOY/Try-Tiny-0.12.tar.gz
Fetching with LWP:
ftp://mirror.netcologne.de/cpan/authors/id/D/DO/DOY/Try-Tiny-0.12.tar.gz
Fetching with LWP:
ftp://mirror.netcologne.de/cpan/authors/id/D/DO/DOY/CHECKSUMS
Checksum for /home/drmadmin/.cpan/sources/authors/id/D/DO/DOY/Try-Tiny-0.12.tar.gz ok
CPAN.pm: Going to build D/DO/DOY/Try-Tiny-0.12.tar.gz
Checking if your kit is complete…
Looks good
Writing Makefile for Try::Tiny
cp lib/Try/Tiny.pm blib/lib/Try/Tiny.pm
Manifying blib/man3/Try::Tiny.3pm
DOY/Try-Tiny-0.12.tar.gz
/usr/bin/make — OK
Running make test
PERL_DL_NONLAZY=1 /usr/bin/perl „-MExtUtils::Command::MM“ „-e“ „test_harness(0, ‚blib/lib‘, ‚blib/arch‘)“ t/*.t
t/basic.t ……. ok
t/context.t ….. ok
t/finally.t ….. ok
t/given_when.t .. ok
t/when.t …….. ok
All tests successful.
Files=5, Tests=85, 0 wallclock secs ( 0.04 usr 0.02 sys + 0.16 cusr 0.02 csys = 0.24 CPU)
Result: PASS
DOY/Try-Tiny-0.12.tar.gz
/usr/bin/make test — OK
Running make install
Installing /usr/local/share/perl/5.12.4/Try/Tiny.pm
Installing /usr/local/man/man3/Try::Tiny.3pm
Appending installation info to /usr/local/lib/perl/5.12.4/perllocal.pod
DOY/Try-Tiny-0.12.tar.gz
/usr/bin/make install — OK
Running make for R/RJ/RJBS/Test-Fatal-0.010.tar.gz
Has already been unwrapped into directory /home/drmadmin/.cpan/build/Test-Fatal-0.010-ipHhnd
CPAN.pm: Going to build R/RJ/RJBS/Test-Fatal-0.010.tar.gz
cp lib/Test/Fatal.pm blib/lib/Test/Fatal.pm
Manifying blib/man3/Test::Fatal.3pm
RJBS/Test-Fatal-0.010.tar.gz
/usr/bin/make — OK
Running make test
PERL_DL_NONLAZY=1 /usr/bin/perl „-MExtUtils::Command::MM“ „-e“ „test_harness(0, ‚blib/lib‘, ‚blib/arch‘)“ t/*.t
t/basic.t …………… ok
t/like-exception.t …… ok
t/release-pod-syntax.t .. skipped: these tests are for release candidate testing
All tests successful.
Files=3, Tests=12, 0 wallclock secs ( 0.03 usr 0.00 sys + 0.09 cusr 0.00 csys = 0.12 CPU)
Result: PASS
RJBS/Test-Fatal-0.010.tar.gz
/usr/bin/make test — OK
Running make install
Installing /usr/local/share/perl/5.12.4/Test/Fatal.pm
Installing /usr/local/man/man3/Test::Fatal.3pm
Appending installation info to /usr/local/lib/perl/5.12.4/perllocal.pod
RJBS/Test-Fatal-0.010.tar.gz
/usr/bin/make install — OK
Running install for module ‚Module::Implementation‘
Running make for D/DR/DROLSKY/Module-Implementation-0.06.tar.gz
Fetching with LWP:
ftp://mirror.netcologne.de/cpan/authors/id/D/DR/DROLSKY/Module-Implementation-0.06.tar.gz
Checksum for /home/drmadmin/.cpan/sources/authors/id/D/DR/DROLSKY/Module-Implementation-0.06.tar.gz ok
CPAN.pm: Going to build D/DR/DROLSKY/Module-Implementation-0.06.tar.gz
Checking if your kit is complete…
Looks good
Warning: prerequisite Module::Runtime 0.012 not found.
Warning: prerequisite Test::Requires 0 not found.
Writing Makefile for Module::Implementation
—- Unsatisfied dependencies detected during —-
—- DROLSKY/Module-Implementation-0.06.tar.gz —-
Test::Requires [build_requires]
Module::Runtime [requires]
Running make test
Delayed until after prerequisites
Running make install
Delayed until after prerequisites
Running install for module ‚Test::Requires‘
Running make for T/TO/TOKUHIROM/Test-Requires-0.06.tar.gz
Fetching with LWP:
ftp://mirror.netcologne.de/cpan/authors/id/T/TO/TOKUHIROM/Test-Requires-0.06.tar.gz
Fetching with LWP:
ftp://mirror.netcologne.de/cpan/authors/id/T/TO/TOKUHIROM/CHECKSUMS
Checksum for /home/drmadmin/.cpan/sources/authors/id/T/TO/TOKUHIROM/Test-Requires-0.06.tar.gz ok
CPAN.pm: Going to build T/TO/TOKUHIROM/Test-Requires-0.06.tar.gz
Checking if your kit is complete…
Looks good
Writing Makefile for Test::Requires
cp lib/Test/Requires.pm blib/lib/Test/Requires.pm
Manifying blib/man3/Test::Requires.3pm
TOKUHIROM/Test-Requires-0.06.tar.gz
/usr/bin/make — OK
Running make test
PERL_DL_NONLAZY=1 /usr/bin/perl „-MExtUtils::Command::MM“ „-e“ „test_harness(0, ‚inc‘, ‚blib/lib‘, ‚blib/arch‘)“ t/*.t
t/00_compile.t ……… ok
t/01_simple.t ………. ok
t/02_no_plan.t ……… ok
t/03_import_hashref.t .. skipped: Test requires module ‚Acme::Unknown::Missing::Module::Name‘ but it’s not found
t/04_import_array.t …. skipped: Test requires module ‚Acme::Unknown::Missing::Module::Name‘ but it’s not found
t/05_success.t ……… ok
All tests successful.
Files=6, Tests=13, 0 wallclock secs ( 0.04 usr 0.01 sys + 0.17 cusr 0.02 csys = 0.24 CPU)
Result: PASS
TOKUHIROM/Test-Requires-0.06.tar.gz
/usr/bin/make test — OK
Running make install
Installing /usr/local/share/perl/5.12.4/Test/Requires.pm
Installing /usr/local/man/man3/Test::Requires.3pm
Appending installation info to /usr/local/lib/perl/5.12.4/perllocal.pod
TOKUHIROM/Test-Requires-0.06.tar.gz
/usr/bin/make install — OK
Running install for module ‚Module::Runtime‘
Running make for Z/ZE/ZEFRAM/Module-Runtime-0.013.tar.gz
Fetching with LWP:
ftp://mirror.netcologne.de/cpan/authors/id/Z/ZE/ZEFRAM/Module-Runtime-0.013.tar.gz
Fetching with LWP:
ftp://mirror.netcologne.de/cpan/authors/id/Z/ZE/ZEFRAM/CHECKSUMS
Checksum for /home/drmadmin/.cpan/sources/authors/id/Z/ZE/ZEFRAM/Module-Runtime-0.013.tar.gz ok
CPAN.pm: Going to build Z/ZE/ZEFRAM/Module-Runtime-0.013.tar.gz
Creating new ‚MYMETA.yml‘ with configuration results
Creating new ‚Build‘ script for ‚Module-Runtime‘ version ‚0.013‘
Building Module-Runtime
ZEFRAM/Module-Runtime-0.013.tar.gz
./Build — OK
Running Build test
t/cmn.t ……….. ok
t/dependency.t …. ok
t/import_error.t .. ok
t/ivmn.t ………. ok
t/ivms.t ………. ok
t/mnf.t ……….. ok
t/pod_cvg.t ……. skipped: Test::Pod::Coverage not available
t/pod_syn.t ……. skipped: Test::Pod not available
t/rm.t ………… ok
t/taint.t ……… ok
t/um.t ………… ok
t/upo.t ……….. ok
All tests successful.
Files=12, Tests=303, 1 wallclock secs ( 0.09 usr 0.03 sys + 0.43 cusr 0.04 csys = 0.59 CPU)
Result: PASS
ZEFRAM/Module-Runtime-0.013.tar.gz
./Build test — OK
Running Build install
Building Module-Runtime
Installing /usr/local/share/perl/5.12.4/Module/Runtime.pm
Installing /usr/local/man/man3/Module::Runtime.3pm
ZEFRAM/Module-Runtime-0.013.tar.gz
./Build install — OK
Running make for D/DR/DROLSKY/Module-Implementation-0.06.tar.gz
Has already been unwrapped into directory /home/drmadmin/.cpan/build/Module-Implementation-0.06-kPJenR
CPAN.pm: Going to build D/DR/DROLSKY/Module-Implementation-0.06.tar.gz
cp lib/Module/Implementation.pm blib/lib/Module/Implementation.pm
Manifying blib/man3/Module::Implementation.3pm
DROLSKY/Module-Implementation-0.06.tar.gz
/usr/bin/make — OK
Running make test
PERL_DL_NONLAZY=1 /usr/bin/perl „-MExtUtils::Command::MM“ „-e“ „test_harness(0, ‚blib/lib‘, ‚blib/arch‘)“ t/*.t
t/basic.t ……………… ok
t/both-fail.t ………….. ok
t/env-value.t ………….. ok
t/more-symbols.t ……….. ok
t/one-impl-fails1.t …….. ok
t/one-impl-fails2.t …….. ok
t/release-cpan-changes.t … skipped: these tests are for release candidate testing
t/release-eol.t ………… skipped: these tests are for release candidate testing
t/release-no-tabs.t …….. skipped: these tests are for release candidate testing
t/release-pod-linkcheck.t .. skipped: these tests are for release candidate testing
t/release-pod-no404s.t ….. skipped: these tests are for release candidate testing
t/release-pod-spell.t …… skipped: these tests are for release candidate testing
t/release-pod-syntax.t ….. skipped: these tests are for release candidate testing
t/requested-fails.t …….. ok
t/taint.t ……………… skipped: Test requires module ‚Test::Taint‘ but it’s not found
All tests successful.
Files=15, Tests=22, 0 wallclock secs ( 0.07 usr 0.02 sys + 0.38 cusr 0.06 csys = 0.53 CPU)
Result: PASS
DROLSKY/Module-Implementation-0.06.tar.gz
/usr/bin/make test — OK
Running make install
Installing /usr/local/share/perl/5.12.4/Module/Implementation.pm
Installing /usr/local/man/man3/Module::Implementation.3pm
Appending installation info to /usr/local/lib/perl/5.12.4/perllocal.pod
DROLSKY/Module-Implementation-0.06.tar.gz
/usr/bin/make install — OK
Running Build for D/DR/DROLSKY/Params-Validate-1.07.tar.gz
Has already been unwrapped into directory /home/drmadmin/.cpan/build/Params-Validate-1.07-ag8vW1
CPAN.pm: Going to build D/DR/DROLSKY/Params-Validate-1.07.tar.gz
Building Params-Validate
cc -Ic -I/usr/lib/perl/5.12/CORE -DXS_VERSION=“1.07″ -DVERSION=“1.07″ -fPIC -c -D_REENTRANT -D_GNU_SOURCE -DDEBIAN -fno-strict-aliasing -pipe -fstack-protector -I/usr/local/include -D_LARGEFILE_SOURCE -D_FILE_OFFSET_BITS=64 -O2 -g -o lib/Params/Validate/XS.o lib/Params/Validate/XS.c
ExtUtils::Mkbootstrap::Mkbootstrap(‚blib/arch/auto/Params/Validate/XS/XS.bs‘)
cc -shared -O2 -g -L/usr/local/lib -fstack-protector -o blib/arch/auto/Params/Validate/XS/XS.so lib/Params/Validate/XS.o
DROLSKY/Params-Validate-1.07.tar.gz
./Build — OK
Running Build test
t/01-validate.t ……………………. ok
t/02-noop.t ……………………….. ok
t/03-attribute.t …………………… ok
t/04-defaults.t ……………………. ok
t/05-noop_default.t ………………… ok
t/06-options.t …………………….. ok
t/07-with.t ……………………….. ok
t/08-noop_with.t …………………… ok
t/09-regex.t ………………………. ok
t/10-noop_regex.t ………………….. ok
t/11-cb.t …………………………. ok
t/12-noop_cb.t …………………….. ok
t/13-taint.t ………………………. ok
t/14-no_validate.t …………………. ok
t/15-case.t ……………………….. ok
t/16-normalize.t …………………… ok
t/17-callbacks.t …………………… ok
t/18-depends.t …………………….. ok
t/19-untaint.t …………………….. skipped: These tests require Test::Taint 0.02+ to run
t/21-can.t ………………………… ok
t/22-overload-can-bug.t …………….. ok
t/23-readonly.t ……………………. skipped: Need Readonly::XS and Readonly for this test
t/24-tied.t ……………………….. ok
t/25-undef-regex.t …………………. ok
t/26-isa.t ………………………… ok
t/27-string-as-type.t ………………. ok
t/28-readonly-return.t ……………… ok
t/29-taint-mode.t ………………….. skipped: This test is flaky
t/30-hashref-alteration.t …………… ok
t/31-incorrect-spelling.t …………… skipped: Spec validation is disabled for now
t/32-regex-as-value.t ………………. ok
t/33-keep-errsv.t ………………….. ok
t/34-recursive-validation.t …………. ok
t/release-cpan-changes.t ……………. skipped: these tests are for release candidate testing
t/release-eol.t ……………………. skipped: these tests are for release candidate testing
t/release-no-tabs.t ………………… skipped: these tests are for release candidate testing
t/release-pod-coverage.t ……………. skipped: these tests are for release candidate testing
t/release-pod-linkcheck.t …………… skipped: these tests are for release candidate testing
t/release-pod-no404s.t ……………… skipped: these tests are for release candidate testing
t/release-pod-spell.t ………………. skipped: these tests are for release candidate testing
t/release-pod-syntax.t ……………… skipped: these tests are for release candidate testing
t/release-pp-01-validate.t ………….. skipped: these tests are for testing by the release
t/release-pp-02-noop.t ……………… skipped: these tests are for testing by the release
t/release-pp-03-attribute.t …………. skipped: these tests are for testing by the release
t/release-pp-04-defaults.t ………….. skipped: these tests are for testing by the release
t/release-pp-05-noop_default.t ………. skipped: these tests are for testing by the release
t/release-pp-06-options.t …………… skipped: these tests are for testing by the release
t/release-pp-07-with.t ……………… skipped: these tests are for testing by the release
t/release-pp-08-noop_with.t …………. skipped: these tests are for testing by the release
t/release-pp-09-regex.t …………….. skipped: these tests are for testing by the release
t/release-pp-10-noop_regex.t ………… skipped: these tests are for testing by the release
t/release-pp-11-cb.t ……………….. skipped: these tests are for testing by the release
t/release-pp-12-noop_cb.t …………… skipped: these tests are for testing by the release
t/release-pp-13-taint.t …………….. skipped: these tests are for testing by the release
t/release-pp-14-no_validate.t ……….. skipped: these tests are for testing by the release
t/release-pp-15-case.t ……………… skipped: these tests are for testing by the release
t/release-pp-16-normalize.t …………. skipped: these tests are for testing by the release
t/release-pp-17-callbacks.t …………. skipped: these tests are for testing by the release
t/release-pp-18-depends.t …………… skipped: these tests are for testing by the release
t/release-pp-19-untaint.t …………… skipped: these tests are for testing by the release
t/release-pp-21-can.t ………………. skipped: these tests are for testing by the release
t/release-pp-22-overload-can-bug.t …… skipped: these tests are for testing by the release
t/release-pp-23-readonly.t ………….. skipped: these tests are for testing by the release
t/release-pp-24-tied.t ……………… skipped: these tests are for testing by the release
t/release-pp-25-undef-regex.t ……….. skipped: these tests are for testing by the release
t/release-pp-26-isa.t ………………. skipped: these tests are for testing by the release
t/release-pp-27-string-as-type.t …….. skipped: these tests are for testing by the release
t/release-pp-28-readonly-return.t ……. skipped: these tests are for testing by the release
t/release-pp-29-taint-mode.t ………… skipped: these tests are for testing by the release
t/release-pp-30-hashref-alteration.t …. skipped: these tests are for testing by the release
t/release-pp-31-incorrect-spelling.t …. skipped: these tests are for testing by the release
t/release-pp-32-regex-as-value.t …….. skipped: these tests are for testing by the release
t/release-pp-33-keep-errsv.t ………… skipped: these tests are for testing by the release
t/release-pp-34-recursive-validation.t .. skipped: these tests are for testing by the release
t/release-pp-is-loaded.t ……………. skipped: these tests are for release candidate testing
t/release-xs-is-loaded.t ……………. skipped: these tests are for release candidate testing
t/release-xs-segfault.t …………….. skipped: these tests are for release candidate testing
All tests successful.
Test Summary Report
——————-
t/34-recursive-validation.t (Wstat: 0 Tests: 1 Failed: 0)
TODO passed: 1
Files=77, Tests=502, 4 wallclock secs ( 0.33 usr 0.12 sys + 2.46 cusr 0.36 csys = 3.27 CPU)
Result: PASS
DROLSKY/Params-Validate-1.07.tar.gz
./Build test — OK
Running Build install
Building Params-Validate
Files found in blib/arch: installing files in blib/lib into architecture dependent library tree
Installing /usr/local/lib/perl/5.12.4/auto/Params/Validate/XS/XS.so
Installing /usr/local/lib/perl/5.12.4/auto/Params/Validate/XS/XS.bs
Installing /usr/local/lib/perl/5.12.4/Params/ValidateXS.pm
Installing /usr/local/lib/perl/5.12.4/Params/ValidatePP.pm
Installing /usr/local/lib/perl/5.12.4/Params/Validate.pm
Installing /usr/local/lib/perl/5.12.4/Params/Validate/PP.pm
Installing /usr/local/lib/perl/5.12.4/Params/Validate/XS.pm
Installing /usr/local/lib/perl/5.12.4/Params/Validate/Constants.pm
Installing /usr/local/lib/perl/5.12.4/Attribute/Params/Validate.pm
Installing /usr/local/man/man3/Attribute::Params::Validate.3pm
Installing /usr/local/man/man3/Params::Validate.3pm
DROLSKY/Params-Validate-1.07.tar.gz
./Build install — OK
Running install for module ‚Math::Calc::Units‘
Running make for S/SF/SFINK/Math-Calc-Units-1.07.tar.gz
Checksum for /home/drmadmin/.cpan/sources/authors/id/S/SF/SFINK/Math-Calc-Units-1.07.tar.gz ok
CPAN.pm: Going to build S/SF/SFINK/Math-Calc-Units-1.07.tar.gz
Checking if your kit is complete…
Looks good
Writing Makefile for Math::Calc::Units
cp Units/Convert/Byte.pm blib/lib/Math/Calc/Units/Convert/Byte.pm
cp Units/Convert/Multi.pm blib/lib/Math/Calc/Units/Convert/Multi.pm
cp Units/Convert/Combo.pm blib/lib/Math/Calc/Units/Convert/Combo.pm
cp Units/Grammar.y blib/lib/Math/Calc/Units/Grammar.y
cp Units/Convert/Metric.pm blib/lib/Math/Calc/Units/Convert/Metric.pm
cp Units/Grammar.pm blib/lib/Math/Calc/Units/Grammar.pm
cp Units/Convert/Date.pm blib/lib/Math/Calc/Units/Convert/Date.pm
cp Units/Convert.pm blib/lib/Math/Calc/Units/Convert.pm
cp Units/Convert/Base2Metric.pm blib/lib/Math/Calc/Units/Convert/Base2Metric.pm
cp Units/Rank.pm blib/lib/Math/Calc/Units/Rank.pm
cp Units/Convert/Base.pm blib/lib/Math/Calc/Units/Convert/Base.pm
cp Units/Convert/Distance.pm blib/lib/Math/Calc/Units/Convert/Distance.pm
cp Units/Compute.pm blib/lib/Math/Calc/Units/Compute.pm
cp Units.pm blib/lib/Math/Calc/Units.pm
cp Units/Convert/Time.pm blib/lib/Math/Calc/Units/Convert/Time.pm
cp script/ucalc blib/script/ucalc
/usr/bin/perl -MExtUtils::MY -e ‚MY->fixin(shift)‘ — blib/script/ucalc
Manifying blib/man3/Math::Calc::Units.3pm
SFINK/Math-Calc-Units-1.07.tar.gz
/usr/bin/make — OK
Running make test
PERL_DL_NONLAZY=1 /usr/bin/perl „-MExtUtils::Command::MM“ „-e“ „test_harness(0, ‚blib/lib‘, ‚blib/arch‘)“ t/*.t
t/main.t .. ok
t/pod.t … skipped: Test::Pod 1.00 required for testing POD
All tests successful.
Files=2, Tests=64, 0 wallclock secs ( 0.04 usr 0.00 sys + 0.13 cusr 0.01 csys = 0.18 CPU)
Result: PASS
SFINK/Math-Calc-Units-1.07.tar.gz
/usr/bin/make test — OK
Running make install
Installing /usr/local/share/perl/5.12.4/Math/Calc/Units.pm
Installing /usr/local/share/perl/5.12.4/Math/Calc/Units/Compute.pm
Installing /usr/local/share/perl/5.12.4/Math/Calc/Units/Rank.pm
Installing /usr/local/share/perl/5.12.4/Math/Calc/Units/Grammar.pm
Installing /usr/local/share/perl/5.12.4/Math/Calc/Units/Convert.pm
Installing /usr/local/share/perl/5.12.4/Math/Calc/Units/Grammar.y
Installing /usr/local/share/perl/5.12.4/Math/Calc/Units/Convert/Date.pm
Installing /usr/local/share/perl/5.12.4/Math/Calc/Units/Convert/Byte.pm
Installing /usr/local/share/perl/5.12.4/Math/Calc/Units/Convert/Base.pm
Installing /usr/local/share/perl/5.12.4/Math/Calc/Units/Convert/Distance.pm
Installing /usr/local/share/perl/5.12.4/Math/Calc/Units/Convert/Base2Metric.pm
Installing /usr/local/share/perl/5.12.4/Math/Calc/Units/Convert/Time.pm
Installing /usr/local/share/perl/5.12.4/Math/Calc/Units/Convert/Multi.pm
Installing /usr/local/share/perl/5.12.4/Math/Calc/Units/Convert/Combo.pm
Installing /usr/local/share/perl/5.12.4/Math/Calc/Units/Convert/Metric.pm
Installing /usr/local/man/man3/Math::Calc::Units.3pm
Appending installation info to /usr/local/lib/perl/5.12.4/perllocal.pod
SFINK/Math-Calc-Units-1.07.tar.gz
/usr/bin/make install — OK
Running install for module ‚Config::Tiny‘
Running make for A/AD/ADAMK/Config-Tiny-2.14.tar.gz
Checksum for /home/drmadmin/.cpan/sources/authors/id/A/AD/ADAMK/Config-Tiny-2.14.tar.gz ok
CPAN.pm: Going to build A/AD/ADAMK/Config-Tiny-2.14.tar.gz
Checking if your kit is complete…
Looks good
Writing Makefile for Config::Tiny
cp lib/Config/Tiny.pm blib/lib/Config/Tiny.pm
Manifying blib/man3/Config::Tiny.3pm
ADAMK/Config-Tiny-2.14.tar.gz
/usr/bin/make — OK
Running make test
PERL_DL_NONLAZY=1 /usr/bin/perl „-MExtUtils::Command::MM“ „-e“ „test_harness(0, ‚blib/lib‘, ‚blib/arch‘)“ t/*.t
t/01_compile.t .. ok
t/02_main.t ….. ok
All tests successful.
Files=2, Tests=34, 0 wallclock secs ( 0.02 usr 0.01 sys + 0.06 cusr 0.01 csys = 0.10 CPU)
Result: PASS
ADAMK/Config-Tiny-2.14.tar.gz
/usr/bin/make test — OK
Running make install
Installing /usr/local/share/perl/5.12.4/Config/Tiny.pm
Installing /usr/local/man/man3/Config::Tiny.3pm
Appending installation info to /usr/local/lib/perl/5.12.4/perllocal.pod
ADAMK/Config-Tiny-2.14.tar.gz
/usr/bin/make install — OK
Running make for T/TO/TONVOON/Nagios-Plugin-0.36.tar.gz
Has already been unwrapped into directory /home/drmadmin/.cpan/build/Nagios-Plugin-0.36-HwusWi
CPAN.pm: Going to build T/TO/TONVOON/Nagios-Plugin-0.36.tar.gz
cp lib/Nagios/Plugin/ExitResult.pm blib/lib/Nagios/Plugin/ExitResult.pm
cp lib/Nagios/Plugin/Functions.pm blib/lib/Nagios/Plugin/Functions.pm
cp lib/Nagios/Plugin/Threshold.pm blib/lib/Nagios/Plugin/Threshold.pm
cp lib/Nagios/Plugin/Range.pm blib/lib/Nagios/Plugin/Range.pm
cp lib/Nagios/Plugin/Getopt.pm blib/lib/Nagios/Plugin/Getopt.pm
cp lib/Nagios/Plugin/Performance.pm blib/lib/Nagios/Plugin/Performance.pm
cp lib/Nagios/Plugin/Config.pm blib/lib/Nagios/Plugin/Config.pm
cp lib/Nagios/Plugin.pm blib/lib/Nagios/Plugin.pm
Manifying blib/man3/Nagios::Plugin::ExitResult.3pm
Manifying blib/man3/Nagios::Plugin::Functions.3pm
Manifying blib/man3/Nagios::Plugin::Threshold.3pm
Manifying blib/man3/Nagios::Plugin::Range.3pm
Manifying blib/man3/Nagios::Plugin::Getopt.3pm
Manifying blib/man3/Nagios::Plugin::Performance.3pm
Manifying blib/man3/Nagios::Plugin::Config.3pm
Manifying blib/man3/Nagios::Plugin.3pm
TONVOON/Nagios-Plugin-0.36.tar.gz
/usr/bin/make — OK
Running make test
PERL_DL_NONLAZY=1 /usr/bin/perl „-MExtUtils::Command::MM“ „-e“ „test_harness(0, ‚blib/lib‘, ‚blib/arch‘)“ t/*.t
t/check_stuff.t ………………. ok
t/Nagios-Plugin-01.t ………….. ok
t/Nagios-Plugin-02.t ………….. ok
t/Nagios-Plugin-03.t ………….. ok
t/Nagios-Plugin-04.t ………….. ok
t/Nagios-Plugin-Functions-01.t …. 1/113 defined(%hash) is deprecated at t/Nagios-Plugin-Functions-01.t line 22.
(Maybe you should just omit the defined()?)
t/Nagios-Plugin-Functions-01.t …. ok
t/Nagios-Plugin-Functions-02.t …. ok
t/Nagios-Plugin-Functions-03.t …. ok
t/Nagios-Plugin-Getopt-01.t ……. ok
t/Nagios-Plugin-Getopt-02.t ……. ok
t/Nagios-Plugin-Getopt-03.t ……. ok
t/Nagios-Plugin-Getopt-04.t ……. ok
t/Nagios-Plugin-Performance-02.t .. ok
t/Nagios-Plugin-Performance.t ….. ok
t/Nagios-Plugin-Range.t ……….. ok
t/Nagios-Plugin-Threshold.t ……. ok
All tests successful.
Files=16, Tests=975, 4 wallclock secs ( 0.20 usr 0.02 sys + 3.84 cusr 0.20 csys = 4.26 CPU)
Result: PASS
TONVOON/Nagios-Plugin-0.36.tar.gz
/usr/bin/make test — OK
Running make install
Installing /usr/local/share/perl/5.12.4/Nagios/Plugin.pm
Installing /usr/local/share/perl/5.12.4/Nagios/Plugin/Performance.pm
Installing /usr/local/share/perl/5.12.4/Nagios/Plugin/Functions.pm
Installing /usr/local/share/perl/5.12.4/Nagios/Plugin/Range.pm
Installing /usr/local/share/perl/5.12.4/Nagios/Plugin/Threshold.pm
Installing /usr/local/share/perl/5.12.4/Nagios/Plugin/ExitResult.pm
Installing /usr/local/share/perl/5.12.4/Nagios/Plugin/Config.pm
Installing /usr/local/share/perl/5.12.4/Nagios/Plugin/Getopt.pm
Installing /usr/local/man/man3/Nagios::Plugin.3pm
Installing /usr/local/man/man3/Nagios::Plugin::Performance.3pm
Installing /usr/local/man/man3/Nagios::Plugin::Getopt.3pm
Installing /usr/local/man/man3/Nagios::Plugin::Threshold.3pm
Installing /usr/local/man/man3/Nagios::Plugin::Range.3pm
Installing /usr/local/man/man3/Nagios::Plugin::Functions.3pm
Installing /usr/local/man/man3/Nagios::Plugin::ExitResult.3pm
Installing /usr/local/man/man3/Nagios::Plugin::Config.3pm
Appending installation info to /usr/local/lib/perl/5.12.4/perllocal.pod
TONVOON/Nagios-Plugin-0.36.tar.gz
/usr/bin/make install — OK
[/EXPAND]
cpan[3]> quit
Fertig.
Alternativ kann man auch beim Kompilieren von Nagios die Perl-Erweiterung installieren:
./configure --enable-perl-modules
Anschließend noch Make, Make Install machen.
Noch nice to know, wie man sich die bisher installierten Perl Module auflisten lassen kann:
instmodsh
Bringt die Ausgabe:
Available commands are:
l            - List all installed modules
m    - Select a module
q            - Quit the program
cmd?
At cmd? prompt type l to list all installed modules:
Mit der Eingabe von l , bekommt man nun die Ausgabe der Module:
cmd? l
Sample outputs:
Installed modules are:
Archive::Tar
CPAN
Class::Spiffy
Compress::Zlib
Cwd
Digest::SHA
Sony Xperia Z – Neustart Button hinzufügen
Ab und zu gehört ein Neustart des Handy’s einfach dazu. Irgendwas hängt immer mal… Doch im Stock-Rom (Original/Standard) des Sony Xperia Z ist kein Neustart vorgesehen. Lediglich Herunterfahren gibt es….
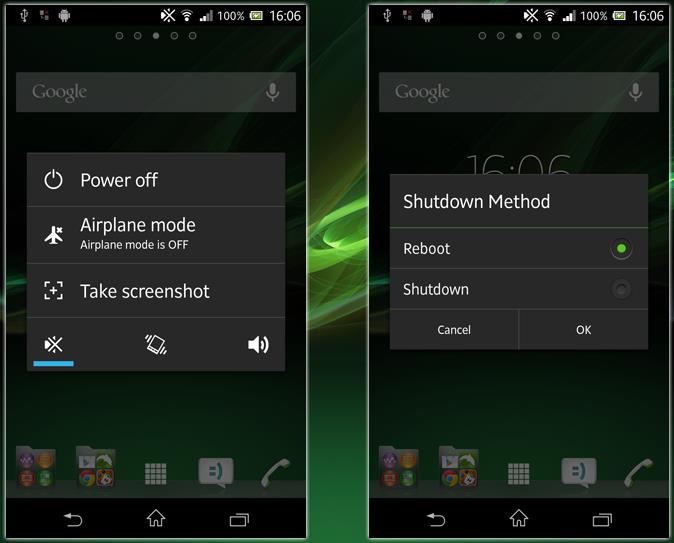
Wer auch einen Neustart-Button haben will, kann einfach folgende Modifikation flashen (Für das Sony Xperia Z mit dem Softwarestand .253):
Download:
.253 ODEX (Stock rom)
.253 DEODEX
Flashen geht ganz normal über das CWM Recovery oder TWRP, welches ihr auch bei gesperrtem Bootloader installieren könnt. Die beiden Recovery’s bekommt ihr hier. Root vorausgesetzt.
Anschließend hat man, wenn man auf Herunterfahren/Power Off klickt noch die Wahl zwischen Herunterfahren und Neustarten 🙂
Für die ältere .434 Version habe ich bisher noch kein Mod / Download gefunden. Vielleicht tut sich ja hier im original Thread noch was.
Viel Spaß beim Sony Xperia Z Neustart 😉
Sony Xperia Z – Update 10.1.1.A.1.253 flashen und root Rechte behalten *Update*
Seit ein paar Tagen wird in Deutschland das Update 10.1.1.A.1.253 für das Sony Xperia Z ausgerollt. Doch kann man es installieren wenn man sein Handy gerootet hat (bei gesperrtem Bootloader) und die root Rechte dabei nicht verlieren möchte ?
Antwort: Jain. Installiert man das Update via OTA dann verliert man seine root Rechte und Programme wie die LBE Firewall etc. funktionieren nicht mehr.Sorry für die Fehlinformation meinerseits.
Das Exploit ([ROOT] [Exploit by: goroh_kun & huhka_com]) was bei gesperrtem Bootloader zu root Rechten verholfen hat funktioniert unter der neuen Version nicht.
ABER:
Hat man aber bereits mit diesem Exploit Root Rechte erlangt und führt das OTA Update von .434 auf .253 durch behält man die root Rechte. (soeben getestet)
Doch erst einmal zu den Neuerungen und Verbesserungen die das Update mit sich bringt:
Following are the changes which I can see:
1. Default Launcher is smooth now, bettter than before
2. White Balance Display
3. Navigation Bars are now Dark Black
4. Pulse Light Notification – LED Notification Issue Resolved
5. NFC Firmware update
6. Widgets – World Clock
7. Album – Photo Tagging Option added
8. Movies – Portrait mode available
9. Small Apps – Icon Changed, Browser from Xperia
10. Camera – Enhanced image quality, Camera opens fast from lock screen now
11. Keyboard changed slightly
Issues/Problems:
1. Camera still taking too much time to launch
(xda)
Auf Deutsch – Die untere graue Navigationsleiste wurde jetzt komplett schwarz gemacht – sind dadurch besser erkennbar, bei weißer Schrift / Pfeilen.
Allgemein sind die Farben jetzt viel knalliger und kommen durch den dunkleren Hintergrund auch viel besser zur Geltung.
Bei manchen Besitzern des Xperia Z hat die Status LED, welche normalerweise Benachrichtigungen wie z.B. verpasste Anrufe, Nachrichten etc. anzeigt nicht angezeigt. Dies ist nun auch behoben und funktioniert.
Die Kameraqualität wurde verbessert, was auch die Burst Funktion betrifft. Leider ist die Startzeit der Kamera mit ca. 2 Sekunden immer noch relativ hoch.
Da ich aufgrund einiger Beiträge im XDA-Dev Forum davon ausgegangen bin, dass beim OTA Update die root Rechte verloren gehen, hatte ich folgenden Workaround angewendet um auf Nummer sicher zu gehen:
Dieser ist aber nicht Notwendig, sofern ihr schon root Rechte habt. Dennoch gut zu wissen, wie man im Notfall sein Handy neu flashen kann:
Voraussetzungen:
– Handy hat die Softwareversion 10.1.A1.434 installiert. (Einstellungen -> Über das Telefon -> Build-Nummer)
Hat man aus versehen schon das neue Update installiert muss man zuerst wieder die alte Version aufspielen, da bisher für diese Version keine Exploits zum Rooten verfügbar sind. Dafür zu allererst Schritt 5 mit C6603_10.1.A.1.434_unbranded.ftf ausführen. (ungetestet)
– Handy ist gerootet. Anleitung gibt’s hier.
Benötigte Software / Dateien:
– Flashtool 0.9.10.2beta6 : Download
– Dual Recovery: Windows Download
(Thread dazu, falls Neuerungen vorhanden sind: hier)
– Modifiziertes Flashbares Image: 10.1.1.A.1.253 Version 5 Download
(Thread dazu, falls Neuerungen vorhanden sind: hier)
– Original FTF Image 10.1.1.A.1.253 : Download
Anleitung:
Schritt 1: Sicherung erstellen 😉
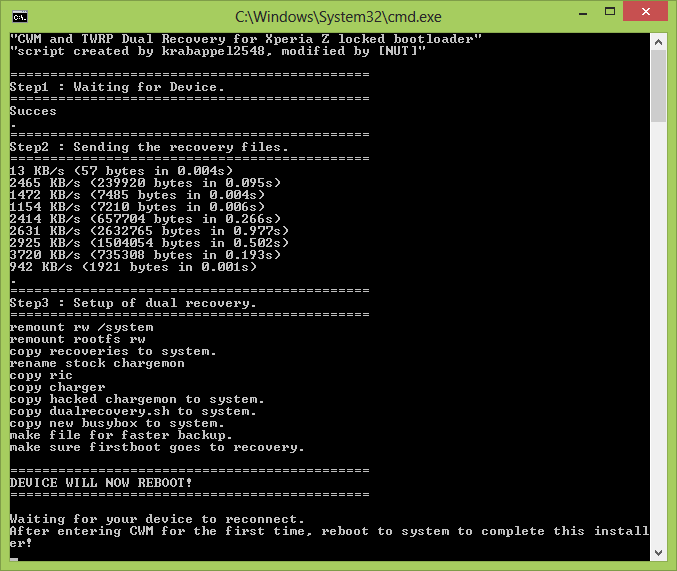
Schritt 2: Dual Recovery installieren – Anleitung gibts hier.
Schritt 3: Heruntergeladenes .zip (Version 5) auf die SD Karte kopieren und in das Recovery starten.
Dazu Handy herunterfahren. Einschalten und sobald das Sony Logo erscheint mit grüner Status LED die Leiser Taste (Volume Down) ein paar mal drücken, bis die Status LED Violett wird und das Recovery startet.
Schritt 4: Das .zip installieren. – Install – Pfad auswählen – und los. Am Ende kann man noch „Wipe Cache / Dalvik“ machen sowie „Fix Root Permission“ – Reboot.
Anschließend wird nach dem Neustart noch die NFC Firmware aktualisiert.
Schritt 5: Flashtool starten und in Flashmode wechseln. (Das original .FTF Image auswählen)
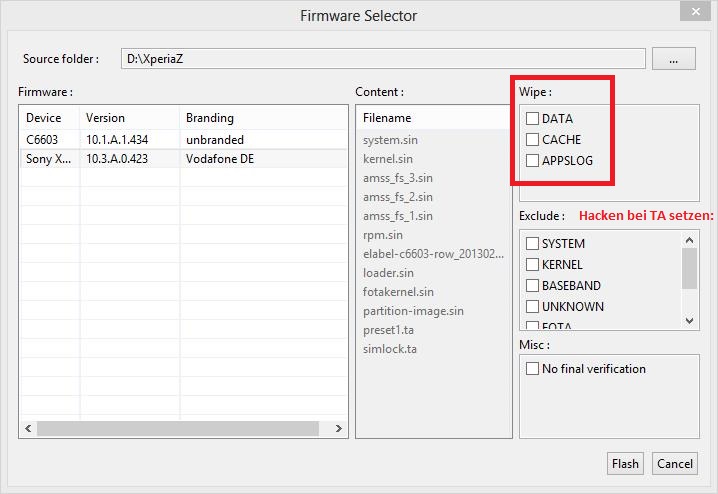
So nun auf der rechten Seite bei Wipe Data alle Haken herausnehmen! Unten alles bis auf KERNEL, BASEBAND und FOTA anhacken. Flash klicken.

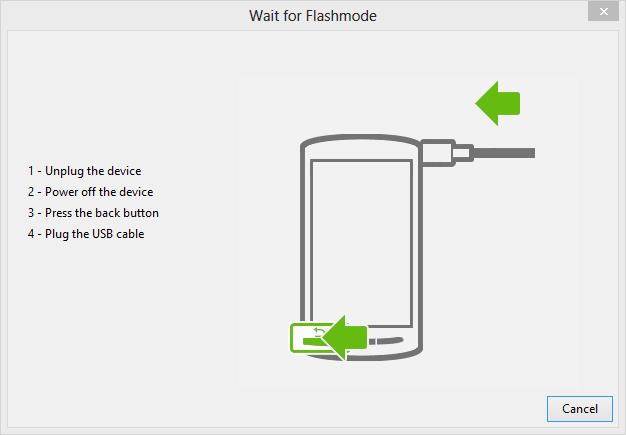
Schritt 6: Das Flashtool will nun, dass ihr das Handy vom USB trennt, ausschaltet und in den Flashmode bringt. Wenn das Handy aus ist, die leiser Taste (Volume Down) gedrückt halten und dann einfach das USB Kabel anschließen.
Nach dem Flashvorgang wieder USB Kabel trennen und Gerät starten.
Fertig
ACHTUNG: Die Anleitung ist von mir selbst mehrmals erfolgreich getestet – Ihr solltet euch aber bewusst sein, dass beim Flashen, Rooten und allem anderen auch mal etwas schiefgehen kann wodurch euer Smartphone auch beschädigt werden kann – Die Anwendung erfolgt auf eigene Gefahr.