BSI-TR-03116-4 Beispiel Konfiguration für Webserver (Apache2 + NGINX)

Für die Konfiguration von Webservern und Dienste hat das BSI eine entsprechende technische Richtline (BSI TR-03116-4 Kryptographische Vorgaben für Projekte der Bundesregierung Teil 4 Stand 2023) veröffentlicht, die im wesentlichen für einige Behörden Anwendung findet.

Diese regelt welche kryptografischen Verfahren wie z.B. TLS 1.2 / TLS 1.3 und die dazugehörigen Signatur und Ciphers für die Übertragung verwendet werden dürfen.
Wer jetzt denkt: Ich habe doch schon eine A+ Bewertung bei ssllabs.com sollte hier nochmal genauer hinsehen. Die BSI-TR-03116-4 ist leider deutlich strikter. Hier gibt es unter anderem noch die Vorgabe, dass alle Zertifikate (also die komplette Zertifikatskette) mit einem privaten Schlüssel mit mind. 3072bit generiert worden sein. Das ist mit manchen CA-Anbietern wie z.B. Letsencrypt aktuell nicht möglich, da die Root-Zertifikate teilweise noch mit 2048bit erstellt worden sind. Wenn ihr hier kostenfreie funktionierende Alternativen gefunden habt, lasst es mich wissen.

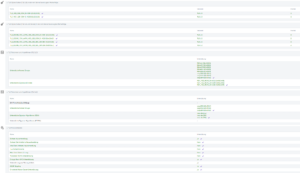
Über die Webseite tls-check.de von Achelos könnt ihr eure Konfiguration schnell und online prüfen. Für rein lokal gehostete Instanzen gibt es Projekte auf Github wie z.B. den tlsassistant.

Für die wesentlichen Webserver wie Apache2 und NGINX liefere ich euch hier jeweils eine Beispielkonfiguration die für TR-03116-4 konform ist. Wenn ihr z.B. noch Apache Tomcat haben solltet, lasst uns gerne austauschen.

Voraussetzungen

  • Ihr braucht eine aktuelle apache2 / nginx Version
    • Manche Features sind nur in neueren Versionen enthalten. Bei Nginx lohnt es sich z.B. von der Ubuntu Version auf die eigene ppa von Nginx zu wechseln.
  • Ihr braucht eine aktuelle openssl Version
    • Speziell die SSLOpenSSLConfCmd Befehle basieren auf der Openssl Version. Ihr braucht hier mind. openssl 1.1.1f oder openssl 3.x+
    • Lässt sich mit „openssl version“ prüfen.

Apache2

<VirtualHost *:80>
    ServerName example.com
    ServerAdmin admin@example.com

    # Redirect all HTTP traffic to HTTPS
    Redirect / https://example.com

    ErrorLog /var/www/html/example.com/logs/error.log
    CustomLog /var/www/html/example.com/logs/access.log combined
</VirtualHost>

# SSL Stapling
# Specify the OCSP cache response location and size
SSLStaplingCache "shmcb:logs/stapling-cache(150000)"

<VirtualHost *:443>
    ServerName example.com
    ServerAdmin admin@example.com
    DocumentRoot /var/www/html/example.com/web

    SSLEngine on

    SSLCertificateFile /etc/apache2/ssl/example_com_2025.cer
    SSLCertificateKeyFile /etc/apache2/ssl/example_com_2025.key

    # =========================================================================
    # TLS Protocols
    # Only allow TLS 1.2 and TLS 1.3 (disabling older protocols).
	# BSI-TR-03116-4 recommends using at least TLS 1.2 with secure cipher suites.																				 
    # =========================================================================
    SSLProtocol -all +TLSv1.2 +TLSv1.3

    # =========================================================================
    # Cipher Suites
    # Enforce server-preferred order and specify strong cipher suites.
    # Adjust as new ciphers are recommended or deprecated.
    # =========================================================================
    SSLHonorCipherOrder On

    # For TLS 1.3:
    SSLCipherSuite TLSv1.3 TLS_AES_256_GCM_SHA384:TLS_AES_128_GCM_SHA256

    # For TLS 1.2:
    SSLCipherSuite ECDHE-ECDSA-AES256-GCM-SHA384:\
                   ECDHE-ECDSA-AES128-GCM-SHA256:\
                   ECDHE-RSA-AES256-GCM-SHA384:\
                   ECDHE-RSA-AES128-GCM-SHA256:\
                   ECDHE-RSA-AES256-SHA384:\
                   ECDHE-RSA-AES128-SHA256
    # SSLLABS Reported WEAK Ciphers:  ECDHE-RSA-AES256-SHA384:ECDHE-RSA-AES128-SHA256
    # Disable compression to prevent CRIME attacks
    SSLCompression Off

    # Enable or disable session tickets depending on your security stance
    SSLSessionTickets On

    # Named curves for ECDH key exchange (TLS 1.2 & 1.3)
    SSLOpenSSLConfCmd Curves X25519:secp521r1:secp384r1:prime256v1

    # Signature algorithms for TLS 1.2
    SSLOpenSSLConfCmd SignatureAlgorithms \
      "ECDSA+SHA512:ECDSA+SHA384:ECDSA+SHA256:\
       RSA+SHA512:RSA+SHA384:RSA+SHA256:\
       rsa_pss_rsae_sha512:rsa_pss_rsae_sha384:rsa_pss_rsae_sha256"

    # OCSP Stapling: provides the client with certificate status information
    SSLUseStapling on

    # HTTP Strict Transport Security (HSTS)
    Header always set Strict-Transport-Security "max-age=15768000"

    # Security headers
    Header always set X-Content-Type-Options "nosniff"
    Header set Content-Security-Policy \
      "default-src 'self' data: 'unsafe-inline' 'unsafe-hashes' 'unsafe-eval' *.example.com; \
       frame-ancestors 'self' *.example.com; \
       base-uri 'self' *.example.com; \
       script-src 'self' data: 'unsafe-inline'"
    Header set Referrer-Policy "no-referrer"
    Header set X-XSS-Protection "1; mode=block"

    ErrorLog /var/www/html/example.com/logs/error.log
    CustomLog /var/www/html/example.com/logs/access.log combined
</VirtualHost>

NGINX

server {
    # Listen on port 443 for SSL/TLS connections (IPv4 and IPv6).
    listen 443 ssl;
    listen [::]:443 ssl;

    # Enable HTTP/2 support.
    http2 on;

    # Hostname this server block responds to.
    server_name example.com;

    # SSL certificate and key paths (adjust as needed).
    # The lines below are active ones:
    ssl_certificate     /etc/nginx/ssl/cert.crt;
    ssl_certificate_key /etc/nginx/ssl/cert.key;

    # Uncomment and specify if using custom Diffie-Hellman parameters.
    # ssl_dhparam /etc/ssl/certs/dhparam.pem;

    # SSL session settings: improves performance by allowing session reuse.
    ssl_session_timeout 5m;
    ssl_session_cache   shared:SSL:50m;
    ssl_session_tickets on;

    # Enabled TLS protocols (recommend keeping TLSv1.2 and TLSv1.3).
    ssl_protocols TLSv1.3 TLSv1.2;

    # Prefer server ciphers over client-proposed ciphers.
    ssl_prefer_server_ciphers on;

    # Strong ciphers for TLS 1.2 and also includes TLS 1.3 ciphers.
    # Note that TLS 1.3 ciphers (TLS_AES_*) are negotiated separately in most modern OpenSSL.
       ssl_ciphers "ECDHE-ECDSA-AES256-GCM-SHA384:ECDHE-ECDSA-AES128-GCM-SHA256:ECDHE-RSA-AES256-GCM-SHA384:ECDHE-RSA-AES128-GCM-SHA256:TLS_AES_256_GCM_SHA384:TLS_AES_128_GCM_SHA256:ECDHE-RSA-AES256-SHA384:ECDHE-RSA-AES128-SHA256";
    # SSL LABS Reported WEAK: ECDHE-RSA-AES256-SHA384 & WEAK:ECDHE-RSA-AES128-SHA256

    # Explicitly define TLS 1.3 cipher suites (for OpenSSL 1.1.1+).
    ssl_conf_command Ciphersuites TLS_AES_256_GCM_SHA384:TLS_AES_128_GCM_SHA256;

    # Specify curves for ECDH (used in TLS 1.2).
    ssl_ecdh_curve X448:secp521r1:secp384r1:secp256r1;

    # Set Named Groups for TLS 1.3 key exchange.
    ssl_conf_command Curves ffdhe2048:ffdhe3072:ffdhe4096:ffdhe6144:ffdhe8192:secp256r1:secp384r1:secp521r1;

    # Configure signature algorithms for TLS 1.2 and 1.3.
    ssl_conf_command SignatureAlgorithms "ECDSA+SHA512:ECDSA+SHA384:ECDSA+SHA256:RSA+SHA512:RSA+SHA384:RSA+SHA256:rsa_pss_rsae_sha512:rsa_pss_rsae_sha384:rsa_pss_rsae_sha256";

    # Enable and verify OCSP stapling for better SSL performance and security.
    ssl_stapling on;
    ssl_stapling_verify on;

    # Security headers
    add_header Strict-Transport-Security "max-age=15768000; includeSubDomains; preload;" always;
    add_header Permissions-Policy "interest-cohort=()";
    add_header Referrer-Policy "no-referrer" always;
    add_header X-Content-Type-Options "nosniff" always;
    add_header X-Download-Options "noopen" always;
    add_header X-Frame-Options "SAMEORIGIN" always;
    add_header X-Permitted-Cross-Domain-Policies "none" always;
    add_header X-Robots-Tag "noindex, nofollow" always;
    add_header X-XSS-Protection "1; mode=block" always;

Exchange RetentionPolicy / Outlook Synchronisation Fehler 0x800406C

Eines Tages streikte eines meiner Outlooks mit folgender Fehlermeldung:

Allerdings war mein Postfach keineswegs voll. Das Kuriose: Auf einem anderem Client ging die Synchronisation einwandfrei. Als erstes also das Outlook Profil zurückgesetzt. Das hat allerdings nur kurz geholfen.

Also Prüfen ob für meine Mailbox RetentionHoldEnabled oder LitigationHoldEnabled ist – also die eDiscovery Funktionen.
Get-Mailbox -Identity Constantin.Lotz@domain.de | Select-Object hold

LitigationHoldEnabled : False
RetentionHoldEnabled : False
EndDateForRetentionHold :
StartDateForRetentionHold :
LitigationHoldDate :
LitigationHoldOwner :
ComplianceTagHoldApplied : False
DelayHoldApplied : False
LitigationHoldDuration : Unlimited
SCLDeleteThreshold :
SCLRejectThreshold :
SCLQuarantineThreshold :
SCLJunkThreshold :
InPlaceHolds : {mbx84979c154b2f42519722a12485e9d88d:3}

Obwohl bei uns Onpremise keine derartigen Regel konfiguriert sind, scheint es ein InplaceHold zu geben. Wenn man das ms-Exch-User-Hold-Policies AD-Attribut bei dem Account weglöscht, funktioniert der Sync sofort wieder. Also müssen wir hier schauen.

Eigentlich kann es dann nur noch ein defekter Verwais aus ExchangeOnline sein. Prüfen wir hiermit:
Import-Module ExchangeOnlineManagement
Connect-IPPSSession

Siehe da, es gibt noch eine EXO Policy die warum auch immer greift.
Via Remove-RetentionCompliancePolicy dann einfach löschen und nach einer kurzen Zeit, synchronisiert sich auch die Veränderung ins lokale AD/Exchange.

VMware WorkspaceOne Boxer – Mails als Privat markieren (wie in Outlook)

Über die Boxer App lassen sich bequem Nachrichten bequem per S/MIME verschlüsseln oder aber auch entsprechend Klassifizieren.
Was mir im Standard gefehlt hat, war dass man Nachrichten nicht wie in Outlook einfach als „Privat“ markieren kann. Da gibt es erstmal nur die Klassifikation der Wichtigkeit „Hoch“.  In den Assignment Einstellungen im WS1 Portal lässt sich aber auch das Klassifizieren von Nachrichten konfigurieren.

Ich beschreibe hier in kürze, wie ihr die Privat Markierung (für Outlook) nachbauen könnt.

Wie funktioniert in Outlook das „Privat“ markieren?

Um zu verstehen wie Outlook die Privat markierung überhaupt feststellt schauen wir uns den E-Mail Header an:


Date: Thu, 4 Aug 2022 16:48:03 +0200
From: Constantin Lotz &lt;<a href="mailto:Constantin.Lotz@xxxxx">Constantin.Lotz@xxxxx</a>&gt;
To: Constantin Lotz &lt;<a href="mailto:Constantin.Lotz@xxxx">Constantin.Lotz@xxxx</a>&gt;
Message-ID: &lt;4DB995C8-1CD9-4B85-BCB5-2C11388F602F@xxxxx&gt;
Subject: Privat iPhone (Privat)
X-Mailer: VMwareBoxer 22.07.0 DEV BUILD 9139
Sensitivity: private
X-Boxer-MessageId: 4DB995C8-1CD9-4B85-BCB5-2C11388F602F@xxxx
MIME-Version: 1.0
Content-Type: multipart/alternative; boundary="62ebdc23_327b23c6_1e3"

Hier seht ihr, dass der Header einen Wert „Sensitivity: private“ enthält. Dies ist das entscheidende Header Element.

In Outlook sieht dass dann so aus:


Wie bekommen wir dies nun in WorkspaceOne Boxer konfiguriert?

Beim Zuweisen der Boxer App (für iOS und Android identisch – muss aber separat eingerichtet werden) könnt ihr in den Email Settings die „Email Classification“ auswählen.

Hier besteht die Möglichkeit die Azure Information Protection Labels zu verwenden, was aber nur bei Nutzung von O365 Sinn macht (korrigiert mich, wenn ich da falsch liege).

Wir aktivieren die Email Classification und setzen bei Markings folgenden JSON String ein:


[
{
"Rank": 1,
"DisplayName": "Privat",
"Description": "Diese E-Mail als Privat markieren.",
"Subject": "(Privat)",
"TopBody": "Klassifikation: Privat",
"BottomBody": "Klassifikation: Privat",
"XHeader": "private"
},
{
"Rank": 2,
"DisplayName": "Vertraulich",
"Description": "Diese E-Mail bitte vertraulich behandeln.",
"Subject": "(Vertraulich)",
"TopBody": "Klassifikation: Vertraulich",
"BottomBody": "Klassifikation: Vertraulich",
"XHeader": "Confidential"
}
]

Hier könnt ihr nach belieben eigene Klassifikationen hinzufügen. Wichtig für die Outlook „Privat“ Markierung ist allerdings der Header. Dieser muss auf private stehen. („XHeader“: „private“)
Über „Define x-header“ geben wir an, wie der Header Wert aussehen soll. Dies muss „Sensitivity“ sein, wie ihr gleich sehen werdet.

Anschließend die Konfiguration speichern. Auf dem Mobilgerät müsst ihr die Boxer App einmal de-, und wieder installieren. Das ist der sauberste Weg, bis die Einstellung greift.

Mail in Boxer App nun als Privat kennzeichnen

In der Boxer App habt ihr beim Schreiben einer neuen Nachricht anschließend ein kleines Schild in der unteren Leiste über die ihr die Klassifikation vornehmen könnt.

Leider sieht man bei eingehenden Nachrichten nach wie vor nicht, ob die Mail als Privat markiert ist oder nicht. Allerdings: Wenn Sie Privat markiert ist, sieht man es zwar nicht – beim Antworten bleibt die E-Mail aber Privat. Also die Klassifikation wird dann nicht entfernt.

VMware UAG – SEG Configuration Issues (ERR05_INVALID_SEG_HOST_NAME)

Hi there,

i’ve noticed a bug in the UEG 2106.1 when you have specified a wrong SEG Hostname in the first place.

After catching some logs you will see the following error in the installer-script.log of the Archive:


2021-08-23 16:33:03 uag.domain.de Installer jar exited with status 0 for action LOAD_CONFIG_FROM_API
2021-08-23 16:33:03 uag.domain.de Validating SEG SSL configuration.
2021-08-23 16:33:04 uag.domain.de SSL keystore is supplied from API.
2021-08-23 16:33:04 uag.domain.de SEG SSL configuration verified successfully. SEG in UAG is configured with SSL enabled.
2021-08-23 16:33:04 uag.domain.de Kerberos authentication is enabled for this MEM configuration.
2021-08-23 16:33:04 uag.domain.de The file '/opt/vmware/seg/config/seg-jvm-args.conf' exists, Value for property '-Dextract.executable.from.jar' is ''.
2021-08-23 16:33:04 uag.domain.de Validating SEG server hostname from API response against SNI configured hostname
2021-08-23 16:33:04 uag.domain.de The file '/opt/vmware/seg/config/restart-validation.properties' exists, Value for property 'airwatch.server.hostname' is 'cn1108.awmdm.com'.
2021-08-23 16:33:04 uag.domain.de The file '/opt/vmware/seg/config/restart-validation.properties' exists, Value for property 'enable.status.overwrite' is 'false'.
2021-08-23 16:33:04 uag.domain.de Overwriting status file is disabled. Error code: ERR05_INVALID_SEG_HOST_NAME, Error message: The SNI hostname 'cn1108.awmdm.com' does not match with that received from API 'mdm03.domain.de'
2021-08-23 16:33:04 uag.domain.de Running clean up..
2021-08-23 16:33:04 uag.domain.de Exiting the container with FAILED status

So I’ve messed up writing the wrong SEG Host Name, but the wizard is keeping the config file and does not overwrite the hostname with any further names.

How to fix ?

That’s an easy one: Just rename the mentioned restart-validation.properties file and resave the Secure Email Gateway Settings. The docker build process will then recreate the container with the correct settings as entered.


mv /opt/vmware/docker/seg/container/config/restart-validation.properties /opt/vmware/docker/seg/container/config/restart-validation.properties.old